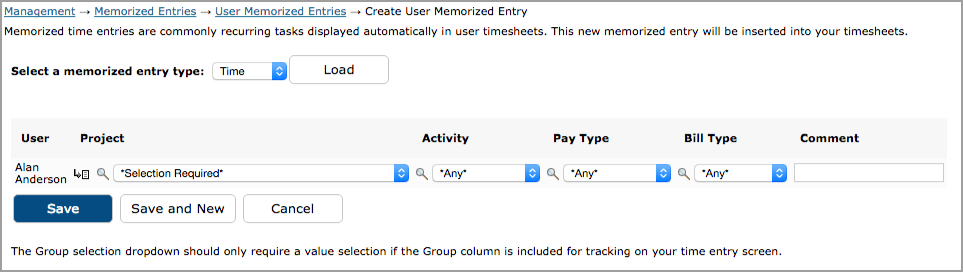
Figure 23.2. User Memorized Time Entries
Memorized Entries |
Help Contents |
Memorized Entries is located under Management-->Memorized Entries.
Memorized Entries allow you to save users' most common tasks, expenses, or custom entries
so that they do not have to repeatedly select them in their timesheets, expense
sheets, and custom entry sheets. A Memorized Time Entry contains a single Project,
Activity, Pay Type, Bill Type, and Comment. After a time entry has been memorized
and assigned to users or Groups, it will appear in all of those users' timesheets
thereafter. Those users then only need to specify the hours, if any, for that
task. Similarly, a Memorized Expense Entry contains a single Project, Expense
Code, Currency, Source, and Comment. After an expense entry has been memorized
and assigned to users or Groups, it will appear in those users' expense sheets
thereafter. Users then only need to add hours, if any, for that task. Similarly,
a Memorized Expense Entry contains a single Project, Expense Code, Currency,
Source, and Comment. After an expense entry has been memorized and assigned
to users or Groups, it will appear in those users' expense sheets thereafter.
Users then only need to add an expense amount. Similarly, a Memorized Custom
Entry contains a single Project, Reason, Measurement, Vehicle, and Comment.
After a custom entry has been memorized and assigned to users or Groups, it
will appear in those users' custom entry sheets thereafter. Users then only need
to add the actual distance traveled.

To create a User Memorized Entry, you must first select the user for whom you
would like to create the Memorized Entry. Specify the search criteria for users
in the main User Memorized Entries screen and click the Search button. The search
results will be displayed below the criteria. Select the user by clicking on
the username. This will direct you to the Memorized Entry management screen
(see figure 23.2).
Figure 23.2. User Memorized Time Entries
To create a Memorized Time Entry, select the 'Time' type from the dropdown selection at the top of the screen and click the Load button. This will load all existing Memorized Time Entries that have been assigned to the selected user (see figure 23.2). Click the Create New Memorized Entry button. This will load a blank Memorized Time Entry where you can select the Group, Project, Activity, Pay Type, Bill Type, and Comment. You can also memorize part of an entry by using the wildcards feature. Selecting the 'any' value from the appropriate dropdown will not memorize that field. The same is true when leaving the Comment field blank. When finished, click the Save button. The Memorized Time Entry will then be assigned to the selected user.
To create a Memorized Expense Entry, select the 'Expense' type from the dropdown
selection at the top of the screen and click the Load button. This will load
all existing Memorized Expense Entries that have been assigned to the selected
users (see figure 23.3). Click the Create New Memorized Entry button. This will
load a blank Memorized Expense Entry where you can select the Project, Expense
Code, Source, Currency, and Comment. You can also memorize part of an entry
by using the wildcards feature. Selecting the 'any' value from the appropriate
dropdown will not memorize that field. The same is true when leaving the Comment
field blank. When finished, click the Save button. The Memorized Expense Entry
will then be assigned to the selected users.
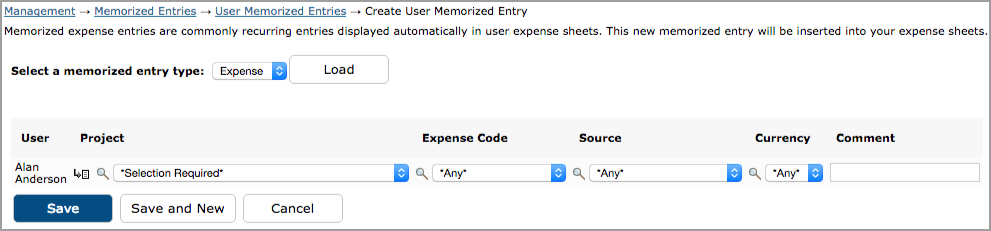
Figure 23.3. User Memorized Expense Entries
To create a Memorized Custom Entry, select the 'Custom' type from the dropdown
selection at the top of the screen and click the Load button. This will load
all existing Memorized Custom Entries that have been assigned to the selected
users (see figure 23.4). Click the Create New Memorized Entry button. This will
load a blank Memorized Custom Entry where you can select the Project, Location,
Item, Unit, and Comment. You can also memorize part of an entry by
using the wildcards feature. Selecting the 'any' value from the appropriate
dropdown will not memorize that field. The same is true when leaving the Comment
field blank. When finished, click the Save button. The Memorized Custom Entry
will then be assigned to the selected users.
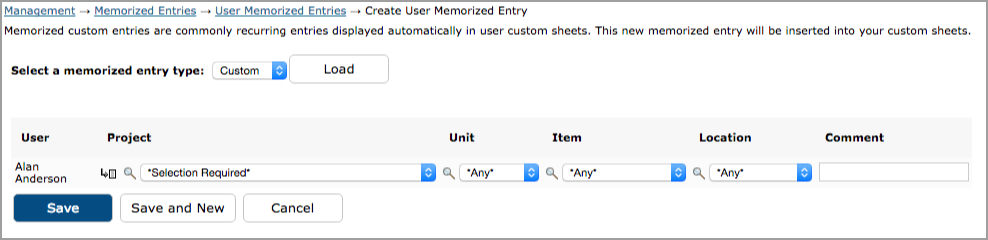
Figure 23.4. User Memorized Custom Entries
To manage existing Memorized Entries for users, you must first select the user you would like to manage. Specify the search criteria for users in the main User Memorized Entries screen and click the Search button (see figure 23.1). The search results will be displayed below the criteria. Select the users to manage by clicking on the username. This will direct you to the Memorized Entry management screen. To manage Memorized Time Entries, select the 'Time' type from the dropdown selection at the top of the screen and click the Load button. This will load all existing Memorized Time Entries that have been assigned to the selected user (see figure 23.2). You can make modifications to the entries themselves from within the table. When finished, click the Save button. To delete a Memorized Time Entry, select the entries and click the Delete button.
Similarly, to manage Memorized Expense Entries, select the 'Expense' type from the dropdown selection at the top of the screen and click the Load button. This will load all existing Memorized Expense Entries that have been assigned to the selected user (see figure 23.3). You can make modifications to the entries themselves from within the table. When finished, click the Save button. To delete a Memorized Expense Entry, select the entries and click the Delete button.
Similarly, to manage Memorized Custom Entries, select the 'Custom' type from the dropdown selection at the top of the screen and click the Load button. This will load all existing Memorized Custom Entries that have been assigned to the selected user (see figure 23.4). You can make modifications to the entries themselves from within the table. When finished, click the Save button. To delete a Memorized Custom Entry, select the entries and click the Delete button.
Memorized Entries can be created and managed for users and Groups. This section
discusses Memorized Entries that will be assigned to Groups. Group Memorized
Entry management is located under Management-->Memorized Entries-->Group
Memorized Entries (see figure 23.5).
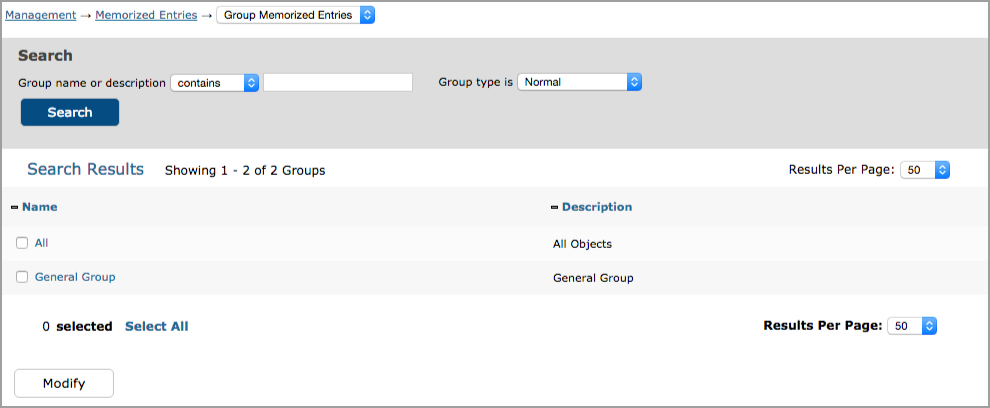
Figure 23.5. Group Memorized Entries main page
To create a Group Memorized Entry, you must first select the group for which
you would like to create the Memorized Entry. Specify the search criteria for
Groups in the main Group Memorized Entries screen and click the Search button.
The search results will be displayed below the criteria. Select the Group by
clicking on the Group name. This will direct you to the Memorized Entry management
screen (see figure 23.6).

Figure 23.6. Group Memorized Time Entries
To create a Memorized Time Entry, select the 'Time' type from the dropdown selection at the top of the screen and click the Load button. This will load all existing Memorized Time Entries that have been assigned to the selected Group (see figure 23.6). Click the Create New Memorized Entry button. This will load a blank Memorized Time Entry where you can select the Group, Project, Activity, Pay Type, Bill Type, and Comment. You can also memorize part of an entry by using the wildcards feature. Selecting the 'any' value from the appropriate dropdown will not memorize that field. The same is true when leaving the Comment field blank. When finished, click the Save button. The Memorized Time Entry will then be assigned to the selected Group.
To create a Memorized Expense Entry, select the 'Expense' type from the dropdown
selection at the top of the screen and click the Load button. This will load
all existing Memorized Expense Entries that have been assigned to the selected
Group (see figure 23.7). Click the Create New Memorized Entry button. This will
load a blank Memorized Expense Entry where you can select the Project, Expense
Code, Source, Currency, and Comment. You can also memorize part of an entry
by using the wildcards feature. Selecting the 'any' value from the appropriate
dropdown will not memorize that field. The same is true when leaving the Comment
field blank. When finished, click the Save button. The Memorized Expense Entry
will then be assigned to the selected Group.

Figure 23.7. Group Memorized Expense Entries
To create a Memorized Custom Entry, select the 'Custom' type from the dropdown
selection at the top of the screen and click the Load button. This will load
all existing Memorized Custom Entries that have been assigned to the selected
Group (see figure 23.8). Click the Create New Memorized Entry button. This will
load a blank Memorized Custom Entry where you can select the Project, Location,
Item, Unit, and Comment. You can also memorize part of an entry by
using the wildcards feature. Selecting the 'any' value from the appropriate
dropdown will not memorize that field. The same is true when leaving the Comment
field blank. When finished, click the Save button. The Memorized Custom Entry
will then be assigned to the selected Group.
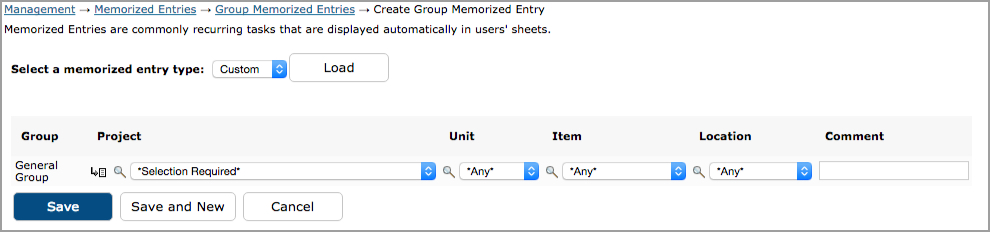
Figure 23.8. Group Memorized Custom Entries
To manage existing Memorized Entries for Groups, you must first select the Groups you would like to manage. Specify the search criteria for Groups in the main Group Memorized Entries screen and click the Search button. The search results will be displayed below the criteria. Select the Group you would like to edit by clicking on the Group name. This will direct you to the Memorized Entry management screen. To manage Memorized Time Entries, select the 'Time' type from the dropdown selection at the top of the screen and click the Load button. This will load all existing Memorized Time Entries that have been assigned to the selected Group (see figure 23.6). You can make modifications to the entries themselves from within the table. When finished, click the Save button. To delete a Memorized Time Entry, select the entries and click the Delete button.
Similarly, to manage Memorized Expense Entries, select the 'Expense' type from the dropdown selection at the top of the screen and click the Load button. This will load all existing Memorized Expense Entries that have been assigned to the selected Groups (see figure 23.7). You can make modifications to the entries themselves from within the table. When finished, click the Save button. To delete a Memorized Expense Entry, select the entries and click the Delete button.
Similarly, to manage Memorized Custom Entries, select the 'Custom' type from
the dropdown selection at the top of the screen and click the Load button. This
will load all existing Memorized Custom Entries that have been assigned to
the selected Groups (see figure 23.8). You can make modifications to the entries
themselves from within the table. When finished, click the Save button. To delete
a Memorized Custom Entry, select the entries and click the Delete button.