Managing Assignments
My Assignments
is located under the My Assignments menu (see figure 34.1).
My Assignments allows you to
view, manage and track time against your task assignments for scheduled projects. While My
Assignments can be used in tandem with a traditional Time Entry screen, it includes non-project
time and time off tracking that allows you to enter all of your time on one screen.
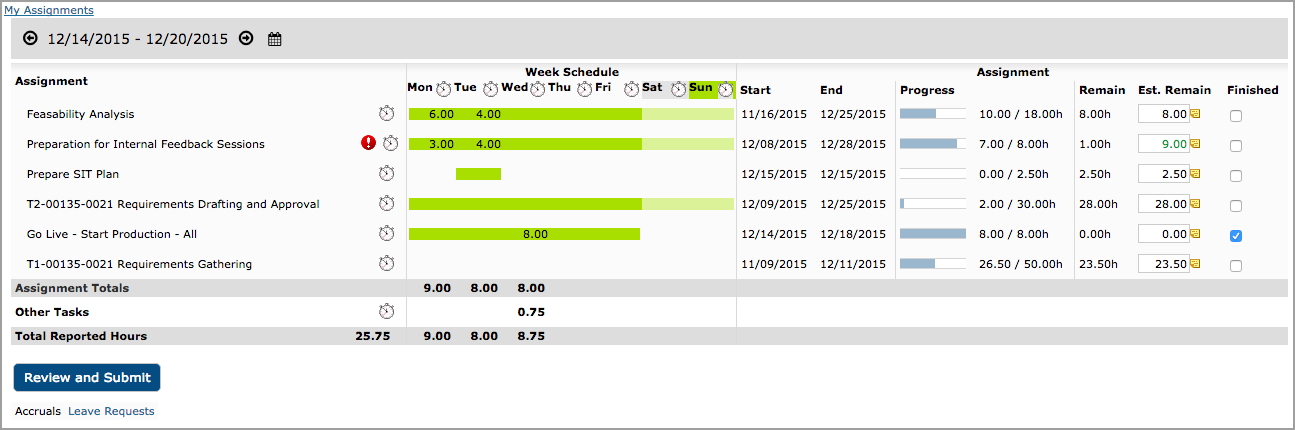
Figure 34.1. My Assignments
My Assignments shows a weekly view of your task assignments scheduled for a given week, as well
as unfinished assignments from the previous week(s). The number of old assignments that are
carried over depends on how your Administrator has your site configured. At the top of the
screen is the date range for the week shown with arrows for navigating to previous and future
weeks (provided your system administrator has given you access to the arrows). In the first
column on the left side of the assignment panel below the arrows and dates, the task names
associated with each assignment are displayed. The task names include more information about the
associated project plans when you mouse over them. To the right of the task name in the same
column, you will see icons with mouse over information for alerts/warnings associated with the
assignment if there are any. You will also see a clock icon for entering actual work against the
assignment if the period is open for time entry. Entering time will be discussed in more detail
below.
In addition to the task name, mouse over project information, clock icons and alert icons, the
assignment panel includes:
- Progress on Week Plan - This section acts as a guide for the weekly pace needed to
work an assignment evenly over time. While you may not choose to work an assignment evenly
over all of the days allotted, this guide provides a visual reference for when time is
running short.
- Week Schedule - This section shows your assignment schedules versus actual work
entered on a daily basis. Actual work is shown as a number of hours within the yellow
scheduled hours bar. Weekends/leave/holidays and the current day are highlighted in
different colors, and clock icons next to each day provide single day time entry panel for
all assignments. Entering time will be discussed in more detail below.
- Assignment Start/End Date - This section shows the start and end dates the project
manager has set for the assignment.
- Assignment Progress - This section shows the total progress based on all actual
versus scheduled work for the entire assignment.
- Assignment Remain - This section shows the total remaining work based on all actual
work versus the current scheduled work set by the project manager.
- Assignment Est. Remain - This field allows you to request more time or notify your
project manager that you need less time to complete an assignment. To notify your project
manager that you need a change to the schedule, you simply enter the number of hours you
have left in the Est. Remain field. The number you enter will turn green to indicate your
change request has been saved, but you can change/update it at any time. Your project
manager will only see the current value when he checks project alerts for change requests.
The numbers you enter in the Est. Remain fields will continue to appear in the fields until
your project manager accepts the changes by working them into the project schedules. Project
managers can either add/subtract the changes to/from your current assignment, or they can
add them to a pool of unassigned hours for future assignment to others. In either case, your
changes in the Est. Remain fields will no longer appear after the project manager has
accepted them into the project schedule. In the event that your changes are added
to/subtracted from your assignment, you will see the Assignment Remain field adjusted by the
amount of your change.
- Assignment Finished - This field allows you to signal that you have completed the
work on an assignment. In the event that you finish an assignment with less or more actual
work than was scheduled, you will need to select this checkbox when finished. If you simply
enter the same amount of actual work as was scheduled, this field will be automatically
selected as a convenience. It can be unselected at any time if an assignment requires more
work.
Under the assignment totals, there is a section for Other Tasks with a clock icon for entering
time for informal projects, non-project work and leave time. At the foot of the panel, there are
totals for all assignment and non-assignment time for the week.
The Review and Submit button below the assignment panel allows you to review all of your time in
either a detailed report with totals and subtotals or the grid time entry screen view. Whether
you review your time in a report or on a grid entry screen will depend on how your Journyx
administrator has configured your system. If you see a time report after clicking on the
Review and Submit button, you can customize this report. Go to Reports->Standard Reports
and modify the time report selected for the View Time Report button under the Preferences tab
(the `My Timesheet Report` report by default). If your time is subject to a period or project
approval plan, you will have a Submit for Approval option in the report menu in the upper left
corner for submitting your time for approval when it is completed and reviewed for the entire
period. If you see the grid time entry screen instead, the Submit for Approval button will
appear at the foot of the grid. Once you have submitted your time for approval, you will
not be able to make changes to it. If you discover errors after you have submitted your time
for approval, you must contact your designated approver to regain edit access to your time
for the period.
The report attached to the Review and Submit button also includes options for viewing past and
future periods. These periods are based on the time period your system administrator has
assigned to you and may or may not match the weekly default view for My Assignments. The report
also has a variety of format viewability options and a Return button for going back to time
entry.
Managing Time Entries
You can access the Time Entry panel for the My Assignments screen by clicking on any of the clock
icons next to the assignment task names or the names of the days under Week Schedule.
(see figure 34.1).
The Time Entry panel
allows you to input the hours that you worked on a specific assignment or your hours for all
work on a given day. Selecting a clock icon next to a task name brings up a Time Entry panel for
the selected assignment for an entire week (see figure 34.1.1).. Selecting a clock icon next to
a day brings up a Time Entry panel with a list of the current week's assignments for the
selected day (see figure 34.1.2).

Figure 34.1.1. Time Entry by Assignment
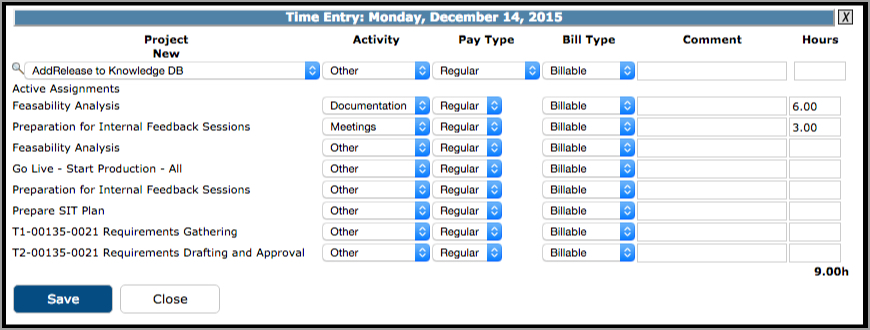
Figure 34.1.2. Time Entry by Day
To enter
time or view hours for a different period, you can use the Calendar in the Toolbar
to jump to a particular date. Alternatively, you may use the date arrow icons to move
backward or forward one week at a time assuming your system administrator has given you access
to past and future periods for time entry.
Keep in mind
that timesheets are configured by administrators, so your time entry panel may vary in
appearance and functionality from the one shown. The system allows your organization
to customize the names of items used for time tracking. For example, certain column
headers in your time entry panel such as Project, Activity, Pay Type, and Bill Type may be
hidden or may have been renamed altogether.
Users are able to enter time
as discreet units of time that are associated with individual Projects, Activities,
Pay Types and Bill Types. Additionally, each of these time entries may also have
a text comment associated with it to further specify the nature of the hours logged.
The system default for Time Entry will allow you to select a Project (unless you're tracking
time for a specific assignment, in which case the Project/Task is already pre-selected),
Activity, Pay Type, and Bill Type.
To create a time entry, select a value from each of the dropdowns shown on your
Time Entry panel. You may also enter a Comment for the time entry row. Once everything has
been selected, you need to enter the hours worked for that project/task on a specific
date. As an alternative, you can enter hours in the rows under the Recently Used section that
includes entries you have used in the previous week(s). See the Preferences section to find out
how to adjust the number of weeks' entries to display in the Recently Used section.
The Time Entry panel will accept hour entries in both standard HH:MM (2:35) format, as well
as in decimal format (1.25 = 1:15). If you enter hours in HH:MM format, it will
convert your entry to decimal format, rounding to the nearest whole hundredth.
Once you have selected the appropriate items and entered
your hours for that combination, click the Save button at the bottom of the Time
Entry panel. The screen will refresh and your entries will now appear in the
Active Tasks section. You may add hours to this entry either in the same day or in
another day during the week that is currently displayed. You may create more
than one time record at a time. Simply create the actual time entries for different
days and/or different combinations of items and then click the Save button at
the bottom of the screen. The screen will refresh and your entries will
now appear in the Active Tasks section.
To edit a time entry, you can change the hours directly in the hours field, or you can create a
new entry to change the selected values in the dropdowns. To delete a time entry, you simply
erase the hours in the hours field and click Save.
Searching For and Selecting a Project/Task
There are two ways to select
a project/task when managing time entries. You can simply use the Project dropdown sorted in
alphabetical order by project/task name, or you can use Project Search to locate projects/tasks
using additional criteria.
Project Search
Search allows
you to specify search criteria and select a project/task from the search results. To
do a project search, click the Project Search Icon ( ),
the magnifying glass, located to the left of the respective Project dropdown.
This will launch a pop-up window containing search criteria (see figure 34.3).
Specify all or part of the project/task name or description for the project that you are
trying to locate. As you type, you will see returned search results below the search
criteria.
From the search results, you can select the project for which you wish to log time. When you
select the project, the pop-up window will automatically close and
the project you selected should appear in the Project dropdown menu. Additional
search options can be selected by clicking on the arrow to expand the Search Options
table.
),
the magnifying glass, located to the left of the respective Project dropdown.
This will launch a pop-up window containing search criteria (see figure 34.3).
Specify all or part of the project/task name or description for the project that you are
trying to locate. As you type, you will see returned search results below the search
criteria.
From the search results, you can select the project for which you wish to log time. When you
select the project, the pop-up window will automatically close and
the project you selected should appear in the Project dropdown menu. Additional
search options can be selected by clicking on the arrow to expand the Search Options
table.
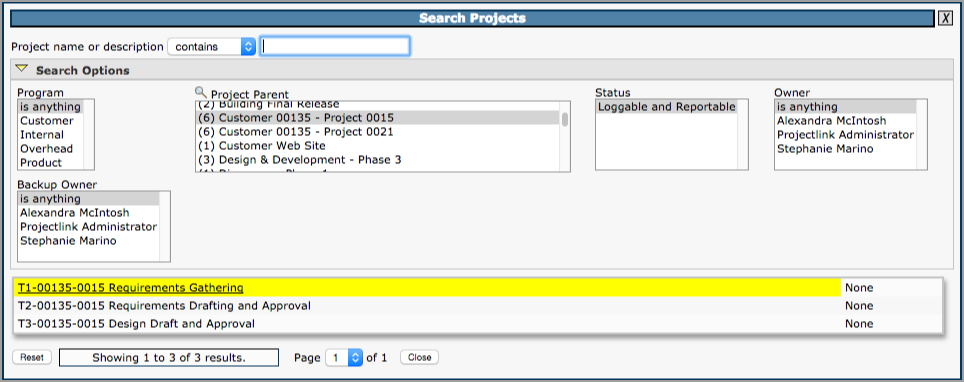
Figure 34.3. Project search