Figure 6.1. Periods main page
Periods |
Help Contents |
Period management is located under Configuration-->Periods-->Manage Periods.
Before users can begin logging time, expense, or custom entries, the system administrator must
first create and assign the Periods that the organization will be using. A Period may be thought
of as the equivalent to a pay period. Although these do not necessarily have to coincide,
administrators and users typically find it most intuitive if they use Periods that coincide with
their pay periods. You may also want to create a monthly Period if you bill your clients every
month or pay your employees at the end of the month. In essence, Periods will be assigned to
users' timesheets, expense sheets, and custom entries sheets, which will force them to track
their time, expense, and custom entries within the chronological confines of how your
organization wishes to keep track of their time and expenses.
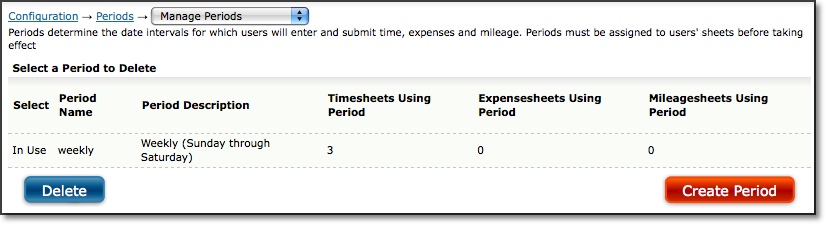
The product ships with only one default Period - weekly (see figure 6.1). This
Period covers seven days that run from Sunday through Saturday. If your organization
needs to use different Periods, the system allows you to create any number of
Periods to meet your unique business or billing needs.
Figure 6.1. Periods main page
To create a new Period, click the Create Period button located in the lower right corner
of the main Periods screen. This will direct you to the Period Creation screen
(see figure 6.2). Specify a name for the new Period. Then specify a date range
for the duration of the Period. The date ranges for which you can create a Period
are weekly, bi-weekly, semi-monthly, monthly, date range or custom semi-monthly.
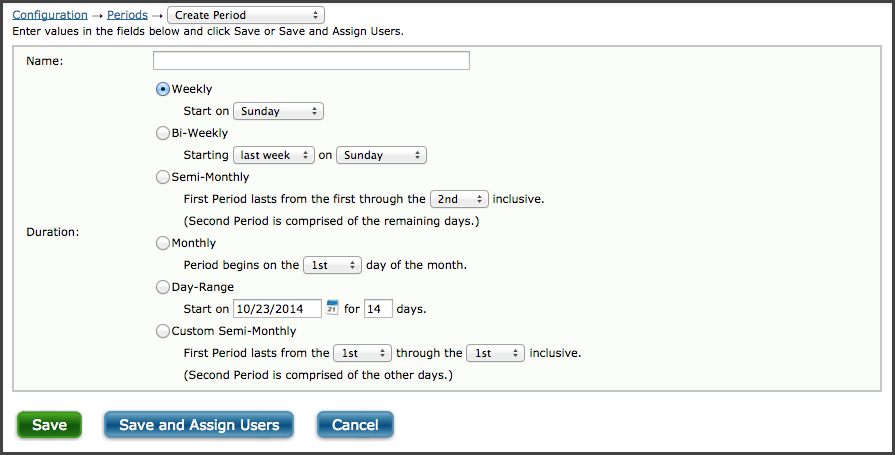
Figure 6.2. Period creation
A weekly Period covers seven days from the day chosen as the start day.
A bi-weekly Period covers fourteen days from the day chosen as the start day.
Please note that when defining a bi-weekly period, you must indicate both the day of the week
and indicate whether the period begins this week or last week.
A semi-monthly Period divides a month into two time periods that are defined as the first of the month through the date you set and the day after the date you set through the end of the month.
A day-range Period covers a set number of days, beginning on the date you define.
A custom semi-monthly Period covers a specified range of days, beginning and ending on the date you define. This supports two periods. One period defined by the dates, and the second period containing all other days. One period must be contained completely in one month, the second period may span across months. For example, one period might be from the 11th to the 25th days of a month and the second period extends from the 26th of the month to the 10th of the next month.
When finished selecting the duration, you can save the Period by clicking the
Save button. Alternatively, you can save the Period and assign users by clicking
the Save and Assign Users button. Periods must be assigned to users' timesheets
in order for users to be able to log time. To assign the Period to users' timesheets,
you must first specify the search criteria for users that you want to assign
the Period to (see figure 6.3). From the search results you can select the users
to assign and click the Assign button. Alternatively, you can assign periods
to users' sheets as you create them under User Management provided the Periods
have already been created. Expense and Custom Entry periods can be assigned to users in the same
way as described above using the respective menu options.

Figure 6.3. Assigning periods to users' timesheets
Note: Extra caution should be exercised when changing the Period assignment for a user who has already entered records. If you select the future only option for the new Period assignment, you may be required to set up a 'transition period' if the old period doesn't end the day before the new period is set to begin. If you select the remove old sheets option, all past records for the user will be permanently deleted from the database. Journyx strongly recommends backing up your database before selecting to remove old sheets for a new period assignment.
To delete an existing Period, select the Period from the Period Management screen and click the Delete button (see figure 6.1). If the Time Period is assigned to any users, you will not have the option to select the Period for deletion.