Entry Screen preferences allow you to select and configure your timesheets, expense sheets, and mileage sheets, as well as the reports associated with each.

Figure 27.2. Entry Screens preferences
Preferences |
Help Contents |
Entry Screens is located under Preferences-->Entry
Screens (see figure 27.2)
Entry Screen preferences allow you to select and
configure your timesheets, expense sheets, and mileage sheets, as well as the
reports associated with each.
Figure 27.2. Entry Screens preferences
On the Leave Management Calendar, limit...
If your system account includes Manager Authority, you will see the setting for limiting the
leave requests you see on your Leave Management Calendar at the top of the screen. This setting
allows you to filter the pending leave requests that are displayed on your Leave Management
Calendar and limit them to the ones you can approve. If this setting is disabled, you will be
able to see pending requests for all users in your groups regardless of whether or not you can
approve them.
Show a 'Previous Entries' section...
If your administrator has given you permission, you may select the option to create
blank entries on the current sheet from time, expense and custom entries that were logged in
previous periods. This is especially useful for short-term projects that span multiple periods.
These temporary entries are not 'permanent' and will cease to be carried over into future
periods when they go unused in the current period. You may also select how many periods
of entries you would like pulled into the current period as temporary entries.
Provided you are not assigned to a monthly period on your time entry screen, the default value
of 1 pulls entries from the previous period only. If you set it to 2, it will pull entries from
the previous two periods. If you are assigned to a monthly period, the numeric value is applied
in weeks (e.g., 1 pulls entries from the previous week only).
Maximum number of items in...
You can also limit the number of items
that are shown in select lists on entry screens. This is helpful when you
have access to long lists that cause screen loading to be slow. When the number
of items in a select list exceeds this setting, the field is changed to
a text field with search as the only option for selection.
Default comment for all entry screens
The Default comment field allows you to set the comment that appears in all blank rows for time,
expense
and custom entry sheets.
Number of blank entries available...
You can specify the number of blank entries to be displayed when you first open your time,
expense or custom entry screen. In most cases, 1 blank row is sufficient because a new blank row
is automatically added when you start entering data in the existing blank row.
Which Leave Request Create screen...
This settings allows you to pick your default screen for creating leave requests. The basic
screen provides an interface for creating requests one at a time. The advanced screen provides
several rows for creating multiple requests at the same time.
Hide declined requests on leave calendar
This setting determines whether or not you will see declined leave requests on the leave
calendar. Declined leave requests are always preserved for reference. However, you can use this
setting to show or hide them on the leave calendar.
Time entry screen
If your administrator has given you access to multiple
timesheets, you may choose the type of timesheet you would like to use when recording
hours worked on projects. Additionally, if made available by your administrator,
you may choose a Stopwatch Module, which gives you access to the Stopwatch feature
on your timesheet. Similarly, you may be able to select a Punch Screen.
Default time report
If your administrator has given you access to multiple Time Reports, you may choose
the default Time Report that you would like to see when previewing your timesheet
for approval.
Number of manual in/out rows
This setting applies to "allocation" type time entry screens that capture in and out times, in
addition to hours worked. If you are assigned to an allocation time entry screen, this setting
allows you to choose how many in/out rows you will start with on a blank time entry screen. In
most cases, 1 set of rows works well because another set of rows is added to the screen after
you have entered the first pair of in and out times.
Punch screen
If your administrator has required you to punch in and out of the system to capture the start
and stop times of your work day, you may have acces to this setting that allows you to choose
which type of punch screen you want to use.
Stopwatch module
If your administrator has given you access to the stopwatch module for timing your work for
inclusion on your time entry screen, you may have access to this setting that allows you to
choose which type of stopwatch module you want to use.
Expense entry screen
If your administrator
has given you access to multiple Expense Sheets, you may choose the type of Expense
Sheet you would like to use when recording business-related project expenses.
Default expenses report
If your administrator has given you access to multiple Expense Reports, you may choose
the default Expense Report that you would like to see when previewing your expense
sheet for approval.
Custom entry screen
If your administrator has given you access to multiple Custom Entry Sheets, you may choose the
type of Custom Entry Screen you would like to use when recording business related travel.
Default custom report
If your administrator has given you access to multiple Custom Reports, you may choose the
default Custom Report
that you would like to see when previewing your custom entry sheet for approval.
Display assignments by project and...
For the My Assignments screen, you have the option to list your assignments alphabetically or
group them by project and summary task(s). Selecting the Display assignments by project and
summary task on My Assignments setting will add project and summary rows above the list of
associated tasks.
Display assignment weekly plan on...
For the My Assignments screen, you can display or hide the weekly plan graph.
Show Suggested Entries...
If your administrator has given you access to Suggested Entries, you may choose to use them on
your time entry screen. This feature loads suggested entries based on data in other applications
that you use to do your work throughout the day. See the next setting for linking to your
Microsoft Office 365 identity, which will allow you to pull your Exchange calendar events and
tasks from Office 365 and Exchange Online.
Microsoft Office 365 identity
If your administrator has set up Journyx access to your Microsoft Office portal, you will see
this option to link your Microsoft Office 365 account to Journyx. Linking your account will
allow you to load Exchange calendar events and tasks in your suggested entries on your
timesheet. If you are already logged in to your Microsoft Office portal in another browser tab,
clicking on the "Link this account to Microsoft Office 365" button will automatically create
the link and enable loading of calendar events and tasks. If you are not logged into the portal,
clicking on the button will take you to a Microsoft Office 365 login screen where you can enter
your Microsoft credentials and link the account. After successfully linking your account, the
button text will change to offer an option to unlink the account.
My Projects is located under Preferences-->My Projects
(see figure 27.3)
In some organizations, having to search through extensive
lists of projects can be quite time consuming when managing time and expenses.
The My Projects feature allows you to select the projects that you typically track
for time and expenses.

Figure 27.3. My Projects
This feature allows you to maintain your own unique list of projects that will be displayed by default in the project dropdown. This will keep you from having to routinely search for or select a project from the project tree for projects that you frequently log hours to. The My Projects link, located at the bottom of each sheet will launch a pop-up window that can be used to add and remove projects from your unique Project List. You may add projects from the Available Projects list by selecting the project and clicking the Add button. These projects will be added to your Project List shown in the box to the right. To remove a project from your Project List, select the project and click the Remove button. Additionally, you can search for a project by specifying the project name or part of the project name. The search results will be displayed in the listbox on the left. If you want to view the full tree instead of the search results, you can click the Go to Top of Tree link located above the left listbox. When you are finished adding and removing projects from the Projects List, click the Save button.
Landing Page is located under Preferences-->Landing Page.
The Landing Page preference allows you to override the system default for the screen you first
view after logging in. All accounts have default landing pages that are based on the authority
and abilities included in their roles. The Landing Page preference allows you to change from the
default to another screen which you have access to. The Landing Page screen selections are the
same as the list of links you see on your Sitemap. You may choose from any of these screens by
selecting one and clicking on Save button. Your selection will remain highlighted. If you wish
to remove the selection and return to the default landing page, you can simply click on the
Remove button.
The only exception to the selected landing pages overriding the defaults applies to approvers with the Approver-Regular ability. These approvers will see the Approvals tab as their landing pages when sheets are awaiting approval in their queues. If an approver has no outstanding approvals, the selected landing page will be displayed upon login.
Reset Password is located under Preferences-->Reset
Password (see figure 27.1)
The Reset Password screen displays your full name
and username as shown in the system and reports. You have the ability to modify
your password if you wish. To modify your password, you must specify your current
password for security purposes. Then specify your new password that you would
like to use when logging into the system. Confirm your new password by entering
it again. When finished, click the Save button. Your password will be changed
and you will have to use the new password the next time you login to the system.
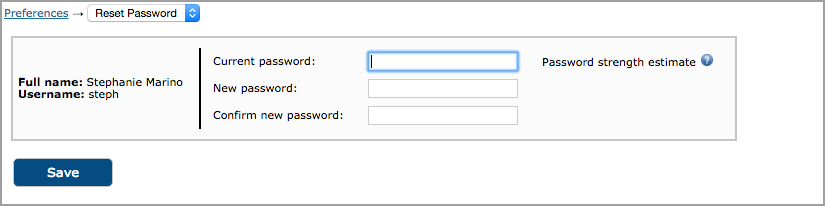
Figure 27.1. Reset password
User Details is located under Preferences-->User Details
(see figure 27.4)
Your administrator has added you to groups that will allow
you to track time and expenses for certain projects. User Details displays all
the groups, projects, and other system information that you have access to. To
view your access information, select the Category Type and click the Load button.
This will refresh the screen with all the items to which you have access.

Figure 27.4. User Details