Figure 40.1.Resource Requisition Management main page
Resource Requisitions |
Help Contents |
Project managers have the option to send a resource requisition to a resource manager when they don't have the access to assign some or all resources directly. Configuration options determine how much access a project manager has to assign resources directly versus request resource assignments from resource managers. Resource managers have the option to fulfill the requisitions by assigning their team members, or they can decline the requisitions while tracking reasons in an auditable comments log. Both project and resource managers can move a requisition into discussion mode if more communication is needed to determine the outcome.
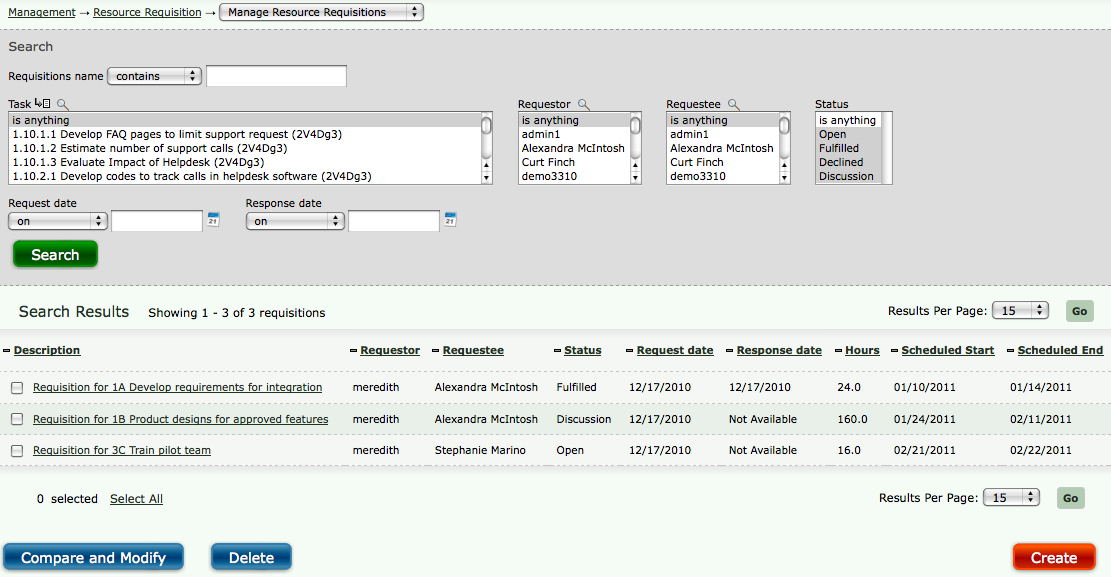
Resource requisitions can be created or managed by going to Management-->Resource Requisitions
or clicking on the Create a Resource Requisition button on any task modification screen (see
Figure 40.1).
Figure 40.1.Resource Requisition Management main page
Managers with roles that include the abilities to create and modify projects and access to Scheduled Project Management will be able to create resource requisitions. Resource or department managers who fulfill the requisitions must have the same access and abilities listed above. Group memberships determine which resource managers a project manager can send requisitions to. Group access also determines the resources a resource manager can assign to fulfill a request.
You can create a new resource requisition by either clicking the Save and Create Requisition
button located in the lower right corner of a selected task modification screen or going
directly to Management-->Resource Requisitions-->Create Resource Requisition where you can
select a task. Requisitions can only be created for tasks with unassigned work. The Requestor
field is set automatically based on the user logged in. The Hours, Scheduled Start and Scheduled
End fields are populated based on the task selection (see figure 40.2).

Figure 40.2.Resource Requisition creation
The Task field will be populated with your selection if you used the Save and Create Requisition
on the task modification screen. If you go directly to the resource requisition creation screen
via the navigation menu, you must choose a task from the Task select list. The Hours, Scheduled
Start and Scheduled End fields will be populated with the task information after saving.
Next, specify a Requestee. The requestee is the department or resource manager who will be making the assignments or "fulfilling" the requisition. The hour glass icon next to the select list can be used to search for managers who preside over specific groups or with other custom attributes.
Next, select the Status. For new requests this will usually be "open". Requestees who review the requisitions can set the status to "fulfilled" or "declined" by acting upon the requisitions. The project managers who request the requisitions can also set open or declined requisitions to discussion status. Discussion status allows you to put requisitions on hold while the details are worked out amongst the managers.
Next, add any comments if necessary. The Comment field tracks the date and logged in user who adds the comment. All comments related to a requisition can be viewed in the Show History link that is displayed when comments exist. The comments are listed in chronological order and are preserved for reporting purposes.
When finished, click the Save button. To create another requisition, click the Save and New button. If email notifications are turned on for resource requisitions, the requestee will receive notice of the new requisition. Resource requisition email settings are under Configuration?System Settings?Resource Requisition.
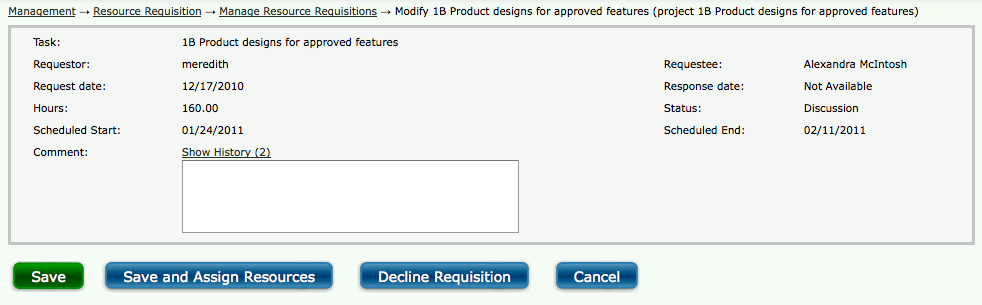
To modify the information contained in an existing requisition, specify the search criteria for the request on the main resource requisition screen and click the Search button (see figure 40.1). The search results will be displayed below the criteria. From the search results, click the name of the requisition you would like to modify. This will direct you to the Resource Requisition Modification screen where you can modify the attributes of the request.
Alternatively, you have the ability to compare and modify multiple requisitions at the same time.
From the search results on the main resource requisition screen, check the checkboxes of the
requisitions that you would like to manage at once (see figure 40.1). Then go to the bottom of
the screen and click the Compare and Modify button. This will take you to a Resource Requisition
Modification screen that contains the attributes of the selected requisitions side by side (see
figure 40.3).
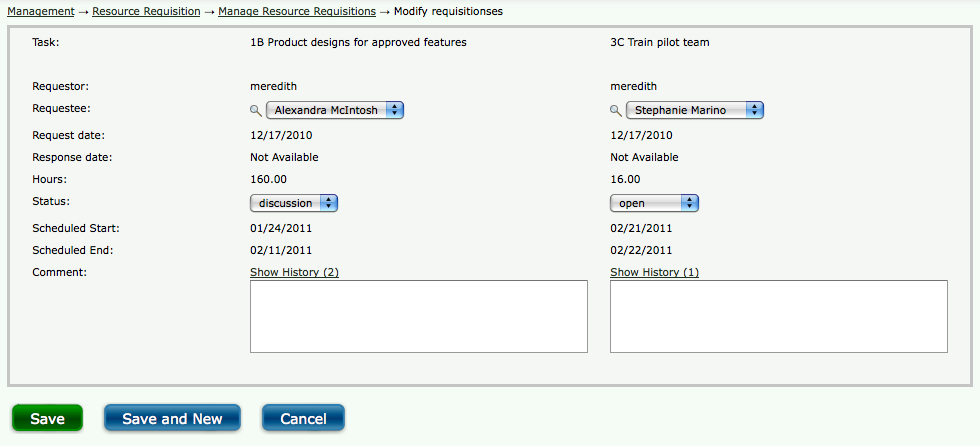
Figure 40.3.Resource Requisition compare and modify
The system allows your organization to delete obsolete requisitions. To delete an existing requisition, specify the search criteria for the requisition on the main resource requisition screen and click the Search button (see figure 40.1). The search results will be displayed below the criteria. From the search results on the main resource requisition screen, select the requisitions that you would like to delete. Then go to the bottom of the screen and click the Delete button.
The department or resource managers who receive requisitions as the "requestees" will see the requisitions in the search results on the main resource requisition screen. To act upon a requisition, specify the search criteria for the request on the main resource requisition screen and click the Search button (see figure 40.1). The search results will be displayed below the criteria. From the search results, click the name of the requisition you would like to manage.
This will direct you to the Resource Requisition Modification screen for requestees where you have two options for acting upon the requisition (see figure 40.4):