Sheet Approval Plans is located
under Management-->Approval Plans.
Sheet Approval Plans allow you to create
different approval workflows for users who submit their timesheets, expense sheets, or
custom entry sheets after each period. Users who have been assigned to Approval Plans
will be required to submit their sheets to be approved by the approvers specified
in the Sheet Approval Plan. If you have enabled interim approvals under Configuration-->System
Settings-->Approvals and Auditing, Sheet Approval Plans for time entry will also apply
to interim submissions when users are allowed to submit work in progress in addition to the
final submission at the end of the period.
Creating and Managing Sheet Approval Plans
To create a new Sheet Approval Plan, select the create option for the Approval Plan type screen
in the navigation menu under Management-->Approval Plans (see figure 21.1). This will direct
you to the Sheet Approval Plan Creation screen, where
you will configure the settings of the new Approval Plan. Specify a name for the
Approval Plan (see figure 21.3).
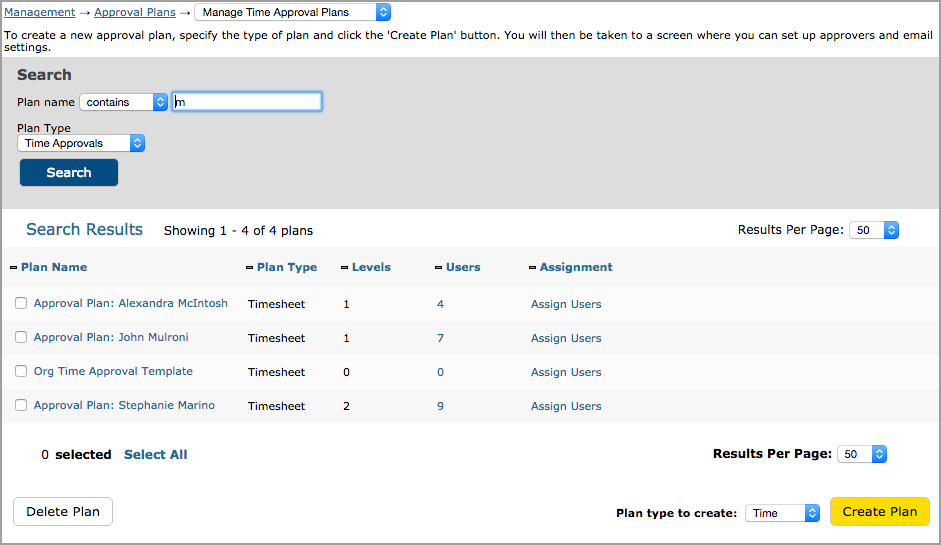
Figure 21.1. Sheet Approval Plan main page
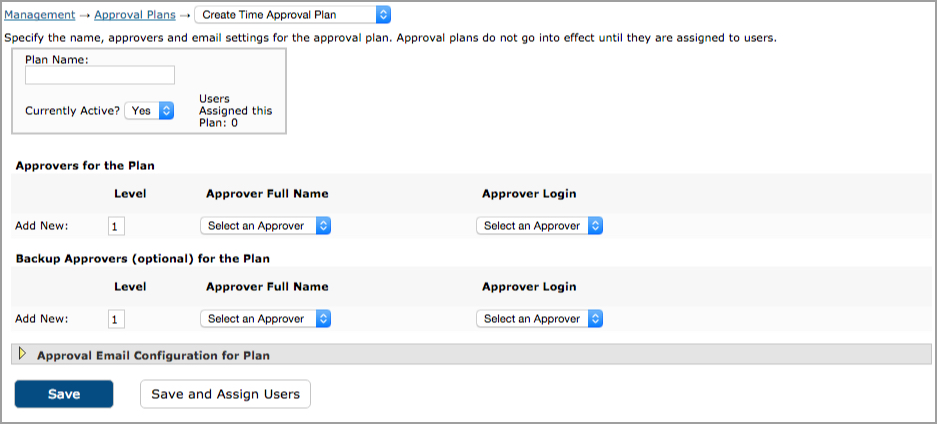
Figure 21.3. Approval Plan creation
The
Currently Active dropdown allows you to choose between 'yes' and 'no.' If you
want the Approval Plan to take effect immediately, you should set this option
to 'yes.' The 'no' option is provided as a way to turn off the approval plan if
you should ever find a need to have that process disabled. Please note that if
you turn an Approval Plan off, any records that are 'in process' at the time you
disable the process will continue through to completion. Next, select the Primary
Approver(s) and Backup Approver(s) for the Approval Plan. Selection of a Backup
Approver is optional. A sheet will be directed to the Backup Approver only if
the Primary Approver has not taken any action on the sheet submitted for approval.
The system allows you to select as many levels of Primary Approvers and Backup
Approvers for each Approval Plan as you like. You may choose to select each Primary
Approver by either the Username or Full Name. These dropdowns are dependent on
one another, so as you select a name in one dropdown, the other will dynamically
update itself. To add more approval levels to this Approval Plan, you must first
save the Approval Plan by clicking the Save button. Once saved, the screen will
refresh allowing you to select an additional level of Approvers and Backup Approvers.
To remove an approval level, simply check the respective Remove checkbox and click
the Save button. This will refresh the Approval Plan screen with the approvers
having been removed.
To change the order of approvers within the Approval
Plan, change the numbers in the Order text boxes to the left of each approver's
name to reflect the new order of approvers. If you need to change only one approver
level, you may use a decimal number to make the change.
The same processes
apply when creating Expense and Custom Sheet Approval Plans.
Once a Sheet Approval Plan
has been created, you can go to Management-->Approval Plans and choose the modify option for
the Approval Plan type from the navigation menu to modify it. On the main Approval Plans screen
for each type, you will see a list of existing
Sheet Approval Plans (see figure 21.1).
Furthermore, you can view the number of approval levels under the Levels column.
To view a list of users that have been assigned to the Approval Plan, click the
respective number under the Users column. This will launch a pop-up window containing
the assigned users (see figure 21.4). To manage an Approval Plan, simply click
the name of the Approval Plan. This will direct you to the Approval Plan Management
screen.
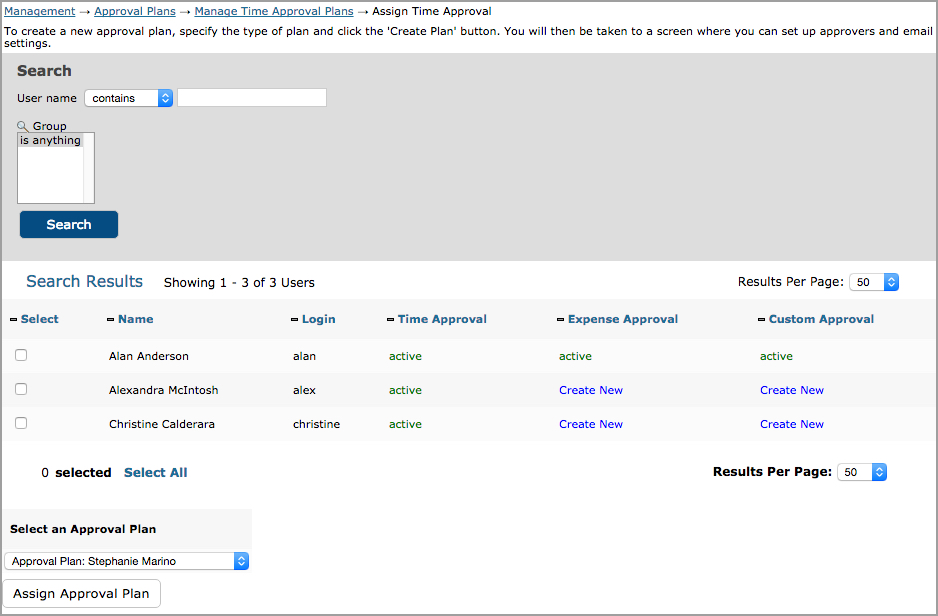
Figure 21.4. Assigned users
To delete
Approval Plans, select the Approval Plans and click the Delete Plan button from
the main Approval Plans screen (see figure 21.1).
Sheet Approval Plan Email Settings
Each Sheet Approval Plan has Email
Settings associated with it (see figure 21.3 and 21.5). Email Settings is located
in its own collapsible section in the Approval Plan Creation and Management screens.
In order for Email Settings to be enabled globally for all Approval Plans, you
must specify the time of day that these emails are to be generated under Configuration-->System
Settings-->Approval Plans (in the Approval Email Settings table). You must also have your
mail server settings configured under Configuration-->System Settings-->Server
and Email.
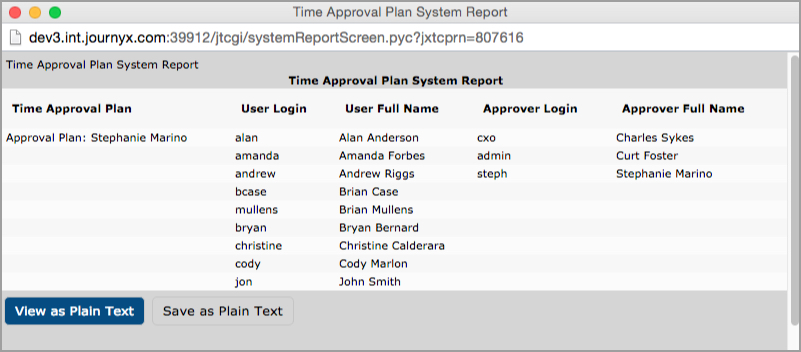
Figure 21.5. Approval Plan Email Settings
Within the Email Settings section of Approval Plans, you can view and manage
the different emails that can be sent to approvers and users who have been assigned
to the Approval Plan. The various Email Settings are detailed below.
User notification of rejection
When this email notification is
enabled, the system will send an email to the user if his/her sheet has been rejected
by any one of the approvers in this Approval Plan.
User notification of approval
When this email notification is enabled, the
system will
send an email to the user when his/her sheet has been approved by an approver.
Approver notification of sheet submission
When this email notification is
enabled,
the system will send an email to the approvers when an assigned user submits a
sheet for approval.
Approver notification of sheet resubmission
When this email notification is
enabled, the system will send an email to
the approvers when an assigned user resubmits a sheet that had been previously
rejected.
User notification of sheet due
When this email notification
is enabled, the system will send a reminder email a specified number of days before
a period ends to assigned users that their sheet is due for submission. The number
of days can be set below the text section of this notification.
User notification of late sheet submission
When this email notification is
enabled, the system will send a late notice email a specified number of days after
a period ends to assigned users that their sheet is past due for submission. The
number of days can be set below the text section of this notification.
Approver notification of late sheet submission by user
When this email
notification
is enabled, the system will send an email for late users a specified number of
days after a period ends to assigned approvers. The number of days can be set
below the text section of this notification.
Approver notification when they have sheets awaiting their approval
When this
email notification
is enabled, the system will send an email to approvers who still have sheets unapproved a
specified number of
days after a period ends. The number of days can be set below the text section of this
notification.
Backup approver notification
When this email notification is enabled, the system
will send an email at
a specified point in time after a sheet has been submitted to, but not processed
by, the primary approver associated with the Approval Plan. The sheet will be
placed in the backup approver's queue a specified number of days after the period
has ended if a submitted sheet has not been approved or rejected by the primary
approver. The default is 1 day after the end of a period, though this value can
be modified.
Late notice emails on weekends
This option allows
you to decide if the late email notifications should be sent on weekends.
Email
Log Options
The two email log options for each Approval Plan relate
directly to the email log. The email log should generally only be used if you
are having difficulties with the emails for this Approval Plan. Please enable
these options only if instructed to do so by Journyx support.
The Email Setting fields for subject lines and messages accept plain text, HTML
tags, and a selection of 'tricky tags' that pull information directly from the
system database. The available tricky tags are given below along with the system
information that the 'tricky tag' will display:
| Tricky Tag |
|
System
Information Displayed |
| <uid> |
|
Displays
the username of the user who submitted the sheet for approval
|
| <ufn> |
|
Displays
the full name of the user who submitted the sheet for approval
|
| <uem> |
|
Displays
the email address of the user who submitted the sheet for approval
|
| <uphn> |
|
Displays
the phone number of the user who submitted the sheet for approval
|
| <rjid> |
|
Displays
the username of the approver rejecting the sheet
|
| <rjfn> |
|
Displays
the full name of the approver rejecting the sheet
|
| <rjem> |
|
Displays
the email address of the individual rejecting the sheet
|
| <rjphn> |
|
Displays
the phone number of the individual rejecting the sheet
|
| <aprid> |
|
Displays
the username of the final approver
|
| <aprfn> |
|
Displays
the full name of the final approver
|
| <aprem> |
|
Displays
the email address of the final approver
|
| <aprphn> |
|
Displays
the phone number of the final approver
|
| <baid> |
|
Displays
the username of the backup approver
|
| <bafn> |
|
Displays
the full name of the backup approver
|
| <baem> |
|
Displays
the email address of the backup approver
|
| <reason> |
|
Displays
the rejection reason for the submitted sheet
|
| <prd> |
|
Displays
the period of the submitted sheet
|
| <type> |
|
Displays
the sheet type submitted (time, expense, or custom entry)
|
| <link> |
|
Displays
a link directly to the sheet that is the subject of the notification
|
| <link=customlink> |
|
Displays
custom text as a link directly to the sheet that is the subject of the notification
(when custom text is inserted in place of "customlink" and the system email format is
set to HTML)
|
Assigning a Sheet Approval Plan to Users
Sheet Approval plans
must be assigned to users before they can be applied. There are two methods of
assigning an Approval Plan to users. You can assign users from the main Approval
Plan screen for each approval type located under Management-->Approval Plans. Here each
Approval Plan
has an Assignment column that contains an Assign Users link (see figure 21.1).
This method is ideal if wanting to assign users without making any modifications
to the Approval Plan itself. By clicking the Assign Users link, you will be taken
through the assignment process (see figure 21.6). The first step is to specify
the search criteria for the users that you would like to assign to the Approval
Plan. Once you have specified the search criteria, click the Search button. The
search results will be displayed below the criteria. From the search results,
select the users to assign to the Sheet Approval Plan and click the Assign Approval
Plan button.
Figure 21.6. User assignment
Alternatively,
you may assign users from the Approval Plan Creation or Management screen. This
method is ideal when initially creating an Approval Plan or when making changes
to an Approval Plan before assigning users. At the bottom of these screens, you
will notice a Save and Assign Users button (see figure 21.3). By clicking this
button, you will be taken through the assignment process. The first step is to
specify the search criteria for the users that you would like to assign to the
Approval Plan. Once you have specified the search criteria, click the Search button.
The search results will be displayed below the criteria. From the search results,
select the users to assign to the Sheet Approval Plan and click the Assign Approval
Plan button.