Punch Conversions are located under Management-->Records-->Punch Conversions.
Punch-in and punch-out pairs are in and out times submitted by users who track
time using the punch clock feature (Punch User). These punch-in/punch-out pairs
require approval before being converted to time records. A punch pair containing
two consecutive punches constitutes a time entry (see figure 13.1).
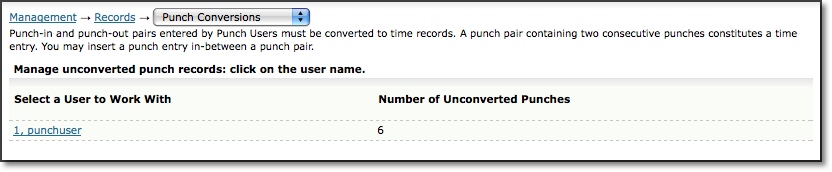
Figure 13.1. Punch Conversions main page
To manage punch entries for a user, you must first select the user to manage.
Click the name of the user to manage. You will be directed to a page that contains
all of that user's unapproved punch-in and punch-out pairs (see figure 13.2).
You can approve all the punch entry pairs shown by clicking the Approve All
button.
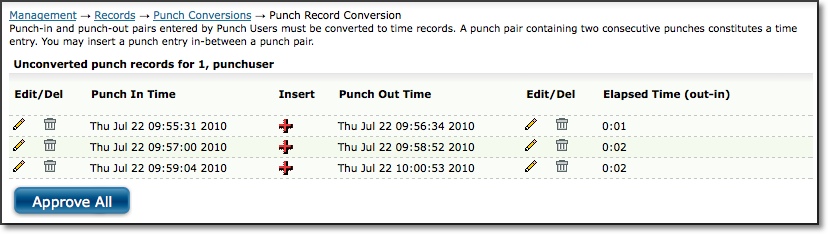
Figure 13.2. User Punch Conversions
To edit a punch, click the respective Edit icon for that punch. This will direct
you to a page containing the attributes of that punch which you will be able to
modify (see figure 13.3). Here you can modify the Project, Activity, Pay Type, Bill
Type, Comment, Punch Time, Group, and whether the first or second punch will determine
the time record contents. Basically, the first punch and the second punch could
potentially have different attributes for Project, Activity, Pay Type, Bill Type,
and Comment. This dropdown determines which values to write to the database if
there is a discrepancy. When finished, click the Modify button. All punch screens
include a default setting for determining whether to use the first or second punch
details for the time record that is created.
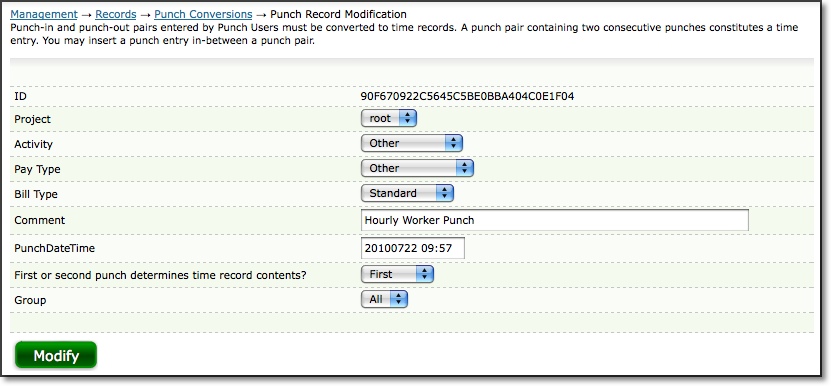
Figure 13.3. Punch Record modification
You may also insert a punch entry between a punch pair from the screen containing
all of the user's punches (see figure 13.2). To insert a punch entry between
a pair, click the Insert icon located between the two punches. This will direct
you to a screen where you can specify the Project, Activity, Pay Type, Bill Type,
Comment, Punch Time, Group, and whether the first or second punch will determine
the time record contents (see figure 13.4). When finished, click the Create
button. This will insert the punch between the original pair that you chose.
By inserting a punch entry, this will sequentially shift all following punches.
In other words, all punch-in entries following the insertion will be converted
to punch-out entries. Similarly, all punch-out entries following the insertion
will be converted to punch-in entries.
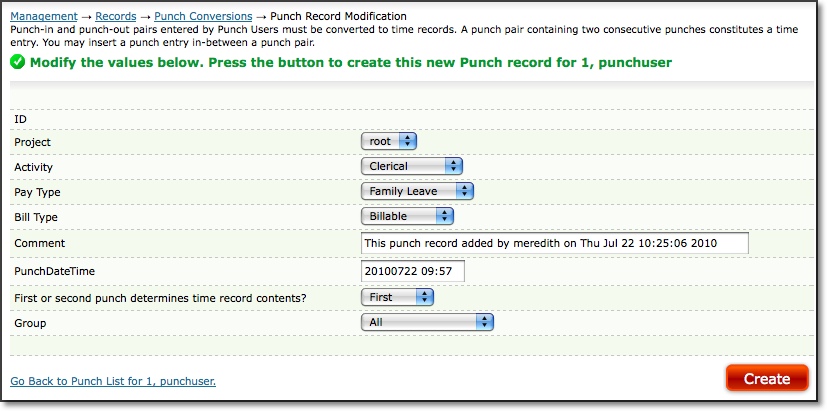
Figure 13.4. Punch Record creation