
Figure 14.1. Time Record creation
Records Management |
Help Contents |
Records Management is located under Management-->Records.
Records Management allows you to create time, expense or custom entries that
will be placed in the selected users' timesheets, expense sheets or custom entry
sheets. You can also modify entries that already exist in users' sheets.
To create a new entry to be placed in users' timesheets, go to Management-->Records-->Create
Time Entries. This will direct you to the Time Entry Creation screen (see
figure 14.1). Specify the users within the Groups that you wish to assign the
entry to. For the time entry, specify the Date, Project, Activity, Pay Type, Bill
Type, Hours, Minutes, and Comment. Then specify whether the entry will be committed
or not. When you commit an entry, it will be approved and can no longer be modified
regardless of whether the selected users' timesheets are approved or not. When
finished, click the Create button.
Figure 14.1. Time Record creation
To modify existing time entries for users, go to Management-->Records-->Modify Time
Entries. You must first specify the search criteria for the entries and click the
Show button (see figure 14.2). From the search results, you can select the entries
to manage (see figure 14.3).
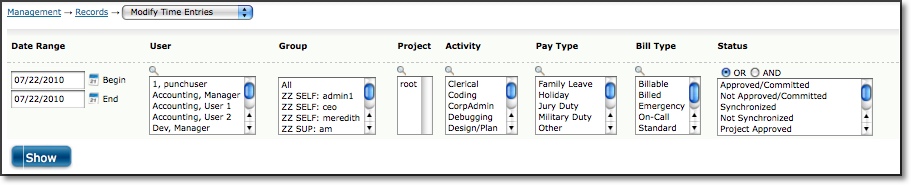
Figure 14.2. Time Record search
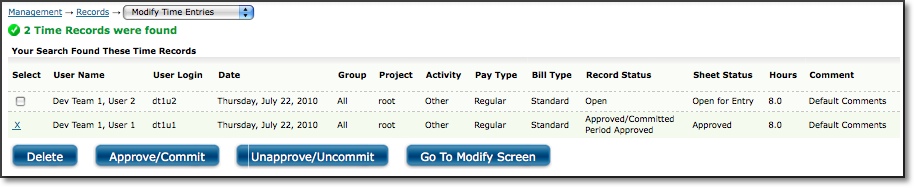
Figure 14.3. Time Record selection
To delete the selected entries, click the Delete button. To approve or commit
the selected entries, click the Approve/Commit button. To disapprove or uncommit
the selected entries, click the Unapprove/Uncommit button. To modify the selected
entries, click the Go to Modify Screen button. This will direct you to an Entry
Management screen where you can change the Project, Activity, Pay Type, Bill Type,
Comment, Hours, and Group (see figure 14.4). When finished, click the Modify
the Records Altered Above button.

Figure 14.4. Time Entry modification
To create a new entry to be placed in users' expense sheets, go to Management-->Records-->Create
Expense Entries. This will direct you to the Expense Entry Creation screen
(see figure 14.5). Specify the users within the Groups that you wish to assign
the entry to. For the expense entry, specify the Date, Project, Expense Code,
Source, Currency, Amount, and Comment. Then specify whether the entry will be
committed or not. When you commit an entry, it will be approved and can no longer
be modified regardless of whether the selected users' expense sheets are approved
or not. When finished, click the Create button.

Figure 14.5. Expense Record creation
To modify existing expense entries for users, go to Management-->Records-->Modify Expense
Entries. You must first specify the search criteria for the entries and click the
Show button (see figure 14.6). From the search results, you can select the entries
to manage (see figure 14.7).
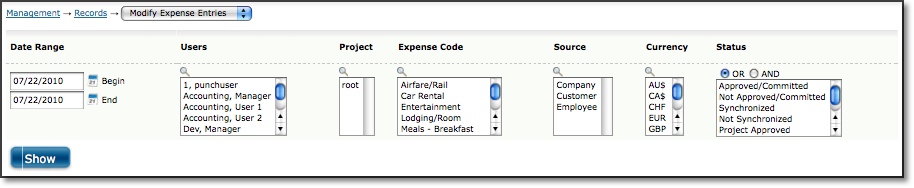
Figure 14.6. Expense Record search
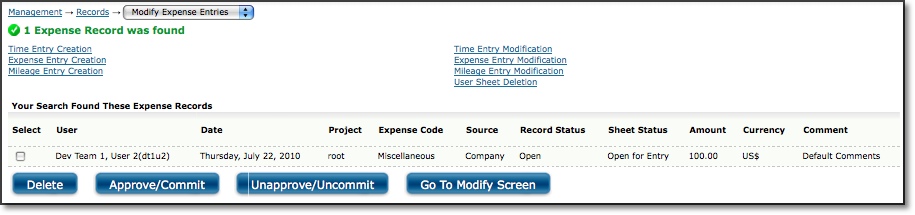
Figure 14.7. Expense Record selection
To delete the selected entries, click the Delete button. To approve or commit
the selected entries, click the Approve/Commit button. To disapprove or uncommit
the selected entries, click the Unapprove/Uncommit button. To modify the selected
entries, click the Go to Modify Screen button. This will direct you to an Entry
Management screen where you can change the Project, Expense Code, Source, Currency,
Comment, Amount, and Group (see figure 14.8). When finished, click the Modify
the Records Altered Above button.

Figure 14.8. Expense Entry modification
To create a new entry to be placed in users' custom entry sheets, go to Management-->Records-->Create
Custom Entries. This will direct you to the Custom Entry Creation screen
(see figure 14.9). Specify the users within the Groups that you wish to assign
the entry to. For the custom entry, specify the Date, Project, Location,
Item, Unit, Comment, and Amount. Then specify whether the entry will be
committed or not. When you commit an entry, it will be approved and can no longer
be modified regardless of whether the selected users' custom entry sheets are approved
or not. When finished, click the Create button.
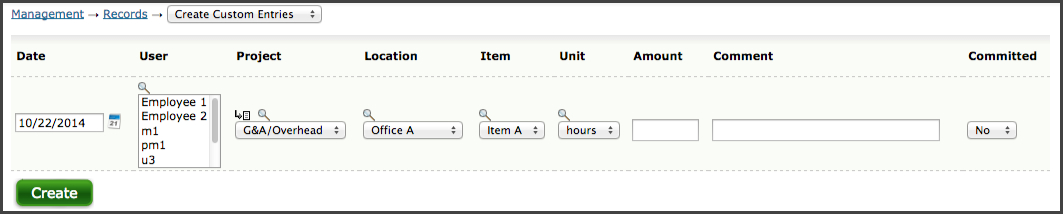
Figure 14.9. Custom Record creation
To modify existing custom entries for users, go to Management-->Records-->Modify Custom
Entries. You must first specify the search criteria for the entries and click the
Show button (see figure 14.10). From the search results, you can select the
entries to manage (see figure 14.11).
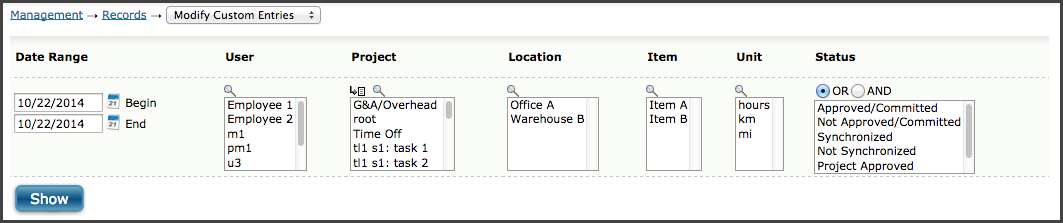
Figure 14.10. Custom Record selection
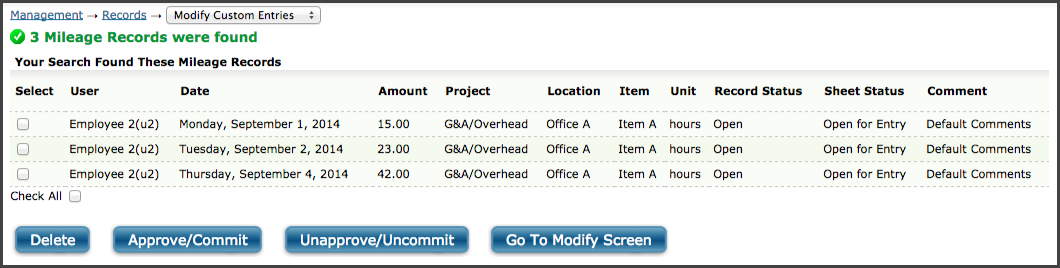
Figure 14.11. Custom Record modification
To delete the selected entries, click the Delete button. To approve or commit
the selected entries, click the Approve/Commit button. To disapprove or uncommit
the selected entries, click the Unapprove/Uncommit button. To modify the selected
entries, click the Go to Modify Screen button. This will direct you to an Entry
Management screen where you can change the Project, Location, Item, Unit,
Comment, Amount, and Group (see figure 14.12). When finished, click the Modify
the Records Altered Above button.

Figure 14.12. Custom Entry modification
Under Management-->Records-->Delete User Sheets, you also have the option to delete sheets that were created erroneously. This scenario usually arises from users navigating to periods in the past or future by accident and thereby "creating" the sheet for email notification purposes. The User Sheet Deletion screen allows you to search for user sheets and delete any that have 0 hours associated with them.