Figure 36.1.Assignment status for a selected task(s)
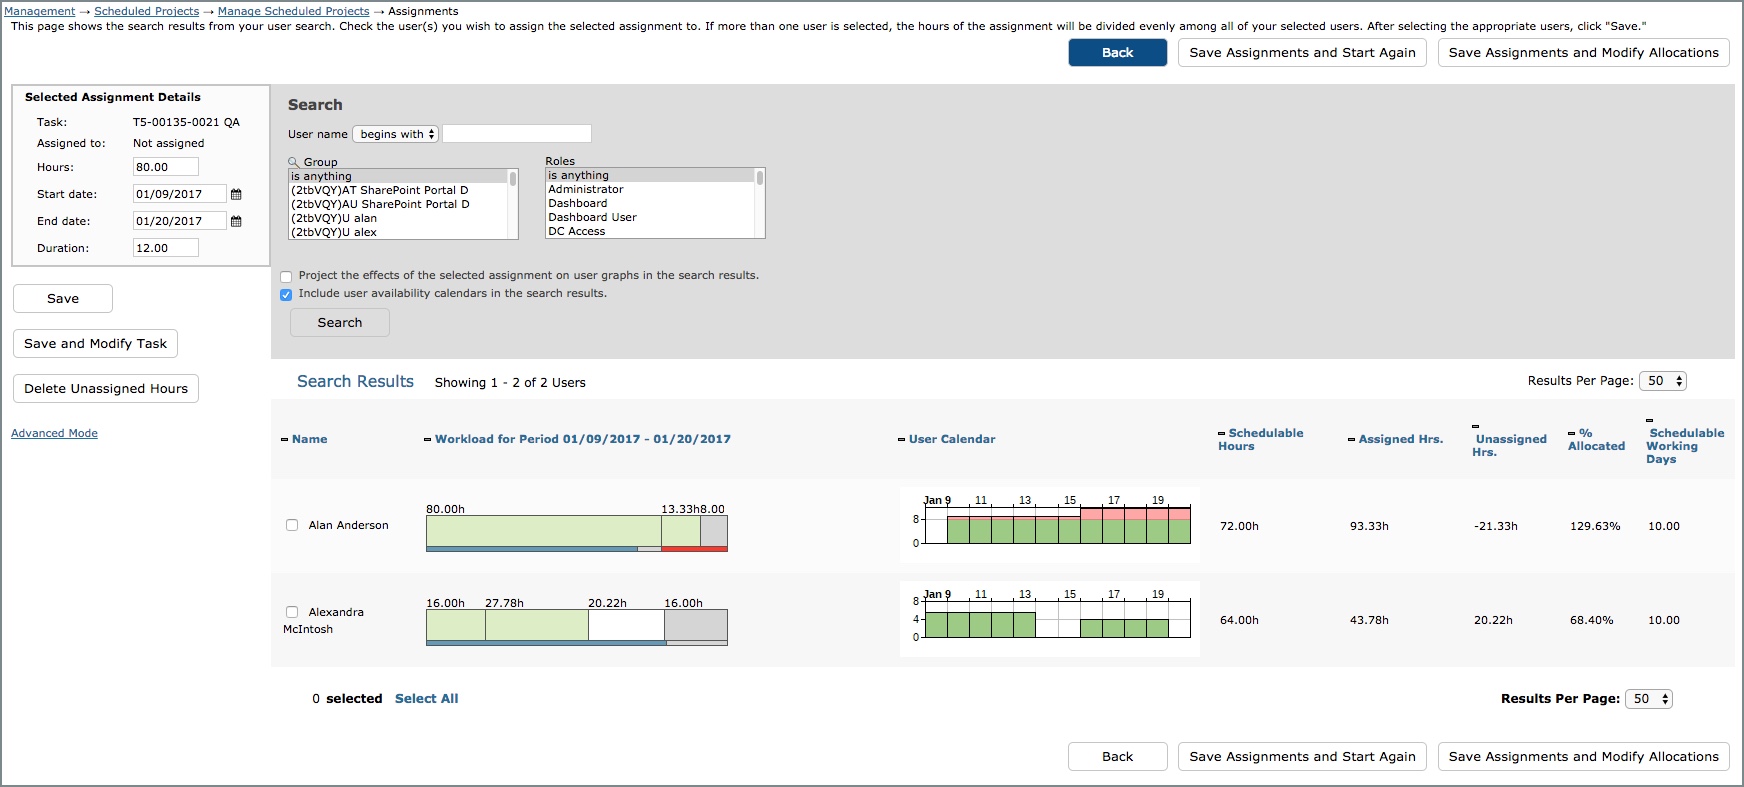
Figure 36.2.Assignment creation/reassignment for a selected task/assignment
Assignments |
Help Contents |
There are two different screens that you can use to manage your assignments. The first is under Management-->Scheduled Projects-->Scheduled Project Management. To create or view assignments under Scheduled Project Management you can either select a scheduled project(s) and click on the View Assignment Loads button, or you can create/edit a scheduled project and click on the Save and View Assignments button when you have finished making changes to the project/task. The assignment management screen under Scheduled Project Management provides graphical information on resource availability and allocation implications.
The second assignment management area is under Management-->Scheduled Projects-->Assignments. This screen looks like a standard Journyx management screen with search filters and a list of search results. This screen is helpful when you need to view existing assignments across projects and make changes. More information about this second assignment management screen is included below.
An assignment is simply the relationship between a task and a user with a designated number of scheduled work hours and start and end dates. Each assignment consists of a single task and a single user, but an unlimited number of assignments can be created for a single task. When a task is fully assigned (all task scheduled hours have been assigned to at least one user), the task scheduled work and date values will reflect the sum of the assignment values for the same (task will reflect the sum of assignment scheduled work, the earliest assignment start date and the latest assignment end date).
NOTE: Anyone who logs time against a scheduled project/task MUST be assigned to the that project/task. It is acceptable to give users Group access to log time against a scheduled project/task without assigning them to it (e.g. for Agile use cases where the first person available will do the work). However, Journyx will automatically create a system-generated assignment when a user logs time against a scheduled project/task without an assignment. The first person to log time and get auto-assigned to a task will be assigned for the full amount of the task scheduled work. Any user who subsequently logs time against the same task and is assigned will get half of the remaining work from existing assignments (unless a previously assigned user has less than 8 hours remaining on the assignment). An individual user can only be assigned to a specific task once. If you require the option to assign a user to a specific task more than once (e.g. based on varying date ranges of the work to be done or differing work estimates per date range), please contact Journyx Support for assistance in setting up this option.
The Scheduled Project Management screens for managing assignments include more than a simple
interface for entering assignment values. They also include features for locating resources,
checking their availability for specific assignments and forecasting how the assignments would
affect selected users' current schedules. The assignment screens provide a wizard approach with
an initial screen for viewing or manipulating existing assignments for a task, and a second
screen for creating or reassigning assignments (see figures 36.1 and 36.2).
Figure 36.1.Assignment status for a selected task(s)
Figure 36.2.Assignment creation/reassignment for a selected
task/assignment
The second option for managing a text-based list of assignments is under Management-->Scheduled
Projects-->Assignments (see figure 36.3).
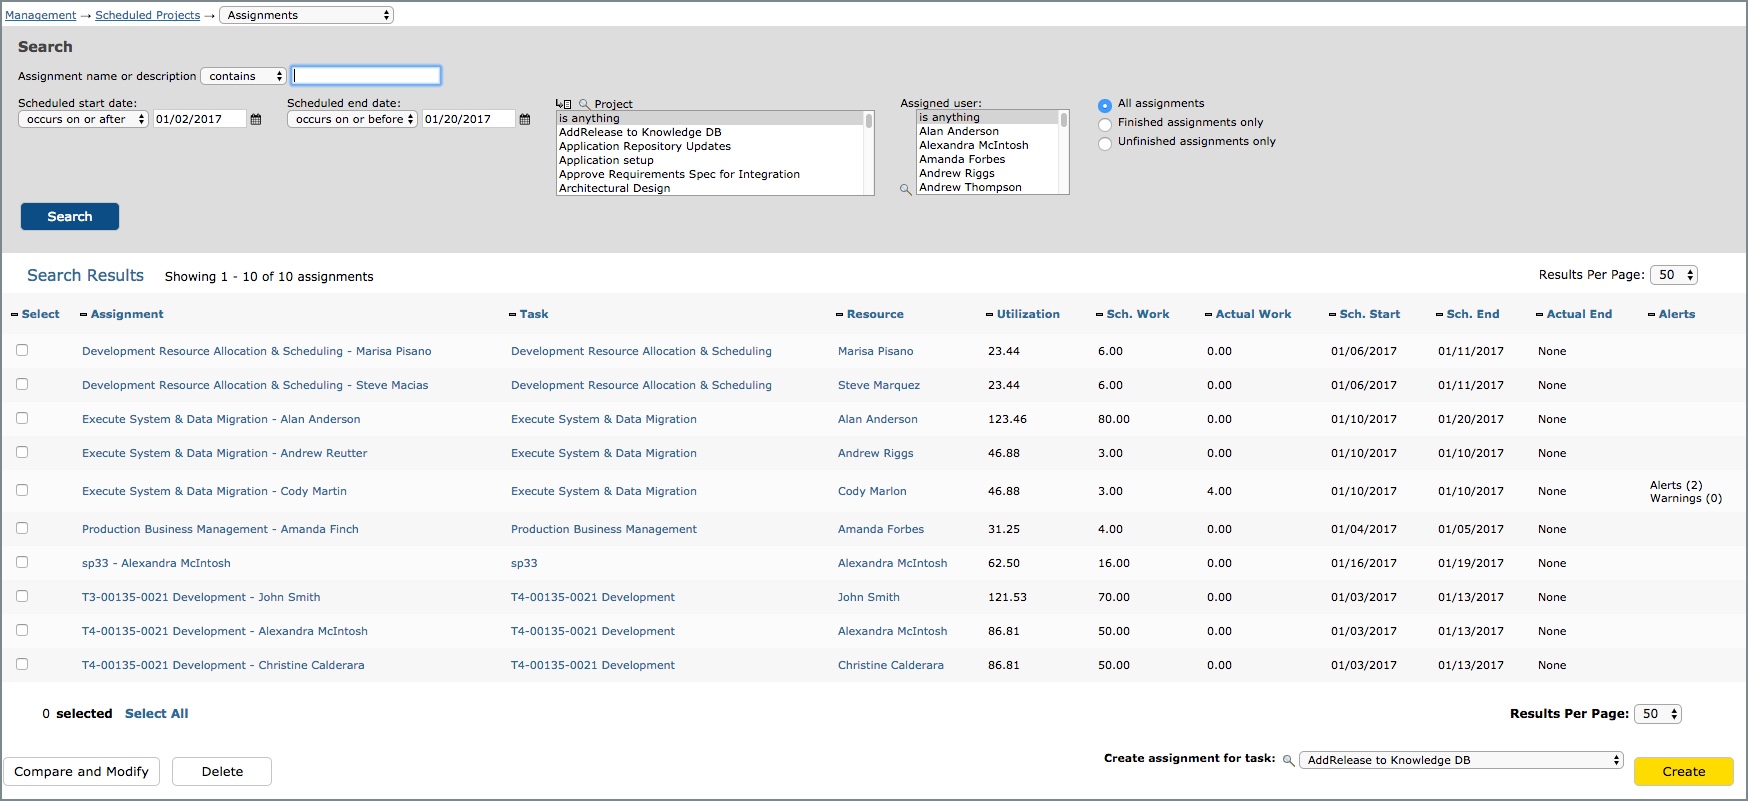
Figure 36.3.Assignment management with text-based search
results
Assignments can be created by selecting a task and user. You can then specify other assignment
details like the scheduled start and end dates, the estimate work, applicable cost/bill rates
and other custom information. To create a new assignment, select the task for which you would
like to
create the assignment and click the Create button in the lower right corner of the screen (see
figure 36.3). This will
direct you to the assignment creation screen where you can specify the attributes of the
assignment (see figure 36.5). For more information on the process of creating assignment, see
the section below for Creating Assignments
To modify an existing assignment, you must first specify the search criteria for the assignment and click the Search button (see figure 36.3). From the search results, you can click the name of the assignment under the Assignment column to modify it. You also have the option to select several assignments and click on the Compare and Modify button to view and edit them all at once. (see figure 36.3)
To delete an assignment, select the assignment to delete from the search results and click the Delete button (see figure 36.3).
You can create assignments for any scheduled project that is an "assignable task". Assignable tasks must be at the lowest level of a project tree - in other words, an assignable task has no additional tasks underneath it in the hierarchy. You can create a new assignment by either selecting a task on the Scheduled Project Management screen and clicking on the View Assignment Loads button or clicking on the Save and View Assignments button on the scheduled project/task creation screen. You can also create an assignment using the assignment management screen with text-based search results.
All assignment create options will direct you to the Assignments area, where you can specify the attributes of the assignment and assign it to a user (see figures 36.1 and 36.2). See the System Settings section of this manual for information on sending automatic email notifications for new assignments.
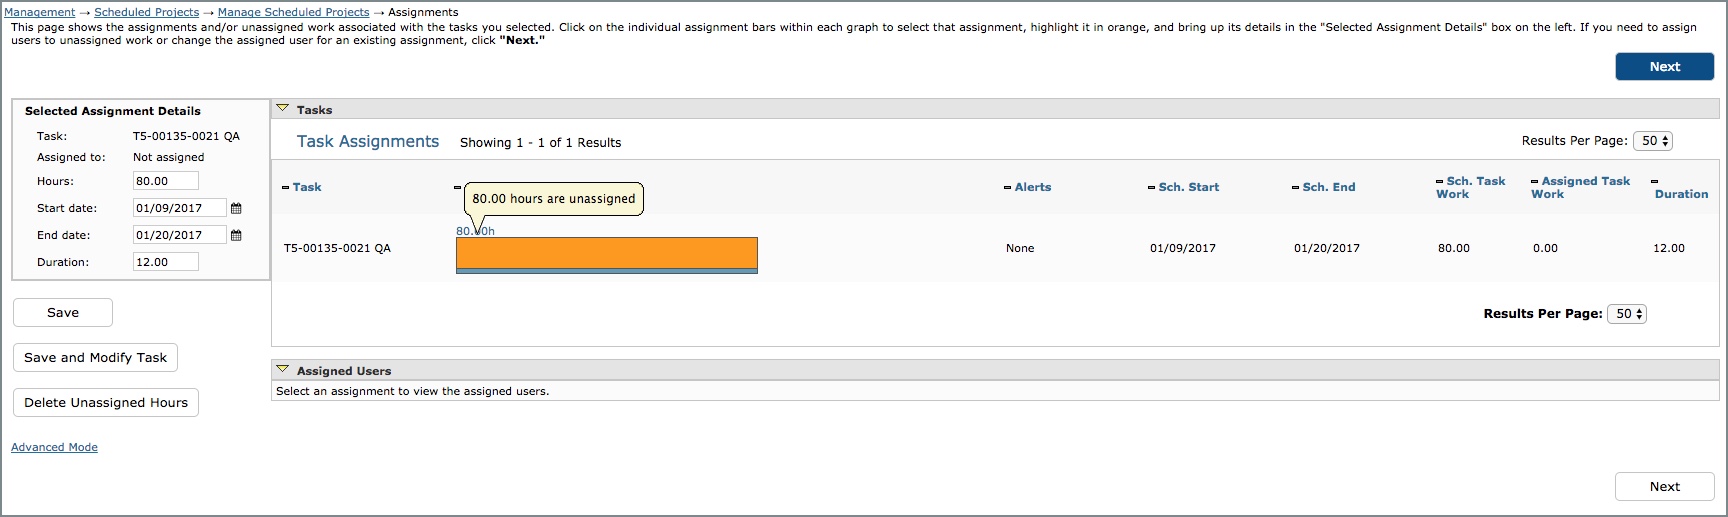
If you selected a task that has no existing assignments (all scheduled work hours are still
unassigned), the unassigned hours will be selected automatically in the Task Assignments bar
graph. The color orange indicates which portion of the bar graph is selected (see figure 36.4).

Figure 36.4.Unassigned hours for a new task selected
Also on this screen are:
After you have verified that the selected unassigned work for the task is showing the details you entered on the task creation screen, you can click on the Next button in the upper right corner to proceed to user assignment. The screen that is displayed next continues to show the Selected Assignment Details in the upper left corner. These details indicate what you will be assigning to a selected user or splitting between more than one user.
On this screen you can search for users to assign to tasks using any of the standard user search parameters.. These include by user name, assignments to other Projects/Tasks, Groups, Roles or any custom user field that includes select list options. As a result, you can set up your own attributes for use when searching for the appropriate users to assign to a specific task.
After you have selected your search parameters for filtering your user list, click on the Search
button to view your search results and the users' availability for the period of the selected
assignment. You can choose to show the "what if" scenario which shows how assigning the selected
assignment to users in the search results would affect their availability by checking the
"Project the effects of the selected assignment on user graphs in the search results." option
before clicking on the Search button. When this option is checked, the potential assignment
appears as an orange block in the user graphs (see figure 36.5). You also have the option to
include user calendar availability graphs in the search results.
Figure 36.5.Search results with potential assignment shown in user
graphs
To assign a single user to all of the unassigned work for the selected task, simply select the checkbox next to the user in the search results and click on any of the Save buttons located on the screen. The Save button under the Selected Assignment Details box and the Save User to Assignment and Start Again button at the top and bottom of search results will both save your assignment and return you to the initial Assignments screen where you can review the results of your selection and add any assignment custom field information if needed. The Save and Modify Task button will return you to the task modification screen under Scheduled Project Management where you can review the effects of your assignments on the task as a whole.
To split up a task's unassigned work evenly between 2 (or more) users, simply leave the assignment values as they are and select the users that you want to assign. When you click on any of the save options, the unassigned work will be split evenly into assignments for each of the selected users. For example, if you select 3 users for a task with unassigned work of 9 hours, 3 assignments will be created (1 for each user) with 3 hours of work for each of them. Any time you select more than 1 user for a block of unassigned time or as replacements for a user assigned to an existing assignment, the Hours value displayed in the Selected Assignment Details box will be split evenly into assignments for the selected users.
To split up a task's unassigned work into unequal assignments for more than 1 user, you must adjust the Hours value in the Selected Assignment Details box and make the assignments one at a time. For example, you have a task with 8 hours of work that you want to assign to 2 users. You want User 1 to be assigned for 2 hours of work and User 2 for 6 hours. To do this, you would set the Hours field in the Selected Assignment Details box to 2, select User 1 and click on Save. Then you select the remaining unassigned work from the Task Assignments bar graph and click on the Next button. The second time you don't have to change the Hours field in the Selected Assignment Details box because 6 hours is all that remains. Run your user search, select User 2 and click on Save. You will return to the task assignments overview where you can see that User 1 is assigned for 2 hours and User 2 for 6 hours.
There is a second option for splitting up an assignment unevenly that allows you to view all the assignment amounts on one screen. If you select all of the users whom you want to assign to the task, you can click on the Save Assignments and Modify Allocations button in the upper or lower right corner of the screen. This button will take you to the assignment modification screen with all of your assigned users lined up side by side. You can then adjust the scheduled work for each user while viewing the other assignment amounts.
You can use the same screens for editing assignments that you used to create them, or you can go to Management-->Scheduled Projects-->Assignments to edit them using the text-based search results method. When using the graphical view for editing assignments, you can edit an assignment by either selecting a task on the Scheduled Project Management screen and clicking on the View Assignment Loads button or clicking on the Save and View Assignments button on the scheduled project/task modification screen.
Both buttons will direct you to the Assignments area, where you can edit the attributes of the assignment or reassign it to a different user or users (see figures 36.1 and 36.2). See the System Settings section of this manual for information on sending automatic email notifications for modified and/or deleted assignments.
If you selected multiple tasks or a task with multiple assignments, you will need to choose a
specific assignment to edit on the Assignments screen. To select an assignment for editing,
click on the specific block of the Task Assignments bar graph that corresponds to the
assignment. You can mouse over each block to see more details. Once you have clicked on a block,
the color orange indicates which portion of the bar graph is selected (see figure 36.6).

Figure 36.6.A specific assignment is selected for editing
Also on this screen are:
After you have verified that the details displayed match the selected assignment, you can go to the Selected Assignment Details box to make schedule adjustments to the assignment. When you have finished making schedule changes, you can click on Save to review the effects of those changes. You also have the option of removing the assignment from the current user by clicking on the Delete Selected Assignment button. This will return the deleted assignment hours to the unassigned work bucket for the task. You can then come back later and assign those hours to someone else in the same way you created the original assignment, or you can go on to delete the unassigned hours by clicking on the Delete Unassigned Hours button. Deleting the unassigned hours reduces the scheduled work for the task by the same amount and leaves the task work fully assigned or planned unless you have the "Retain task scheduled work amount" option turned on. If you do opt to retain the original task scheduled work amount, reducing an assignment amount will put the deleted hours back in the unassigned work bucket for the task. The "Retain task scheduled work amount" option allows you to maintain the original task scheduled work even if you reduce or change existing assignment scheduled work amounts.
If you need to swap out users or add users to an assignment, you can click on the Next button in the upper right corner to proceed to user assignment. The screen that is displayed next continues to show the Selected Assignment Details in the upper left corner. These details indicate what you will be reassigning to a selected user or splitting between the current assignee and another user or users.
On this screen you can search for users to assign to tasks using any of the standard user search parameters. These include by user name, assignments to other Projects/Tasks, Groups, Roles or any custom user field that includes select list options. As a result, you can set up your own attributes for use when searching for the appropriate users to assign to a specific task.
After you have selected your search parameters for filtering your user list, click on the Search button to view your search results and the users' availability for the period of the selected assignment. You can also choose to show the "what if" scenario which shows how assigning the selected assignment to users in the search results would affect their availability by checking the "Project the effects of the selected assignment on user graphs in the search results." option before clicking on the Search button. When this option is checked, the potential assignment appears as an orange block in the user graphs (see figure 36.5).
When you select a user from the search results to add to an assignment that already has another user assigned to it, the original user will always be removed in favor of the new user. Therefore, all you need to do to swap out users on an existing assignment is select the checkbox next to the new user and click on any of the Save buttons located on the screen. The Save button under the Selected Assignment Details box and the Save User to Assignment and Start Again button at the top and bottom of search results will both save your assignment changes and return you to the initial Assignments screen where you can review the results of your selection. You will see that the original assignment was reassigned to the new user. The Save and Modify Task button will return you to the task modification screen under Scheduled Project Management where you can review the effects of your assignments on the task as a whole.
In the event that you need to add users to an existing assignment to assist those who are already working on the task, you can select more than one user from the search results to save to an existing assignment. Technically you will be removing the originally assigned user and splitting up the unassigned time between new users. As a result, you must select the currently assigned user along with any users you want to add in order to split the assignment between the original assignee and new users. If you are splitting the assignment up evenly between users, you can select your users at the same time and click on Save. If you are splitting up the time unevenly, you can make the assignments in multiple steps or use the Save Assignments and Modify Allocations button to adjust amounts on the assignment modification screen. See the sections on splitting assignments up evenly and unevenly under Creating Assignments for detailed instructions.
Bar graphs displayed in the assigned users panel and user search results on the Assignments screens provide a visual means for comparing user availability for a given task or assignment period. These graphs allow you to determine who has time available or will have to work the least amount of overtime to complete a proposed assignment. In addition to showing the results of a new assignment on a user's schedule, the Assignments screens also allow you to project a potential assignment on to user schedules for review before making an assignment.
The different color blocks that make up the bar graphs represent different types of time
scheduled (see figure 36.7):
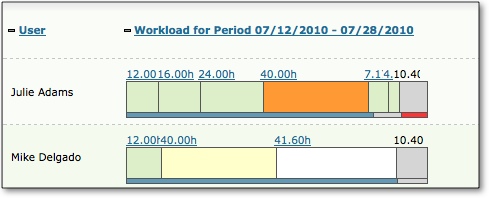
Figure 36.7.User Workload Bar Graph
Availability Calendar graphs displayed in the user search results provide a visual means for finding specific periods of full or partial availability. These graphs allow you to determine on what dates a user has time available for project work - and how much time is available on a given day.
The number scale on the left side of the bar shows the number of hours with the green bar height
determining how many hours are assigned on a specific date. The numbers across the top of the
bar represent the dates included in the period you defined when setting search parameters. The
green bar shows project assignment time. The gray bar shows holiday or leave time that makes the
user unavailable (see figure 37.8). Hovering over any of the bars provides detailed information
on how much time is blocked off.
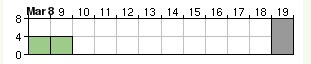
Figure 36.8.User Availability Calendar
By default, Journyx limits you to one assignment per user/task combination. So, User A can only be assigned to Task B one time. This allows the system to associate the time User A enters against Task B with the correct assignment. It also provides the system with a way to associate your assignment custom field information (e.g., Assignment Bill Rate) with the correct time/work entered. When using this "single assignment" mode, users are not required to enter their time within the scheduled start and end dates of the assignment. If they start early or run late, they can still enter the time. Alerts will be generated to indicate that the actual work occurred outside of the scheduled dates. As was mentioned above, all time logged against a scheduled task must have an assignment. In the event a user logs time against a scheduled task without an assignment, the system will automatically generate an assignment for the user/task combination.
Journyx does offer an option to create multiple assignments for the same user/task combination. If you would like to enable this option, please contact Journyx Support for more information. When using the "multi-assignment" mode, the system has to choose between more than one assignment when determining how to associate time entered with the correct assignment. The system does this by comparing the dates of the time entries to the scheduled dates of the assignments. As a result, users are required to enter time within the scheduled dates of the assignment in order to ensure the time is accounted for correctly. When in multi-assignment mode, users will not be allowed to save time entries that fall outside of the assignment dates.