The System Information page displays the basic specifications
of your Journyx installation (see figure 8.1). On this
page
you can see the
current version of the product along with the expiration date and the current
date. You can also view the total number of users the license allows, how many
users are presently logged in, and how many users are presently active in the
system. An active user is one that is counted against the license.
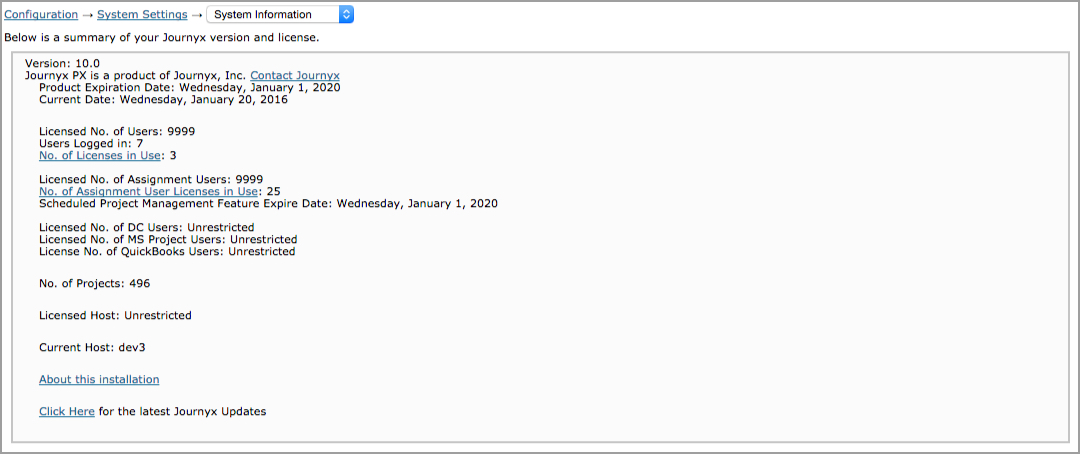
Figure 8.1. System Information
If Journyx
modules were purchased, you will be able to view how many user licenses you have
for Disconnected Users, Projectlink, and Accountlink. These modules are all sold
separately.
This page also includes the number of projects in the system,
the current host server, and licensed host server.
At the bottom of the
System Information page, the link labeled 'About this installation' will take
you to a page containing additional information about the installation as well
as the contact information for Journyx (see figure 8.2).
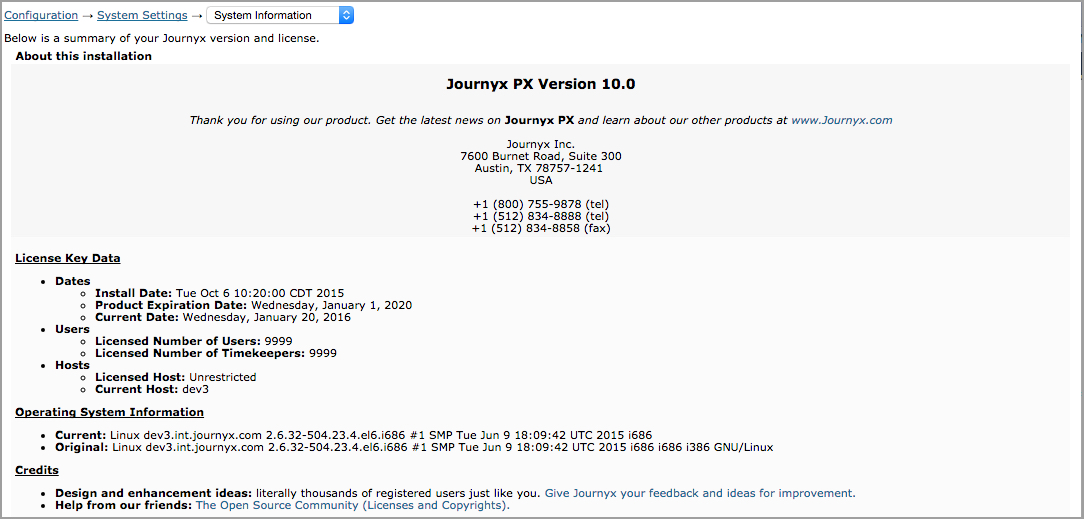
Figure 8.2. About this installation
This page
includes detailed information about the license key data such as the install date,
product expiration date, the current date, total licensed users, total licensed
users who can have the Timekeeping role, the licensed host server, and the current
host server. You can also view and compare the current operating system with the
operating system upon initial install of Journyx. The
Credits
section contains
links to the Journyx website form for requesting new product features, as well
as access to open source licenses and copyrights related to Journyx products.
Entry Sheet Settings allow you to configure preferences
for users' timesheets, expense sheets and custom entry sheets. This section is comprised
of Global Settings, Timesheet Settings, Custom Sheet Settings, and Expense Sheet
Settings. Global Settings contain preferences that will affect all users' timesheets,
custom entry sheets, and expense sheets.
Global Settings
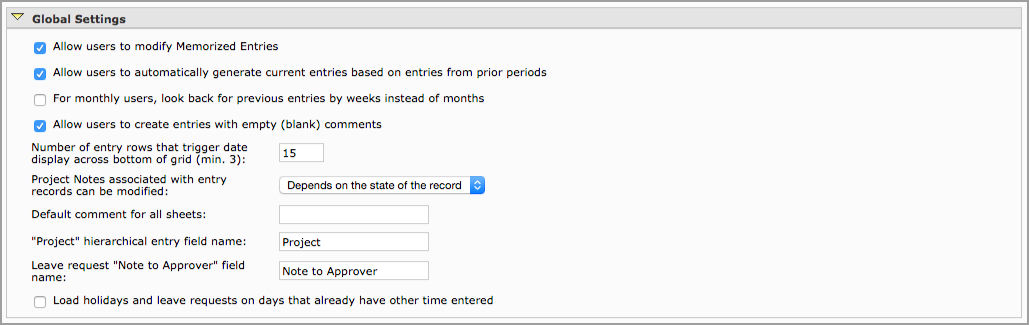
Figure 8.3. Global Settings
Allow
users to modify Memorized Entries
This option allows users to modify
memorized entries that have been assigned to them by managers or administrators.
Allow
users to automatically generate current entries based on entries from prior
periods
Users
may work on certain short-term projects over the duration of several periods.
This option will allow users to automatically create current entries from project
tasks that were logged during prior periods. These are not 'permanent' Memorized
Entries. An entry will cease to be carried over to a future period when it goes
unused in the current period.
For monthly users, look back for prior period entries by weeks instead of months
This option is related to the previous option that will allow users to automatically
create current entries from time entries that were logged during prior periods. Users
have the option to pull current entries from up to 4 periods in the past. However, this
option allows users assigned to monthly time periods to set the look back period for
weeks instead of periods because of the length of the assigned monthly period.
Allow users to create entries with
empty (blank) comments
This option does not force users of the system
to specify a comment for each time entry, expense entry, or custom entry. If
comments for each entry are not critical to your organization, you should check
this option.
Number of entry rows that trigger date display across bottom
of grid (min. 3)
This option allows you to specify the minimum number
of entries in a user's sheet that will trigger the date to be shown at the bottom
of the sheet. Dates are already shown by default at the top of all entry screens.
However, when users have a significant number of entries in their sheets, they
tend to lose sight of the dates when scrolling down. Setting the dates to display
at the foot of the sheet allows users to see the dates associated with each entry
field.
Project Notes associated with entry records can be modified
This option allows you to decide when project notes can be modified. 'Always'
will allow the note to be modifiable regardless of the state of the record or
sheet. 'Never' will never allow the note to be modified once created. 'Depends
on the state of the record' will only allow the note to be modified when the record
is in particular states. For this last option, if the record is in a status of
'open', 'rejected' or 'submitted', the project note can be modified. If the record
is in a status of 'approved', the project note will not be modifiable.
Default
comment for all sheets
This option allows you to specify a default comment
that will appear on every entry of users' timesheets. expense sheets, and custom entry
sheets. Users will still have the ability to modify the comment.
"Project"
hierarchical entry field name
'Project' is the default name suggested
for this hierarchical tracking field. You may specify a different name for the
Project field. The new name will be displayed in place of Project on users' timesheets,
expense sheets, and custom entry sheets.
Leave request "Note to Approver" field name
This field is specific to each leave request and is independent from the leave entry
that is loaded into the user's time entry screen. This field is intended for use when
someone requesting leave needs to add some explanation for the approver. However, you
can rename the field if you wish to use it for another purpose. This field is visible on
leave request management screens for each request.
Load holidays and leave requests on days that already have other time
entered
By default, the system will not load holidays and leave requests on days where the user
has already entered time. If your company allows for partial days off or holiday and
regular work time on the same day, you can turn this setting on to allow holidays and
leave requests to load on days with time logged already.
Timesheet Settings
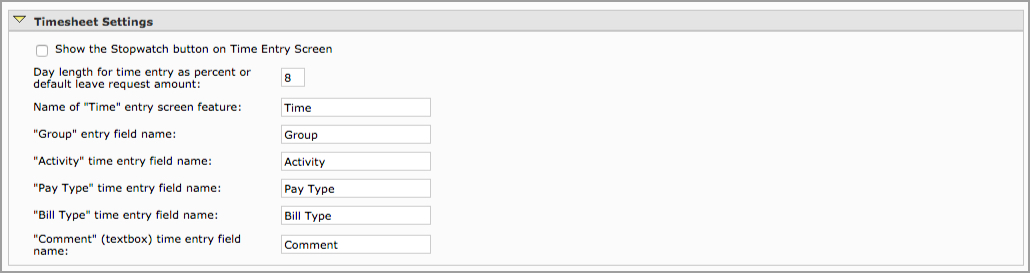
Figure 8.4. Timesheet Settings
Show the Stopwatch button on the time entry screen
This option
will display the Stopwatch button on users' timesheets which they can click to
track the commencement and completion of a task.
Length of workday for
time entry as percent or default leave request amount
This option allows you
to define your company's
work day and is designed for users that are entering their time as a percentage
of the work day on their timesheets. Hence, if the work day for your organization
is defined as 10 hours and a user works 5 hours on a project, he/she would input
50% for that entry in his/her timesheet. This setting is also used to determine the
default number of hours shown when a user creates a new leave request. The system
defaults to 8 hours unless this setting specifies otherwise. The user still has the
option to change the default number of hours to a different amount when creating a leave
request.
Name of "Time" entry screen feature
'Time' is the default name for
this entry screen and menu item. However, you can rename the time entry screen here to
reflect the way your organization uses this screen.
"Group" time entry field name
'Group' is the default name suggested for this tracking field that may be
included in timesheets. You may specify a different name for the Group field.
The new name will be displayed in place of 'Group' on users' timesheets when they
track time for projects.
"Activity" time entry field name
'Activity'
is the default name suggested for this tracking field that may be included in
timesheets. You may specify a different name for the Activity field. The new name
will be displayed in place of 'Activity' on users' timesheets when they track time
for projects.
"Pay Type" time entry field name
'Pay Type'
is the default name suggested for this tracking field that may be included in
timesheets. You may specify a different name for the Pay Type field. The new name
will be displayed in place of 'Pay Type' on users' timesheets when they track
time for projects.
"Bill Type" time entry field name
'Bill
Type' is the default name suggested for this tracking field that may be included
in timesheets. You may specify a different name for the Bill Type field. The new
name will be displayed in place of 'Bill Type' on users' timesheets when they
track time for projects.
"Comment" time entry field name
'Comment'
is the default name suggested for the select list on timesheets. You may specify a
different name for the Comment field. The new name will be displayed in place
of 'Comment' on users' timesheets when they track time for projects.
Expense Sheet Settings

Figure 8.5. Expense Sheet Settings
Name of "Expense" entry screen feature
'Expense' is the default
name for this entry screen and menu item. However, you can rename the expense entry
screen here to reflect the way your organization uses this screen.
"Expense Code" expense entry field name
'Expense Code' is the
default name suggested for this tracking field that may be included in expense
sheets. You may specify a different name for the 'Expense Code' field. The new
name will be displayed in place of 'Expense Code' on users' expense sheets when
they track expenses for projects. NOTE: Some values in the Expense Code field may be
tied to the Mileage Conversions feature for this entry screen. Please see Mileage Conversions for more
information.
"Source" expense entry field name
'Source' is the default name suggested for this tracking field that may be
included in expense sheets. You may specify a different name for the 'Source'
field. The new name will be displayed in place of 'Source' on users' expense sheets
when they track expenses for projects.
"Currency" expense entry field
name
'Currency' is the default name suggested for this tracking field
that may be included in expense sheets. You may specify a different name for the
Currency field. The new name will be displayed in place of 'Currency' on users'
expense sheets when they track expenses for projects. NOTE: The Currency field is tied
to the Conversions feature for this entry screen. Please see Currency Conversions for more
information.
"Comment" expense
entry field name
'Comment' is the default name suggested for the select list
on expense sheets. You may specify a different name for the Comment field. The
new name will be displayed in place of 'Comment' on users' expense sheets when
they track expenses for projects.
Custom Sheet Settings

Figure 8.6. Custom Sheet Settings
Name of "Custom" entry screen feature
'Custom' is the place holder
name for this entry screen and menu item. If you choose to use the custom entry screen
for tracking additional information, you can rename the custom entry screen here to
reflect the way your organization uses this screen.
"Location" custom entry field name
'Location' is the default
name suggested for this tracking field that may be included in custom entry sheets.
You may specify a different name for the Location field. The new name will
be displayed in place of 'Location' on users' custom entry sheets when they track
custom entries for projects.
"Item" custom entry field name
'Item'
is the default name suggested for this tracking field that may be included in
custom entry sheets. You may specify a different name for the Item field. The new
name will be displayed in place of 'Item' on users' custom entry sheets when they
track custom entries for projects.
"Unit" expense entry field name
'Unit' is the default name suggested for this tracking field that may be included
in custom entry sheets. You may specify a different name for the Unit field. The
new name will be displayed in place of 'Unit' on users' custom entry sheets when
they track custom entries for projects. NOTE: The Unit field is tied to the Conversions
feature for this entry screen. Please see
Custom Conversions
for more information.
"Comment" expense entry field name
'Comment' is the default name suggested for the select list on custom entry sheets.
You may specify a different name for the Comment field. The new name will be displayed
in place of 'Comment' on users' custom entry sheets when they track custom entries for
projects.
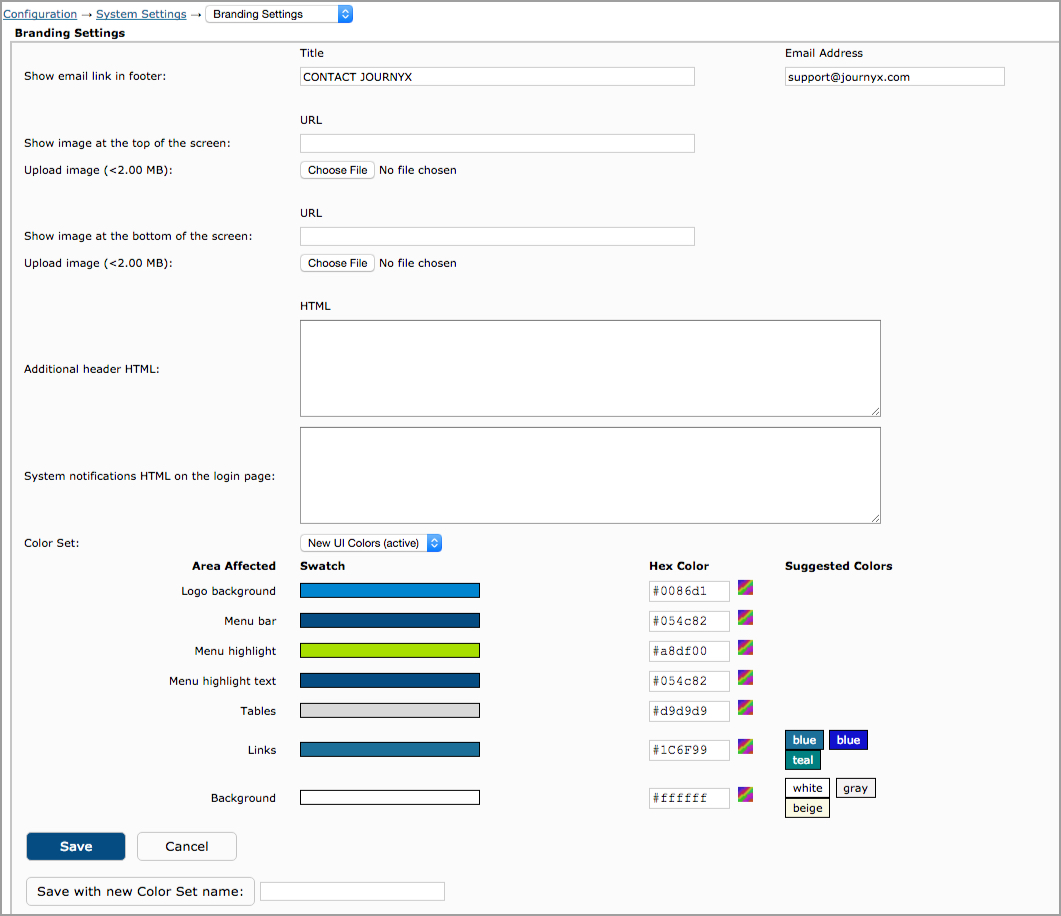
Figure 8.7. Branding Settings
Show email link in footer
This option allows you to display an email
address at the bottom of all pages that users can click on, launching their default
email system such as Outlook or Outlook Express. Typically, organizations prefer
to use the custom email link to allow users to contact the system administrator.
The link title is the text that will be displayed as a link. The default title
that will be shown to users is 'Comments to author: Time@journyx.com'. The email
address is the actual recipient to whom the email will be sent. This must be a
full and valid email address. The default email address is time@journyx.com. You
can specify a different email address for the recipient in the Email Address select list.
Show
image at the top of the screen
This option allows you to display an
image at the top of all pages. The image must be in GIF or JPEG format. You must
specify the URL address where the image is located, or you can upload an image file
using
the Choose File button. If you enter the URL for the image, the address must be a
complete
URL and needs to include the scheme name 'http://'. Additionally, this value must
not be a UNC path as used by some Windows environments. You must also specify
the pixel dimensions of the image in the Height and Width select lists. It is best
that you specify the exact dimensions of the image itself to avoid any distortion.
Alternatively, you may specify a dimension of '0' to use the image's default size.
If the actual image display is too large or too small when displayed on the pages,
it is best that you resize the original image using photo-editing software.
Show
image at the bottom of the screen
This option allows you to display
an image at the bottom of all pages. The image must be in GIF or JPEG format.
You must specify the URL address where the image is located, or you can upload an image
file
using the Choose File button. If you enter the URL for the image, the address must
be a complete URL and needs to include the scheme name 'http://'. Additionally,
this value must not be a UNC path as used by some Windows environments. You must
also specify the pixel dimensions of the image in the Height and Width select list.
It is best that you specify the exact dimensions of the image itself to avoid
any distortion. Alternatively, you may specify a dimension of '0' to use the image's
default size. If the actual image display is too large or too small when displayed
on the pages, it is best that you resize the original image using photo-editing
software.
Additional header HTML
This option allows you to
place custom HTML at the top of every page. This is an advanced feature that could
potentially affect the layout or functionality within the page. This field accepts
up to 250 characters worth of plain text and HTML tags.
Additional HTML on login page
This option allows
you to place custom HTML on the login page. This is an advanced feature that could
potentially affect the layout or functionality of the login page.
Color
set
You can select from one of the pre-defined color sets that uses
complimentary colors to define the graphical layout of the pages. After selecting
a pre-defined color set, you can see the assigned colors for the various areas
that will be visually affected. After selecting a pre-defined color set, you can
click the Activate button to change the layout of all the pages. Alternatively,
you can create your own color set by assigning colors to the various affected
areas. Clicking the Color Grid icon located to the right of the hex values will
load a color swatch from which you can select a color for that specific area.
When finished selecting colors or assigning hex values to the areas affected,
specify a name for the color set and click the Save with New Name button.
This will change the layout of all the pages to the colors that you specified.
Also, the name of the color set that you created will be displayed in the Color
Set select list.
Screen Appearance Settings
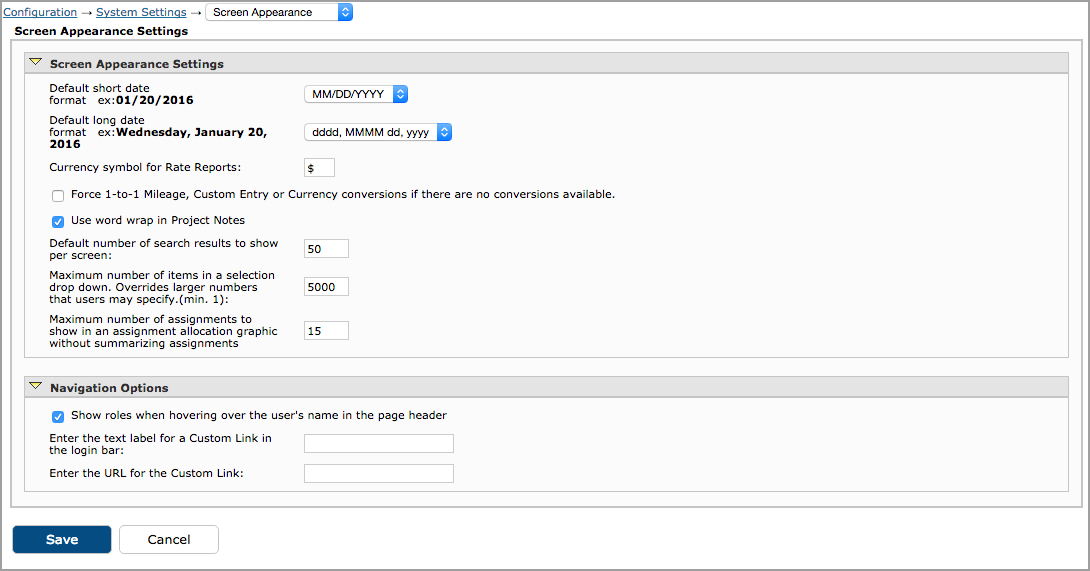
Figure 8.8. Screen Appearance Settings
Default short date format
This option determines the short date
format that will be displayed throughout the application. 'MM' is the 2-digit
month, 'DD' is the 2-digit date, and 'YYYY' is a 4-digit year. The default it
MM/DD/YYYY.
Default long date format
This option determines
the long date format that will be displayed throughout the application. The long
day format will spell out the month and day. 'dddd' is the day of the week, 'MMMM'
is the month, 'dd' is the 2-digit date, and 'yyyy' is a 4-digit year. For example,
the long day format of 'dddd, MMMM dd, yyyy' will display 'Tuesday, January, 14,
2005'.
Currency symbol for Rate Reports
This option allows
you to specify which currency symbol (£, ¥, $) will be used in the Rate
Reports generated by the Rate Rules & Policies module. The default value for
this option is $. To change this option, you will need to use either the HTML
standard script ('Pound' = £ 'Yen' = ¥) or Windows character
map to copy and paste the desired symbol into this field.
Force 1-to-1
Mileage, Custom or Currency conversions if there are no conversions
available
This option allows you to run expense and custom reports with conversions when not
all of entries have active conversions applied to them. When an entry is not
subject to a conversion rate, the original amount of the entry is shown.
Use word wrap
in Project Notes
This option will wrap text when users input Project
Notes directly or via Entry Field Notes from entry sheets themselves. You may
want to disable this setting if you plan to copy and paste code that will not
display properly with word wrap in Project Notes.
Default number of
search results to show per screen
This option determines the default
number of search results to display on a single page at a time. This number of
search results will be applied to all screens that contain search results. The
user will still have the ability to modify and override the number of results
to be shown on a page.
Maximum number of items in a selection select list.
Overrides larger numbers that users may specify (min. 1)
This option
allows you to set the maximum number of items that can be displayed within the
select lists in users' timesheets, expense sheets, and custom entry sheets.
Performance
and load time can be significantly affected by this setting. Users have the ability
to specify this value within their individual Preferences section. However, if
the user-specified value is larger, this administrative setting will override
the user-specified value.
Maximum number of assignments to show in an
assignment allocation graphic without summarizing assignments
This option
allows
you to add text summaries of assignments to the allocation bar graphs on assignment
management screens when the number of assignments reaches your defined threshold.
This
is
helpful when a task includes so many assignments that it is difficult to click on an
individual assignment in its bar graph.
Navigation Options
Show roles when hovering over the user's name in the page header
This option will display the respective roles that have been assigned to each user as a
tooltip on the user's name in the page header.
Enter the text label for a Custom Link in the login bar/Enter the URL for the
Custom
Link
This option allows you to create a Custom Link that will be displayed in the users'
login bar and will allow them to link to the designated site. The link title is the
text
that will be displayed for the link from the login bar. The URL is the actual
website
address where the users will be directed. Typically, organizations prefer to use the
Custom Link for company intranets, corporate websites, or debugging and reporting to
web-based third-party products.
Approval Workflow Settings

Figure 8.10.1. Approval Workflow Settings
Require users to confirm submission
of sheet for approval
This option will require users to undergo an
additional
confirmation step via a pop-up window when attempting to submit a sheet for
approval.
Force approvers to view sheets before approving or rejecting them
This option will require approvers to click on the period link for sheets
awaiting approval under the Approvals tab and require the approver to view the sheet
prior to approving or rejecting it.
When sheets are in multiple approval plans, require approval by all approvers
on each level prior to proceeding to next level
If a user's sheet is
assigned to multiple Approval Plans, this option will require approval at each
tier within each Approval Plan before proceeding onward to the next tier of
approvers.
Hence, all primary approvers must first approve the sheet before it can proceed
to the secondary approvers, and so forth.
When sheet is rejected, restart approval process from the first approver
If
a sheet is rejected at any level in the period approval process, this option will
force
the sheet to begin the approval process over again with the first approver.
Allow users to submit timesheets from the Journyx mobile app
This setting allows you to control whether or not mobile app users are allowed to
submit
timesheets for approval from the mobile app. If your policies require additional
validation checks only available in a browser, you can disable this setting so that
timesheets can only be submitted from a browser.
Use interim approvals
This setting allows you to offer the option to submit work in progress, in addition to
the full sheet submission process covered by time approvals. When this is enabled, you
will be able to add a button labeled Submit Work in Progress to specific time entry
screens that will allow users assigned to those screens to submit a partial timesheet
before the timesheet is complete and submitted at the end of the period. The time
approval plans that apply to timesheet submission at the end of the period (approvers,
levels of approval, email notifications) also apply to interim approvals. After you have
enabled this setting, you will need to add this setting to specific time entry screens
under Configuration-->Entry Screens-->Time Entry Screens. Then you can assign
these time entry screens to individual users who need interim approvals under
Management-->Users-->Manage Users.
For interim approvals, only submit to current date
This setting limits the interim approvals feature above to time records on a sheet
through the current date when a user submits work in progress. If this setting is
enabled, new time entries through the current date will be interim submitted when the
user submits work in progress. If this is not turned on any interim submission will
include all time records on a sheet, including those logged on future dates (e.g.,
holiday time loaded but not yet taken for the end of the week).
Audit Trail Settings

Figure 8.10.2. Audit Trail Settings
Level of auditing required when users make changes to existing entries
This option determines what happens to an existing entry on a user's Time, Expense,
or
Custom entry when a change is made. There are five levels available:
Level 1 - changes to existing records will not be tracked. Changes on a sheet will
change the record in the database, retaining only the timestamp and user ID for the
last
modification.
Level 2 - changes will be tracked only after a sheet has been submitted. If a sheet
has
ever been submitted for approval (regardless of its current state), any change to an
existing row on a user's sheet will cause one or more new corrective records to be
created, rather than modifying an existing record in the database.
Level 3 - similar to level 2, in that corrections are enforced only after a sheet
has
been submitted. For level 3, however, an existing entry cannot be modified at all
without an additional correction note being added to the entry. Correction notes are
similar to diary notes, and each change requires such a note.
Level 4 - like level 2, but corrections are made any time a record is changed.
Level 5 - like level 3, but correction notes are required at all times when records
are
changed.
For more information on corrective records, see Time Entry Corrections.
Show the Commit button on reports
This
option determines whether or not individual records can be approved or "committed"
in
reports outside of a workflow approval process. Showing the Commit button in reports
is
not recommended if you use Period or Project Approval Plans.
Prior
period corrections to approved sheets should:
The 'force resubmission
for approval' option will cause the system to require that any corrections go
back through the approval process. The 'be added as approved entries' option will
cause the system to automatically add the corrections as approved records, with
no requirement for the sheet to go back through the approval process. The 'not
be allowed" option will cause the system to disallow corrective entries to
approved sheets altogether. Both 'allowed' versions of this feature include tracking
who makes corrections and when in the Sheet History system notes.
Approval Email Settings

Figure 8.11. Approval Email Settings
Activate approval emails and send daily at a particular time
This option sets the time for sending out automatically generated emails related
to Approval Plans. The contents of the emails are managed as part of the Approval
Plan. Please see the Approval Plans section of this manual for more information
on automated email notifications.
Compile all backup and approver late notices into
a single email
Instead of receiving an email notification for each user
who is late submitting timesheets, this option compiles all notifications into
a single email, which is then submitted to the respective approver(s) or backup
approver(s).
Do not process notification emails for sheets before
a particular date
This date is the historical cutoff date for automated
emails related to Approval Plans. The system will not send emails regarding any
sheet that covers a period before this date. The default value for this field
is August 18, 1972. Keep in mind that this setting only applies to 'cron' emails.
In other words, this setting only applies to approval emails that are triggered
by a chronological limit. For example, if a user is x number of days late submitting
his sheet for approval. Action-based emails are unaffected by this setting because
they are always triggered and sent when a specific action has been committed.
Automatically
generate sheets for users to trigger late email notifications
Approval
Plan reminders can only be automatically generated if the user has an existing
sheet for the period. If for whatever reason a user has not created a sheet (i.e.,
he/she hasn't logged in during the period), the user will not receive any reminder
emails. By checking this option, the system will automatically create a sheet
for the current period so that Approval Plan email reminders can be sent to the
user if he/she has not fully completed the sheet.
Approval email format
This option determines the format of the automatically generated emails related
to Approval Plans. You can select either text format or HTML format.
URL
for links inside approval emails
This option allows you to specify a
URL for users who require access to the system through any special gateway.
Email Server Settings

Figure 8.12. Email Server Settings
Outgoing email server type
This is where you select the type of connection used by your mail server.
You can obtain this information from your IT staff or email server
administrator. Your choices are:
- SMTP - Unsecured classic SMTP: usually port 25
- SMTP over SSL - SSL (Secure Socket Layer): usually port 465
- SMTP over TLS - TLS (Transport Layer Security): usually port 587. Also
called
"STARTTLS"
If you use SSL or TLS you may also need to set an account name, password
and/or client certificate and key files depending on the mail server's
settings.
We recommend using either SSL or TLS for maximum security. If you're
using classic (unsecured) SMTP please be aware that any passwords and
email text will be transmitted in plaintext and can be intercepted. If
your server requires passwords you should use SSL or TLS if
available. When you select a choice from this menu the suggested port
will be automatically filled in for you but you can override the port.
SMTP (outgoing) email server
This is the hostname or IP address of the server that the system will use
for automated email notifications. There must be a valid server specified
in order for automated email notifications to work properly.
SMTP (outgoing) email server port
This is the port number for the outgoing email server. Find this from
your IT staff or email server administrator. Typical port settings
are:
- SMTP: usually port 25
- SMTP over SSL: usually port 465
- SMTP over TSL: usually port 587
Account name for outgoing mail server, if any
This is the account name used to authenticate to the outgoing email
server. Some servers require a username/password to send mail. If your
server requires a username/password it is recommended to use either SSL
or TLS encryption if available.
Account password for outgoing mail server, if any
This is the account password used to authenticate to the outgoing email
server. Some servers require a username/password to send mail. If your
server requires a username/password it is recommended to use either SSL
or TLS encryption if available.
Server path to private key for outgoing mail server if required:
If your mail server requires a private key to authenticate, you can put
the path to the key file here. This setting should be blank if your
server doesn't use key files. If set this must be the complete path to a
file on the server readable by the web user. If you're not sure where to
put the file you can put it in the installation directory ($WTHOME).
Server path to private certificate for outgoing mail server if required:
If your mail server requires a private key certificate to authenticate,
you can put the path to the certificate file here. This setting should be
blank if your server doesn't use certificate files. If set this must be
the complete path to a file on the server readable by the web user. If
you're not sure where to put the file you can put it in the installation
directory ($WTHOME).
'From' address for email sent by the system
This address will appear as the
'From' address when recipients view emails sent by the system.
Number of seconds to wait before giving up on a mail server connection
This is the maximum amount of time, in seconds, that the system will wait
for a response from the mail server before timing out. You may set this
option to '0' to force the system never to timeout when waiting on a
response from the SMTP server. The default value for this option is 30
seconds.
Rules and Policies Settings

Figure 8.13.1. Rules and Policies Settings
Maximum number of rules that can be in a policy
This option determines how many rules can be included in a single policy under
Configuration-->Policies. The maximum number the system allows is 30.
When applying policy rules to timesheet, use in-out times if available.
This option determines if rate rules should take in/out times into account when
applying a rule.
Allow filtering for a subset of records when applying policy rule.
This option determines if rate rules should include the option to apply filters to
a subset of records. Please consult Journyx Professional Services for more
information on this option.
Miscellaneous
Settings

Figure 8.13.2. Miscellaneous Email and Server Settings
Fully qualified domain name of the server
This is the actual
domain name of the system server. The name is required by the MSP Sync utility
and other SOAP interface functionality. If the system is unable to determine this
value, you may be asked by the Journyx Professional Services Team to modify the
value. Otherwise it is recommended that you do not modify this value.
Preferred email format
This setting determines the format of emails
sent by
the Journyx system. The format choices are text, HTML or both. The text option
always
sends emails in plain text format. The HTML option always sends emails in HTML
format,
and the 'Both' option sends both formats and the user's mail reader shows the
preferred
version. We recommend using the 'Both' option as this allows the user to decide
which
format is preferred.
Alternate prefix for links inside email notifications
This option
provides
a method for customizing links back to the system that can be included in emails.
This
setting can be used to show a URL with a redirect to the Journyx server. If you set
this, it must contain a complete URL with protocol (http:// or https://) and port
number
(if not using port 80) for the link to work.
Number of remaining license seats under which a warning message is generated on
management screens
This option determines when administrators will see
notices
on management screens that warn you when you are close to using all of your license
seats.
Test Outgoing Email Settings
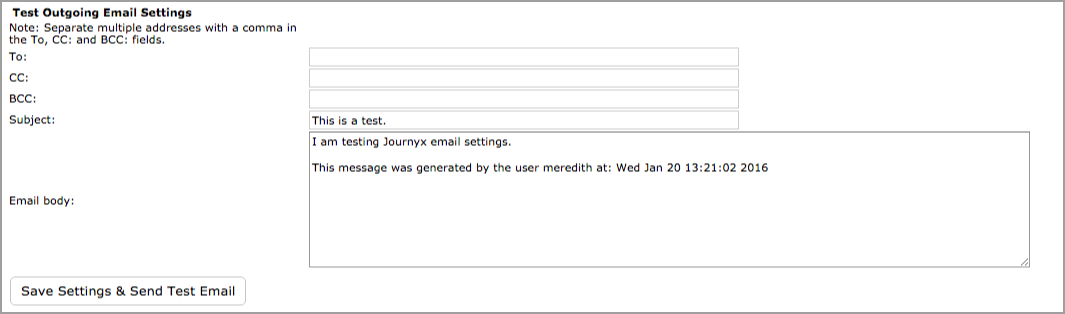
Figure 8.13b. Test Outgoing Email Settings
This feature allows you test your email settings and confirm that you have the
Journyx
system set up properly for handling email notifications.
Leave Request Settings
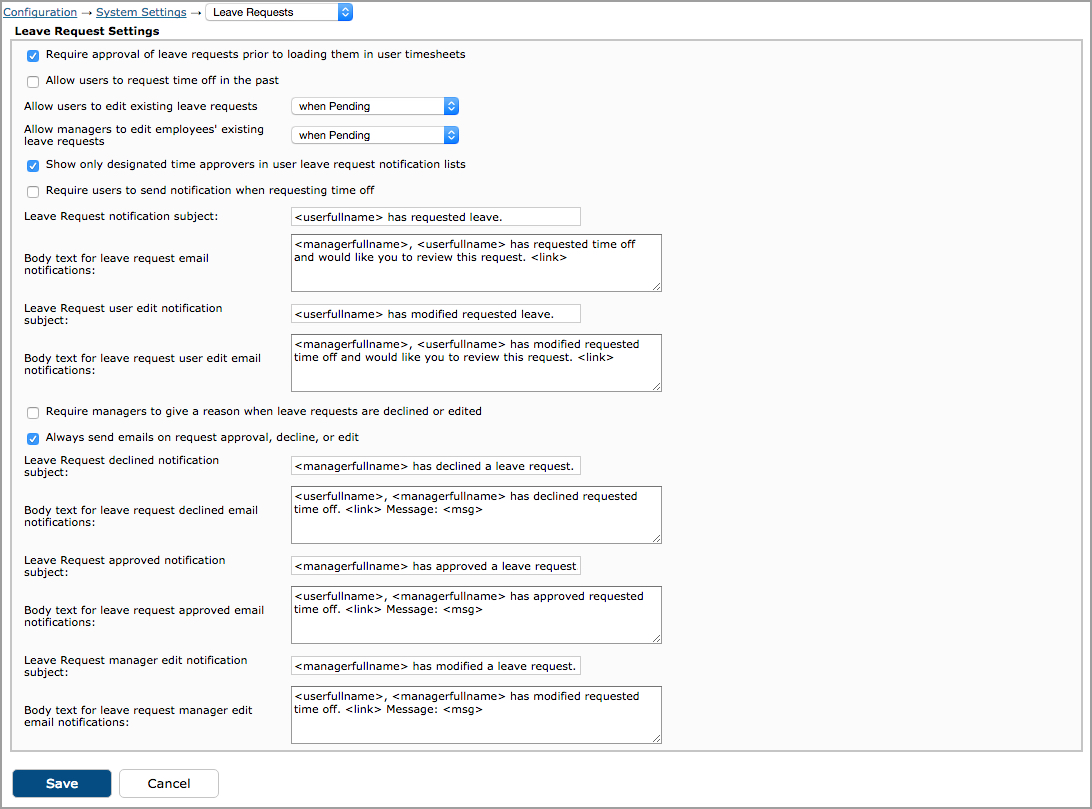
Figure 8.14. Leave Request Settings
Require approval of leave requests
prior to loading them in user timesheets
This option will require all pending
leave requests to be explicitly approved by respective approvers or supervisors
before being displayed in the user's timesheet. Once the request has been approved,
it will be displayed in the user's timesheet and can be saved.
Allow users to request time off in the past
This option allows users to
create
leave requests for dates that have already past in the event they forget to request
leave before taking time off.
Allow users to edit existing leave requests
This option determines under what circumstances a user can edit his own existing
leave
requests. You have the following options for allowing users to edit leave requests:
Never, when Pending, when Pending or Approved, when Pending or Declined, Always.
Allow managers to edit employees' existing leave requests
This option determines under what circumstances a leave request manager can edit
other
users' existing leave requests. You have the following options for allowing managers
to
edit others' leave requests: Never, when Pending, when Pending or Approved, when
Pending
or Declined, Always.
Show
only designated time approvers in user leave request notification lists
If
users are required to send notifications when requesting leave, this option will
display in the notification list only those approvers that have been assigned
to the user via a Time Approval Plan. The user will be able to select the approvers
to notify from this list.
Require users to send notifications when requesting
leave
This option will require users to select a manager or administrator
to be notified via email when users are requesting time off from work.
Leave
Request email notification subject
This is the subject of the email that
will be sent from users to the selected recipients when they request time off.
By default, it uses Journyx Tricky Tags that automatically pull the correct user
name based on the sender and the selected recipients.
Body text for Leave
Request email notifications
This is the body of the email that will be
sent from users to the selected recipients when that user requests time off. By
default, it uses Journyx Tricky Tags that automatically pull the correct user
and manager name based on the sender and the selected recipients.
Leave Request user edit notification subject
This is the subject of the email that
will be sent from users to the selected recipients when the user edits a leave
request.
By default, it uses Journyx Tricky Tags that automatically pull the correct user
name based on the sender and the selected recipients.
Body text for leave request user edit email notifications
This is the body of the email that will be
sent from users to the selected recipients when the user edits a leave request. By
default, it uses Journyx Tricky Tags that automatically pull the correct user
and manager name based on the sender and the selected recipients.
Require
managers to give a reason when Leave Requests are declined or edited
This
option
will require managers and administrators to provide a reason for
Leave Requests they decline or edit. The reason for the rejection or change will be
sent
via email
to the user.
Leave Request declined email notification subject
This
is the subject of the email that will be sent to users when his/her Leave Requests
have been declined. By default, it uses Journyx Tricky Tags that automatically
pull the manager name based on the sender and the selected recipients.
Body
text for Leave Request declined email notifications
This is the body of
the email that will be sent to users when his/her Leave Requests have been declined.
By default, it uses Journyx Tricky Tags that automatically pull the correct user
and manager name based on the sender and the selected recipients.
Leave
Request approved email notification subject
This is the subject of the
email that will be sent to users when his/her Leave Requests have been approved.
By default, it uses Journyx Tricky Tags that automatically pull the manager name
based on the sender and the selected recipients.
Body text for Leave
Request approved email notifications
This is the body of the email that
will be sent to users when his/her Leave Requests have been approved. By default,
it uses Journyx Tricky Tags that automatically pull the correct user and manager
name based on the sender and the selected recipients.
Leave Request manager edit notification subject
This is the subject of the email that
will be sent from the managers to the selected user when a manager edits a leave
request.
By default, it uses Journyx Tricky Tags that automatically pull the correct user
name based on the sender and the selected recipients.
Body text for leave request manager edit email notifications
This is the body of the email that will be
sent from managers to the selected user when a manager edits a leave request. By
default, it uses Journyx Tricky Tags that automatically pull the correct user
and manager name based on the sender and the selected recipients.
The following is a
list of Journyx Tricky Tags that are supported in Leave Request emails:
<userlogin> - Requesting user login
<userfullname> - Requesting user full name
<useremail> - Requesting user email address
<link> - Link to the request approval screen
<managerlogin> - Manager (user who is notified) user login
<managerfullname> - Manager (user who is notified) user full name

Figure 8.15. Third Party Software Settings
Servers which are allowed to connect
This option allows you to
control which Microsoft Project Server installations are allowed to synchronize
to this installation of Journyx. If nothing is
entered, then nothing will be
authorized. This preference is used to help eliminate duplicate synchronizations.
Since there is no way within Microsoft Project to determine that User A who logs
onto the Project Server http://testprojectserver actually logs onto the same server
as User B who logs onto the Project Server http://10.1.1.1, this preference helps
administrators ensure that all Microsoft Project Server users in their organization
access the Microsoft Project server in the same fashion. As such, entering
"testprojectserver"
and not 10.1.1.1 would ensure that Project A, which resides on the server would
not get synchronized to Journyx twice, once for each
server. You can specify
multiple servers using comma delimiters. For more information about Projectlink,
see the latest version of the Projectlink User Manual.
Only allow users
connected to Project Server to synchronize
This option allows you to
ensure that "local" files which are not published to the Microsoft Project Server
cannot be synchronized. In the event that this option is checked and the synchronizing
user is not logged onto a Microsoft Project Server, he/she will not be allowed
to continue. In the event that this option is not checked, the preference is basically
ignored, allowing anyone to connect and synchronize. For more information about
Projectlink, see the latest version of the Projectlink User Manual.
Warn
MS Project Admins when synchronizing an Microsoft Project File for the first time
Older versions of Projectlink, versions prior to 4.0 specifically, stored file
registration information in a .ini file with the same name as the MSP file being synced.
For customers transitioning from older versions of Projectlink, new versions will
automatically transfer the .ini file registration information to the properties of the
MSP file when you sync. If you have been using a version of Projectlink that is older
than 4.x AND you are transitioning from MS Project desktop to MS Project Server, Journyx
recommends you turn this setting on. In this case, Projectlink will not be able to
locate
the corresponding .ini file on its own. If this option is checked, the synchronizing
user will be warned that the project does not exist in Journyx and asked whether
this is the first synchronization. If this option is not checked, the user will
be prompted to enter the 'jxid' of the file. This jxid resides in the .ini file
originally associated with the initial synchronization. For more information about
Projectlink, see the latest version of the Projectlink User Manual.
Allow MSP Admins to create or modify user attributes
This option determines whether or not users with the MSP Admin role can create and
modify other users in the Journyx system using Projectlink sync with MS Project. If this
option is enabled, MSP Admins can create users or modify any matching custom fields by
making changes in MS Project and syncing them to Journyx. If this option is disabled,
MSP Admins will only be able to associate users in MS Project with existing users in the
Journyx system. MSP Users abilities to modify existing users are also subject to this
setting with the exception that they can never create users.
Journyx/MS Project is authoritative for Task (Scheduled) Work after Projectlink file
registration
This option determines which system, Journyx or MS Project, updates the
work/scheduled work for tasks in the other system. MS Project determines the task work
values when a file is first registered and uploaded to the Journyx system. After the
initial registration, you can choose which system will be authoritative for task work
values. While Journyx is always authoritative for assignment work values,
unassigned task work can be adjusted in either system and transferred to the other based
on this option. Journyx is the default setting, and task work/scheduled work values
should be changed in Journyx and passed back to MS Project unless you change this
setting to MS Project.
Take
Project Approvals into consideration when returning entries to MSP and QuickBooks
This option ensures that records that area approved via a Project Approval
Plan will be transferred to MS Project and QuickBooks in addition to records approved
via sheet Approval Plans. If this option is not enabled, only records approved
via sheet Approval Plans will be transferred.
Include mileage records when syncing expenses in Accountlink
This setting allows you to transfer records to QuickBooks from your custom entry
screens (formerly called the mileage entry screen)as expenses. You must have your
expense items from QuickBooks loaded into one of the columns on your custom entry screen
in order to transfer these records as expenses.
If syncing mileage records in Accountlink, which column corresponds to Expense
Code?
This setting refers to the previous setting for transferring mileage to QuickBooks
as expenses. It allows you to indicate which column on the custom entry screen (formerly
known as the mileage entry screen) contains your QuickBooks expense items.
Project Settings
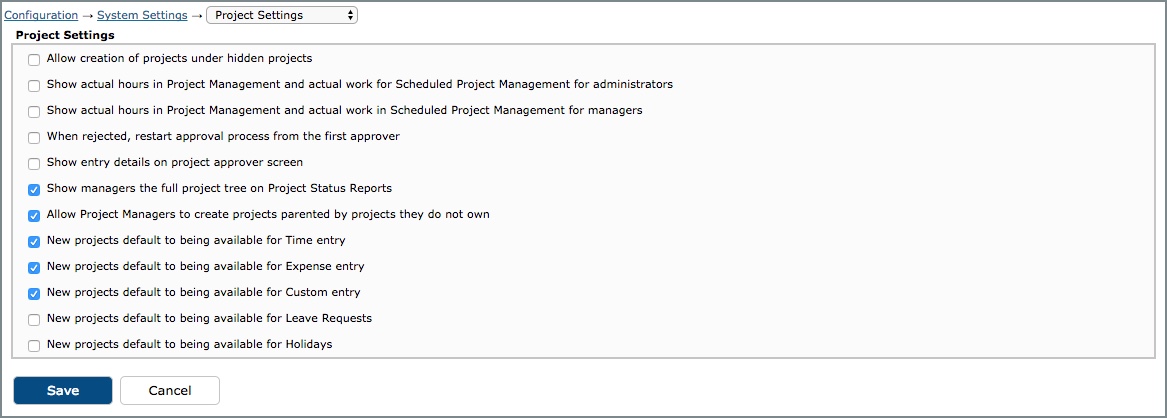
Figure 8.16. Project Settings
Allow creation of projects under hidden projects
This option
allows for the creation of projects under parent projects whose status has been
set to hidden. If the hidden projects are not displayed in the project tree,
creating
new projects under hidden projects is not possible.
Show actual
hours in Project Management for administrators
This option will allow
Administrators to view the total hours logged to each project.
Show
actual hours in Project Management for managers
This option will allow
Managers to view the total hours logged to each project.
When rejected,
restart approval process from the first approver
If a sheet is rejected
at any level in the project approval process, this option will force the sheet
to begin the approval process over again with the first approver.
Show
entry details on project approver screen
When this option is not enabled,
a summary of the projects submitted for approval is displayed on the Project
Approver's
approval screen. When this option is enabled, entry record details are displayed
for each project submission on the Project Approver's screen.
Show
managers the full project tree on Project Status Reports
This option
will display the complete project tree in Project Status Reports, including projects
that are not in the groups of the user viewing the report. If this option is not
checked, the system will display only projects that are within the groups of the
user viewing the report.
Allow Project Managers to create projects parented by projects they do not
own
This settings allows users with Project Manger abilities to create sub-projects or
tasks under projects that they do not own. In other words, another Project Manager
is designated as the owner of the parent project. If you disable this setting, only
the project owners will be able to create sub-projects/tasks under their own
projects.
New projects default to being available for...
The next five settings determine the entry screen availability defaults for new
projects. You can always change these settings when creating and editing projects,
but these settings will determine the availability of projects on various entry
screens by default (e.g., when importing new projects from other sources).
Resource Management
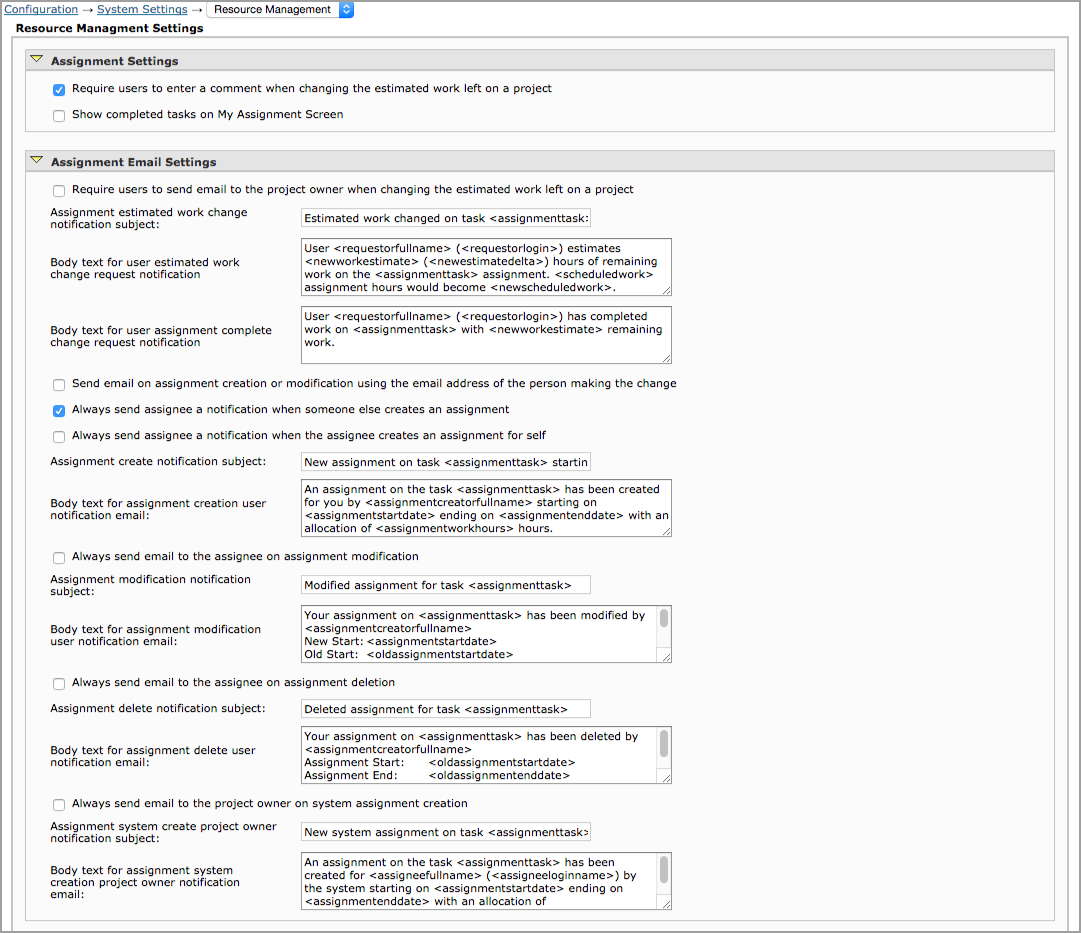

Figure 8.16.1. Resource Management Settings
Assignment Settings
Require users to enter a comment when changing the estimated work left on a
project
This setting requires users to enter comments when submitting a
change to the estimated remaining work for an assignment. The comments are shown
with the estimate change on the task details screen. Project managers can view these
comments and add to them on the task details screen.
Show completed tasks on My Assignments Screen
This setting determines if
assignments marked as finished follow the look back period for assignments (see
below) or ignore the look back period when they are displayed on My Assignments. If
this setting is on, completed assignments will be shown for the duration of the look
back period below (e.g., in case the user has to come back to the assignment to do
some more work). If this setting is off, assignments marked as finished will no
longer be displayed on My Assignments in the next period.
Assignment Email Settings
Require users to send email to the project owner when changing the estimated work
left on a project
This setting generates an automatic email notification
when users make changes to the estimated remaining work for an assignment. The email
notification is delivered to the project owner and backup owner. If no owner or
backup owner is selected, no notification is generated. The two fields below this
setting allow you to customize the subject and body text of this notification. The
default text includes tags, shown in angle brackets, with options for showing
auto-generated system information related to the change. The following tags are
available for the subject: <assignmenttask> and <assignmenttaskdescription>.
The following tags are available for the body:
<assignmenttask>, <assignmenttaskdescription>,
<requestorfullname>, <requestorlogin>, <newworkestimate>, <newestimatedelta>,
<scheduledwork> and <newscheduledwork>.
Send email on assignment creation or modification using the email address of the
person making the change
This option allows the recipients to see who created or changed their assignments by
checking the email address used to send the notice.
Always send assignee a notification when someone else creates an assignment
This setting generates an automatic email notification to any user who is
assigned to a new task by someone else. If the user does not have a valid email
address in the Journyx system, no notification will be generated. Fields below the
assignee notification settings allow you to customize the subject and body text of
this notification. The default text includes tags, shown in angle brackets, with
options for showing auto-generated system information related to the change. The
following tags are available for the subject:
<assignmenttask> and <assignmenttaskdescription>.
The following tags are available for the body:
<assignmenttask>, <assignmenttaskdescription>,
<assignmentcreatorfullname>, <assignmentstartdate>, <assignmentenddate>
and <assignmentworkhours>.
Always send assignee a notification when the assignee creates an assignment for
self
This setting generates an automatic email notification to any user who
is automatically assigned to a new task due to time or expenses he logged against
the task. If the user does not have a valid email address in the Journyx system, no
notification will be generated. Fields below the assignee notification settings
allow you to customize the subject and body text of this notification. The default
text includes tags, shown in angle brackets, with options for showing auto-generated
system information related to the change. The following tags are available for the
subject: <assignmenttask> and <assignmenttaskdescription>. The following
tags are available for the body: <assignmenttask>, <assignmenttaskdescription>,
<assignmentcreatorfullname>, <assignmentstartdate>, <assignmentenddate>
and <assignmentworkhours>.
Always send email to the assignee on assignment modification
This
setting generates an automatic email notification to any assignee when the details
of the assignment are changed. If the user does not have a valid email address in
the Journyx system, no notification will be generated. Fields below the assignee
notification settings allow you to customize the subject and body text of this
notification. The default text includes tags, shown in angle brackets, with options
for showing auto-generated system information related to the change. The following
tags are available for the subject:
<assignmenttask> and <assignmenttaskdescription>.
The following tags are available for the body:
<assignmenttask>, <assignmenttaskdescription>,
<assignmentcreatorfullname>, <assignmentstartdate>, <assignmentenddate>,
<assignmentworkhours>, <oldassignmentstartdate>, <oldassignmentenddate>
and <oldassignmentworkhours>.
Always send email to the assignee on assignment deletion
This setting
generates an automatic email notification to any assignee when the assignments is
deleted. If the user does not have a valid email address in the Journyx system, no
notification will be generated. Fields below the assignee notification settings
allow you to customize the subject and body text of this notification. The default
text includes tags, shown in angle brackets, with options for showing auto-generated
system information related to the change. The following tags are available for the
subject: <assignmenttask> and <assignmenttaskdescription>. The following
tags are available for the body: <assignmenttask>, <assignmenttaskdescription>,
<assignmentcreatorfullname>, <oldassignmentstartdate>, <oldassignmentenddate>
and <oldassignmentworkhours>.
Send email on assignment creation or modification using the email address of the
person making the change
This setting applies to the 3 assignee email
notifications above. It fills in the from address of the automatic email
notification with the user who creates or makes the change to the assignment if that
person has an email address configured in the system. If this setting is not enabled
or if the user does not have an email address configured, the email will be sent
using the address in Server and Email System Settings for the "'From' address for
email sent by the system". In the event that the from address system setting is not
configured, a default system from address will be used. The default system from
address is hard coded to be 'Email_Not_Configured_NoReply@jxnoreplyaddr.com'.
Alert Settings
Alerts are notices that are triggered by specific schedule and resource allocation
situations associated with Scheduled Projects. The triggers for the available alerts
are described below. When triggered, alerts show up with a red alert icon. Each
alert can be changed to a warning (yellow icon) if it is a lower priority, or an
alert can be disabled entirely if it is not critical to your process.
Alert/warn/ignore when a user's allocation is greater than 100% for an
assignment
If a user is assigned for more than 8 hours per day based on an
assignment's scheduled hours and duration, an over allocation alert will be
triggered if this setting is enabled. You can customize the alert message. The
following Journyx fields are available for use in this message: <number_of_ot_hours>
Alert/warn/ignore when a user changes estimated work remaining for an
assignment
If users request more or less time to complete an assignment, a
change alert will be triggered that will show the nature of the change and the user
requesting it if this setting is enabled. These alerts are cleared when the Project
Manager adjusts the project schedule to accommodate the change. You can customize
the alert message. The following Journyx fields are available for use in this
message: <remaining_work_hours> and <ufn>, which is the abbreviation for
User Full Name
Alert/warn/ignore when a user's actual hours exceed the assignment scheduled
hours by X percent
If a user exceeds the scheduled amount of assignment
hours by entering actual hours that exceed this setting's percentage, an alert will
be triggered when this setting is enabled. You can customize the alert message. The
following Journyx fields are available for use in this message: <percent_over_schedule>,
<assign_actual_hours>, <sched_hours> and <ufn>, which is the
abbreviation for User Full Name
Alert/warn/ignore X days before an assignment is due
This alert is a
reminder that is triggered the set number of days before an assignment is due when
enabled. You can customize the alert message. The following Journyx fields are
available for use in this message: <assignment_due_days>
Alert/warn/ignore when an assignment is overdue
This alert is triggered
when an assignment has not been completed by the due/scheduled end date if this
setting is enabled. You can customize the alert message. The following Journyx
fields are available for use in this message: <overdue_days>
Alert/warn/ignore X days after no actual work has been entered for a current
assignment
This alert is a notice that is triggered when no time has been
entered against an assignment for a set number of days when enabled. You can
customize the alert message. The following Journyx fields are available for use in
this message: <work_wait_days>
Miscellaneous and Default Settings
Show option to set all related tasks and assignments as complete for first/top
level projects
This option determines whether or not users can set all
tasks as complete from the top level project screen. In the event a user with access
to modify a selected scheduled project clicks on the option to set all tasks as
complete from the top level project screen, ALL tasks for the project will be set to
complete by changing scheduled work to equal actual work, and any remaining work
will be deleted. The option to set tasks as complete is always available at the task
level, but it is optional to show it at the project level.
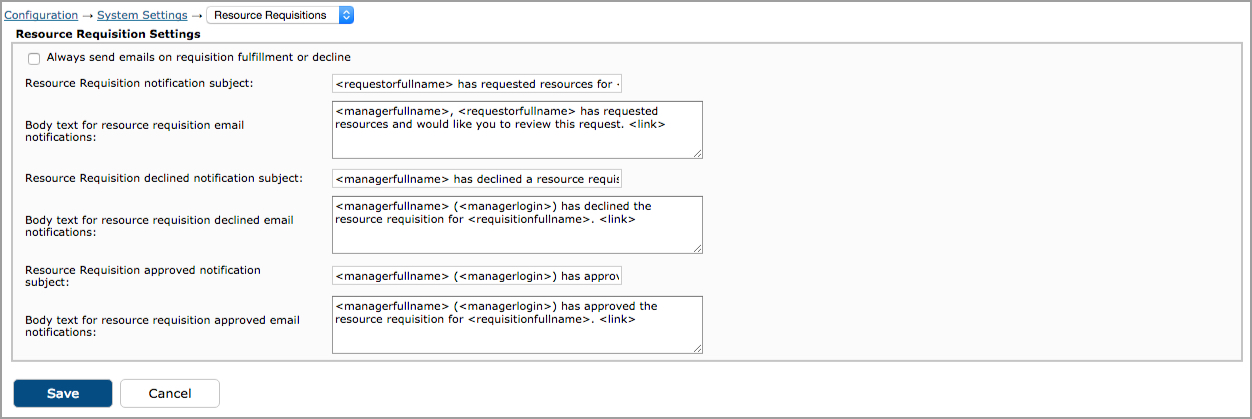
Enable use of Resource Requisitions for Scheduled Project Management usersThis
setting enables or disables the resource requisition feature for the entire system.
Resource requisitions allow any manager with access to Scheduled Project Management
to send requests for resources to department/resource managers when the resources
can't be assigned to tasks directly. For more information on resource requisitions,
see the Resource Requisitions section of
this manual.
Default hourly pay rate for assignment work (if no user pay rate exists)
This is the default hourly rate used to calculate labor cost figures in
Dashboard reports if no specific rates are assigned to the users in the User
Profile.
Default hourly bill rate for assignment work (if no user bill rate exists)
This is the default hourly rate used to calculate revenue/billable amounts in
Dashboard reports if no specific rates are assigned to the users in the User
Profile.
Overhead percentage applied to assignment work
This is an optional
setting for the overhead percentage used to calculate resource availability for
assignment work and included in calculations for Scheduled Projects in Dashboard
reports. There is an overhead percentage setting for individual users as well. If
the user value is blank, this setting will be applied to the user. If the user
setting is different, the user setting will override this one.
Default number of hours worked each week
This setting determines
resource availability and work scheduling for assignments. There is a weekly hours
setting for individual users as well. If the user value is blank, this setting will
be applied to the user. If the user setting is different, the user setting will
override this one.
Number of days to look back for overdue assignments
This setting
determines how long overdue assignments/assignments from previous periods will
continue to show up in a user's current My Assignments list. This setting will also
determine how long completed assignments are shown unless the setting for showing
completed assignments above is off.
Number of days to look back for rollup reporting
This setting controls
how far in the past to look for scheduled work and actual work data to roll up into
project totals in Dashboard reports. If you do a one-time import of historical
project data into the Journyx system, you will need to make this setting large
enough to capture the date range of the historical data and run alert and rollup
report checks as explained below. After you have run the data rollup, you can reset
the number of days to your desired period for capturing the typical lag for getting
user time/time corrections entered against projects.
Run alert and rollup report checks
This button manually runs rollup data
that is ordinarily updated on a regular schedule. Some data for Scheduled Projects
and Dashboard reports is only updated when this process is run.
Data Management Settings
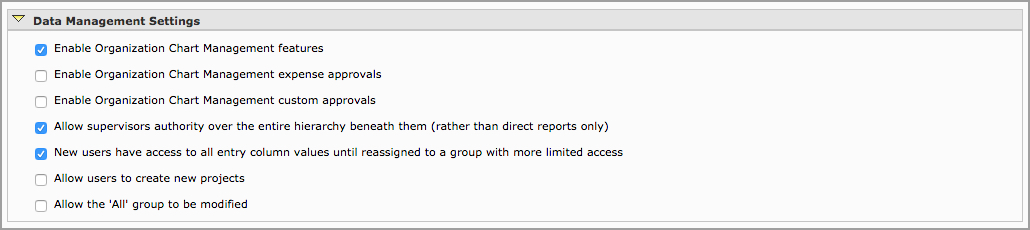
Figure 8.17. Data Management Settings
Enable Organization Chart Management features
This option allows you to use the Organization Chart Manager (OCM). For sites with
existing time approval plans, Journyx recommends you use OCM with caution because it
will
take over your time approval plans and delete any created manually. Please refer to
the Org Chart Manager section of this manual for more information. If you choose not
to use OCM, you can use this setting to disable it and ensure that no one can delete
your manually created time approval plans.
Enable Organization Chart Management expense approvals
This option allows you to use the Organization Chart Manager (OCM) to create expense
approval plans. For sites with
existing expense approval plans, Journyx recommends you use OCM with caution because
it will
take over your expense approval plans and delete any created manually. Please refer
to
the Org Chart Manager section of this manual for more information. If you choose not
to use OCM for expense approvals, you can use this setting to disable it and ensure
that no one can delete
your manually created expense approval plans.
Enable Organization Chart Management custom approvals
This option allows you to use the Organization Chart Manager (OCM) to create custom
approval plans. For sites with
existing custom approval plans, Journyx recommends you use OCM with caution because
it will
take over your custom approval plans and delete any created manually. Please refer
to
the Org Chart Manager section of this manual for more information. If you choose not
to use OCM for custom approvals, you can use this setting to disable it and ensure
that no one can delete
your manually created custom approval plans.
Allow supervisors authority over the entire hierarchy beneath them (rather than
direct reports only)
This option is specific to the hierarchy accessibility created by the Organization
Chart Manager. If you are using OCM, this setting will determine the level of
supervisor access to the users below them. If this setting is enabled, supervisors
will be able to report on direct subordinates, as well as subordinates lower in the
hierarchy. If this setting is disabled, supervisors will only be able to report on
their direct subordinates.
New users have access to all entry field values until
reassigned to a group with more limited access
This option will allow
new users to have default access to all projects and entry field values in the
system by automatically assigning them to the 'All' group. Check this option only
if there will be no varying levels of access between users of the system. If you
will require users to have different levels of access to field values such as
projects, do not check this option. If this option is not checked, you must specify
a group assignment when creating a new user. Otherwise, the new user will be created
with the status 'hidden' and will not be able to login to the system until the
user has been returned to active status by assigning him/her to a group or groups.
Allow
users to create new projects
This option will allow all users, regardless
of role assignment, to create new projects from within the project management
section of the software.
Allow the 'All' group to be modified
This option allows complete modification of the 'All' group which by default
contains
all of your organization's projects, users, roles, clients, activities, pay types,
bill types, expense codes, sources, currencies, reasons, vehicles, measurements,
time entry screens, expense entry screens, custom entry screens, start/stop modules,
and punch entry screens. With the exception of the removal of users, it is highly
inadvisable to modify the 'All' group. Either option will still allow for the
addition or removal of users from the 'All' group; therefore, this setting should
remain disabled for most configurations.
Password Settings
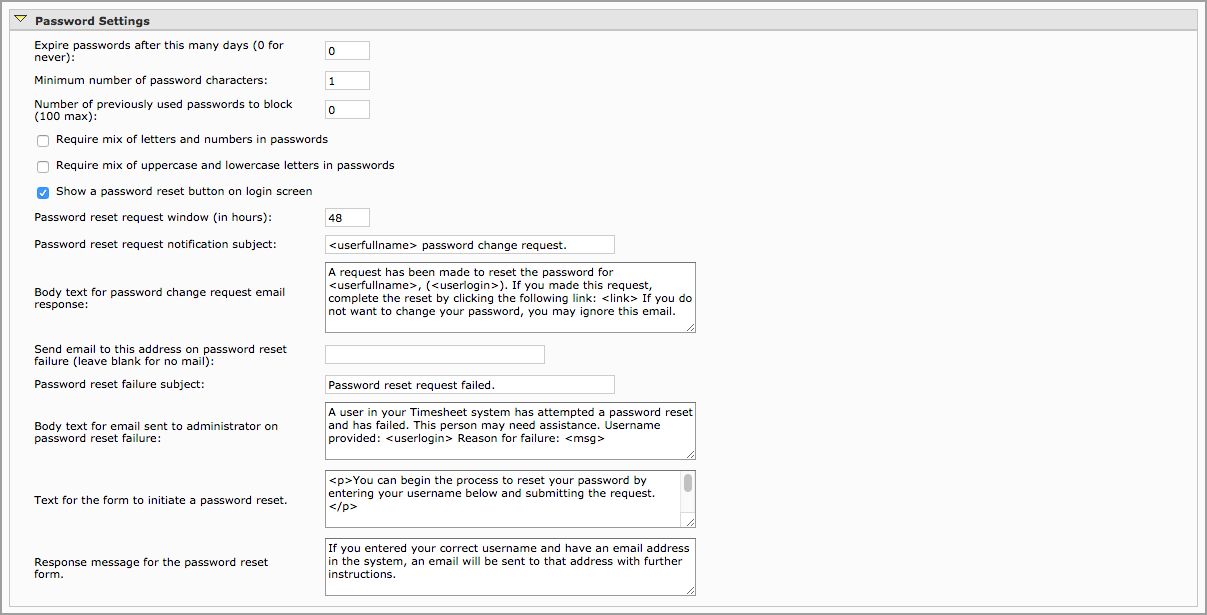
Figure 8.18a. Password Settings
Expire
passwords after this many days (0 for never)
This option allows you
to specify how often users of the system will have to change their passwords for
security purposes. Making this option '0' means that passwords will never expire.
Expire passwords after this many days (0 for never)
This
option allows you to specify how often users of the system will have to
change their passwords for security purposes. Making this option '0'
means that passwords will never expire.
Number of previously used
passwords to block
This option will prevent users from creating passwords
that are the same as previous expired passwords. You can specify the number of
previous passwords that users will not be able to recreate.
Require mix of letters and numbers in passwords
This
option will force users to only create passwords containing both alpha
and numeric characters.
Require mix of uppercase and lowercase letters in
passwords
This option will force users to create passwords that
contain at least one lowercase letter and at least one uppercase
letter. It should work across all languages that include this concept
including most European languages. Some languages (e.g. Arabic, Japanese)
do not distinguish between uppercase and lowercase characters. If you
enable this setting users will not be able to create a password in those
languages unless they also include some letters from a European
alphabet. Changes to this setting will not take effect until the next
time a user changes his or her password.
Show
a password reset link on login screen
This option will display a password
reset link on all users' login screens that users can click in the event that
they have forgotten their passwords. The user will then be required to specify
his/her username. If an email address exists for that user, the system will send
an email to the user containing a link that will allow the user to create a new
password for his/her account.
Password reset request window (in hours)
This option determines the length of validity of the password reset link in emails
sent to users who forget their passwords.
Password reset email subject
This option allows you to specify the text that will appear in the subject line
of each email the system sends to a user in the event that he/she has forgotten
his/her login password.
The following is a list of Journyx Tricky Tags that
are supported in password reset subject lines:
<userfullname>
- User name for which the password is being reset
<userlogin> - User
login for which the password is being reset
Password reset
email body
This option allows you to specify the text that will appear
in the body of the email the system sends to a user in the event that he/she has
forgotten his/her login password.
The following is a list of Journyx Tricky
Tags that are supported in password reset emails:
<userfullname>
- User name for which the password is being reset
<userlogin> - User
login for which the password is being reset
<link> - Link that will
generate a link back to Journyx where users can
reset passwords
Send
email to this address on password reset failure
This option allows you
to designate a single email address for notification when users' attempts to reset
passwords fail for any reason. For security reasons, the users themselves cannot
be given the information on the reason for failure (the user has no email address,
the user supplied an invalid username, etc.). If you leave this field blank, no
email with failure information will be sent.
Password reset failure email
subject
This option allows you to specify the text that will appear in
the subject line of each email the system sends when an attempt to reset a password
fails.
The following is a list of Journyx Tricky Tags that are supported
in password reset subject lines:
<userlogin> - User login
for which the password is being reset
Password reset failure
email body
This option allows you to specify the text that will appear
in the body of the email the system sends when an attempt to reset a password
fails.
The following is a list of Journyx Tricky Tags that are supported
in password reset failure emails:
<userlogin> - User
login for which the password is being reset
<msg> - Failure reason
detected
Login Behavior
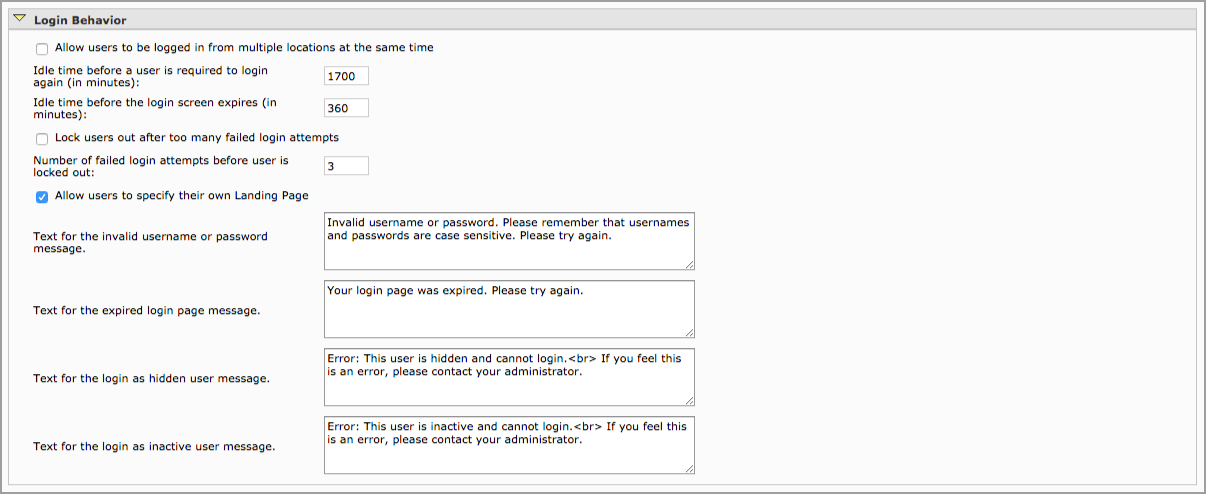
Figure 8.19. Login Behavior Settings
Allow users to be logged in from multiple locations at the same time
If this option is checked users can be logged into the site from more than one
location at once, including desktop browsers
and mobile devices. Journyx recommends using SSL (https://) encryption when using
this option and in
general as a security measure.
Idle time before a user is required to login again (in minutes)
This option allows you to specify how long users can remain logged in and idle
before they are forced out of the system and required to log in again. This option
is set in minutes.
Idle time before the login screen expires (in minutes)
This option allows you to specify how long the login screen remains idle before
users are forced to reload the page and try logging in again. This option is set
in minutes.
Lock users out after too many failed login attempts
This option allows you to set a maximum number of failed login attempts made by
a user before they are locked out of the system. Users who are locked out will
require an administrator to reset their passwords in order to login again.
Allow users to specify their own landing page
The Landing Page preference
allows
your users to override the system default for the screen they first view after
logging in.
All accounts have default landing pages that are based on the authority and
abilities included
in their roles. The Landing Page preference allows your users to change from the
default to another
screen which they have access to. The Landing Page screen selections are the same as
the list of links
they see on the Sitemap.
The only exception to the selected landing pages
overriding the
defaults applies to approvers with the Approver-Regular ability. These approvers
will see the Approvals
tab as their landing pages when sheets are awaiting approval in their queues. If an
approver has no
outstanding approvals, the selected landing page will be displayed upon login.
Text for the invalid username or password message
This setting allows you to customize the message that users will see if they enter
invalid user names or passwords.
Text for the expired login page message
This setting allows you to customize the message that users will see if they try to
login when the login page has expired.
Text for the login as hidden user message
This setting allows you to customize the message that users will see if they try to
login and are set to hidden status in the system.
Text for the login as inactive user message
This setting allows you to customize the message that users will see if they try to
login and are set to inactive status in the system.
Security

Figure 8.18b. Security
Allow User API Keys to authenticate API requests
This
option allows users to generate and use API keys for connecting to the Journyx system
(via the API) through third party integrations. It gives users the option to generate
and copy an API key from their Preferences menu to use in place of storing their Journyx
passwords in third party systems and connections via the Journyx API. These API keys can
be used for custom integrations, as well as Journyx offerings through third parties like
Zapier (e.g., Google Calendar Zap) and Microsoft (e.g. Power BI data sources).
If you would like users redirected to a custom logout page, enter that URL
here
This
option allows you to redirect users to a custom page after logging out.
Maximum size in megabytes (MB) of file attachments, receipt images and other
uploads. Use 0 for unlimited.
This option allows you to limit the file size
of files uploaded to specific records on entry screens.
Azure Active Directory Settings

Figure 8.18c. Azure Active Directory Settings
Journyx v11.0 and higher may be configured to use Microsoft's Azure Active Directory
(AD) to authenticate users for Single Sign-On (SSO), as well as for the
calendar/task integration with Office 365 and Exchange Server. In order to use Azure
authentication and the Exchange calendar integration, your organization must have at
least one of the following:
- Office 365 enterprise level subscription (includes Exchange Online
automatically)
- Exchange Online as a separate service
- Exchange Server 2013 or 2016 local install, but in hybrid deployment connected
to the Microsoft cloud
NOTE: a purely local Exchange Server is not supported for this feature
When the Journyx system is configured to use Microsoft's Azure AD, end users'
passwords are not stored or maintained (password resets or timeouts) in the Journyx
system. Instead, authentication happens only on Microsoft cloud servers, and a
temporary, limited-scope token is passed to the Journyx application using 'OpenID
Connect', which is comprised of the OpenID authentication and OAuth 2.0
authorization protocols.
These protocols, and the ensuing transfer of calendar data, only occur over encrypted
(TLS) connections. Your organization's IT department must grant read-only calendar
access to the Journyx server using the Azure AD administrative console. After
registering the Journyx server in Azure, you enter the App ID, client secret and
other settings into Journyx to enable calendar suggestions and/or SSO.
Click here for detailed instructions on how to connect your Journyx server to the
Azure Portal:
https://www.journyx.com/Files/Azure_Portal_Registration.pdf
After you have successfully set up and tested your connection to Azure, you may want
to set up a test user to confirm that Exchange calendar and task information is
loading in your users' timesheets. Any user who should have access to pull data from
Exchange calendars and tasks must be assigned to a time entry screen that has
Suggested Entries turned on. Please see Entry Screen
Configuration for more details on how to enable Suggested Entries. Once your
test user is assigned to a time entry screen with suggestions turned on, you can
login as your test user and link to a Microsoft Office account. Please see Time Entry for more information
on linking your account and using suggested entries.
For more information on enabling Azure Single Sign-On (SSO), please contact
Journyx.