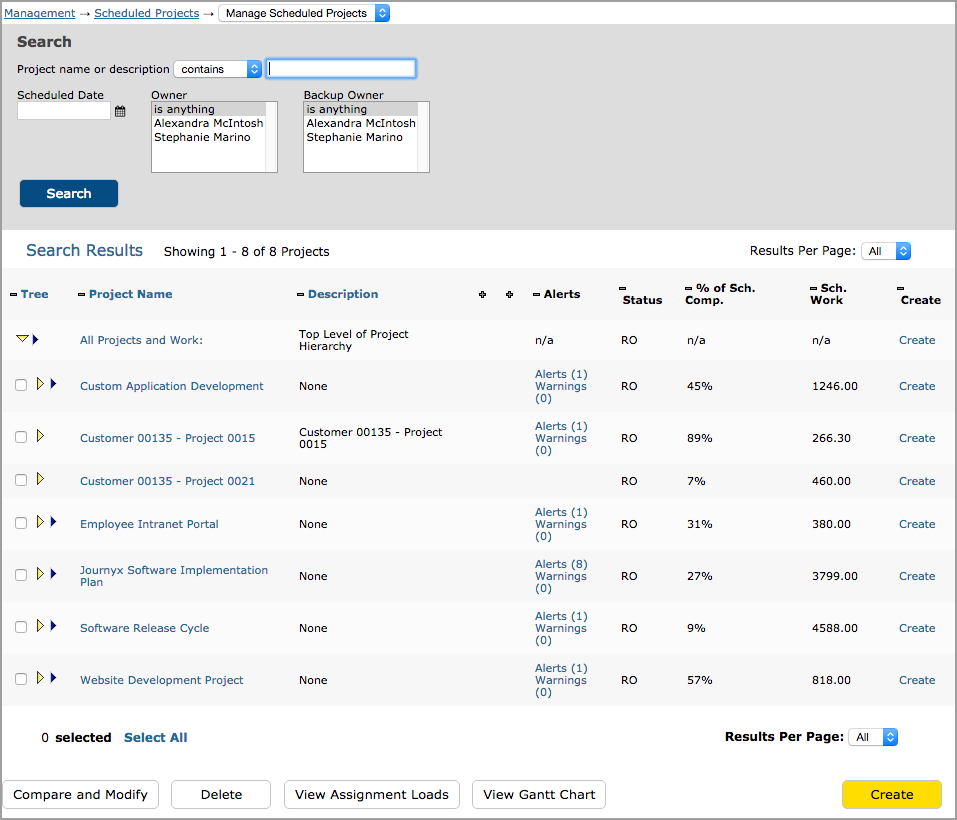
Figure 33.1.Scheduled Project Management main page
Scheduled Projects |
Help Contents |
Management of Scheduled Projects is located under Management-->Scheduled Projects-->Manage
Scheduled Projects.
The system allows you to create an unlimited number of scheduled project plans with assignments
for users to log their time, expenses, and custom entries against. The system uses a
hierarchical project structure and allows unlimited levels of summary tasks and tasks under any
parent/top level project. The main Scheduled Project screen serves as the master control panel
for all scheduled project creation, modification, and deletion (see figure 33.1).
Scheduled Project Management is used for project plans that adhere to specific schedules and
include work planned at the resource/team member level. Items managed under both Scheduled
Project Management and general Project Management appear in the same hierarchical tracking
column on users' time, expense and custom entry screens, as well as the time entry panels on the
My Assignments screens. The combination of these two areas into one tracking column allows users
to track time for formal project task assignments, informal projects and non-project work/leave
all in one timesheet or time entry area.
Figure 33.1.Scheduled Project Management main page
You can create a new scheduled top level project by clicking the Create button located in the
lower right corner of the screen. Projects created using the button in the lower right corner
are created directly under the “root” project in the hierarchy. The root project is simply the
top of the project tree for hierarchical sorting, and you can rename it with a name of your
choosing (e.g., All My Company’s Projects). Clicking the Create button in the lower right corner
will direct you to the Project Creation screen, where you can specify the attributes of the
Scheduled Project (see figure 33.2).
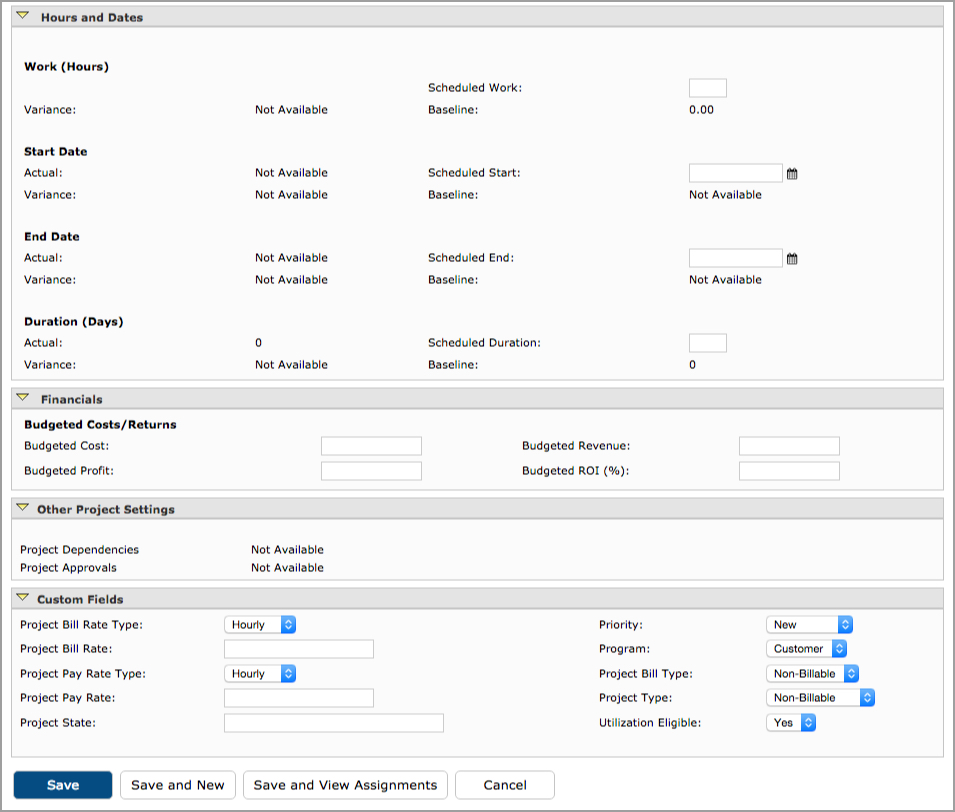
Figure 33.2.Project creation
Specify a name for the Scheduled Project. Although the system allows up to 252 characters for
each project name, Journyx recommends short project names in order to keep the project dropdown
menus on user entry screens more manageable. Enter a description for the new projects. Again,
the system allows up to 252 characters for the description of each project. The description
should be used to provide further details on the project. Notice that the parent project is
root. Creating (summary) tasks under top level projects will be discussed later.
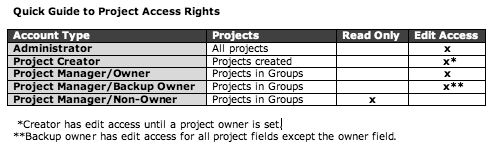
The Owner and Backup owner selection fields are optional. The purpose of establishing ownership
is to limit project modification access, regardless of Group membership, to the owner and backup
owner. If both fields are set to None, any user with group access to the project, Manager
Authority and role abilities for modifying projects will be able to modify the project. If a
Project Manager is designated as a project's owner, other Project Managers with group access to
the project will not be able to modify the project. They will see a read-only view. The creator
of the project and any system Administrators are the only ones who can set a project owner and
will always be able to modify the project regardless of ownership. Project owners can change the
owner field, as well as set/change the Backup owner field. This can be set in the user interface
or using the project import tool. Project Managers must have access to the Scheduled Projects
tab in order to be eligible for owner or backup owner status.
Next, specify the status of the project: Loggable and Reportable, Reportable Only, Hidden. 'Loggable and Reportable' indicates that the project is fully active (i.e., users can log time to this project and all time logged to this project is available in reports). 'Reportable Only' indicates that the project can no longer have time logged against it, but any historical time already logged can be displayed in reports. 'Hidden' indicates that the project can neither have time/expenses logged against it or be displayed in reports.
Next, select which existing Groups should have access to the new projects. Multiple Groups may be selected by using the shift-click or ctrl-click functionality. You can always change which Groups have access to any given project later by modifying that particular Group or by modifying that specific project. Once you have selected the existing Groups that will have access, indicate whether to add this project to new Groups. If you check this option, the project will be added to every new Group that is created in the system at the time of Group creation. If you do not check this option, the newly created Group will not have access to this project by default, but can be given access at a later time by modifying that particular Group or modifying that specific project. While most organizations will add the complete project plan (top level project and all its tasks) to at least one of the primary Project Manager’s groups for full access, it is optional to add the entire project plan to a group that also includes the project team members. Team members will automatically get group access to specific tasks in the project plan when they are assigned to those tasks. Adding the project plan to team member groups is only required if individuals will need access to tasks that they are not assigned to.
Next, choose where to make this project available for logging entries based on the type of entry. By default, a new project will be available on all types for entry screens. However, you can disable its availability for logging on a specific entry screen by unchecking the selection box next to the entry screen type. If you make the project available for Time Entry, it will also appear on the My Assignments screen for project team members.
If you are using project-activity rates, you also have the option to apply project-activity rates for a parent project automatically to the child projects underneath the parent. If the parent project has the Project-Activity Rates field set to "Copy to children", the project-activity rates created for the parent project will automatically create the same rates for the child projects. More information is available under the Project-Activity Rates section of this manual.
The Send a Notification option can be used at any time to send ad-hoc emails to the designated Owners and Assignees for projects or tasks. Ad-hoc notices can also be sent to other interested parties. If you click on the envelope icon, a separate window will be displayed for entering email addresses, a subject and body text. If the project/task has a designated Owner with an email address in the Journyx system, the Owner's email address will be populated automatically. If you select a top level project or summary task, Owners for all the tasks below it will be included. Likewise, users with email addresses in the system who are assigned to the task or any of a selected top level project's tasks will also be populated automatically. You have the option to add other email addresses manually. If you do not have a designated Owner or Assignees for a project/task, you can still send ad-hoc notices by entering email addresses manually. You will see a red warning message when you open the notification window telling you that there are no Owners or Assignees, but you may still send the notice manually. Your system administrator must have Server and Email System Settings configured in order to use this feature.
The Alerts and Hours Status Summary sections will be blank at the time of creation. When the project plan has been entered and data is being tracked, these sections will contain project status data. The Project Type field indicates if it’s a "Reportable first level project" (also called a "top level project", schedule data is rolled up from the tasks underneath them and cannot have assignments), a "Summary" (cannot have assignments) or a "Reportable and assignable task" (task that is assigned to users). If you add a task underneath a reportable and assignable task, the original task becomes a first level project or summary and any existing assignments and schedule data will be transferred to the new reportable and assignable task. Task and assignment alerts are displayed based on your Resource Management alert settings under Configuration-->System Settings-->Projects. In the event that users have requested estimate changes to their assignments, you will see an alert in this section, as well as checkboxes in the Hours Status Summary section for adding/subtracting the changes to/from the users’ assignments or a pool of unassigned hours for the task. In the event multiple users have requested changes for a single task, you will have line items for making adjustments individually or acting on them as a group. See the System Settings section of this manual for information on sending automatic email notifications to project owners when users request changes to estimated remaining work.
The Hours Status Summary also contains status bar graphs for comparison. The top graph shows actual hours logged against the task. The second graph shows user estimated work remaining, which will show variances from the assignment and task scheduled work when there are user requested changes that haven't been worked into the schedule. The third graph shows assignment scheduled work, which will show variances from the task scheduled work when the task has not been fully assigned. The last graph shows the total task scheduled work. All the bar graphs are shown in hours.
Next, fill in your estimated work hours and dates for the project, unless you plan to break the project into tasks and have the total scheduled work and dates roll up from the tasks underneath it. If you don't plan to break out the top level project further, you can create a single level project plan and make assignments. For a single level project plan, you will fill in your work and dates on this screen. You can also fill in work and dates if you plan to use the project as a placeholder for the time being. When you break it into tasks at a later date, the work and dates will be recalculated to roll up from the tasks underneath the project. Scheduled Work is entered in number of hours with up to 2 decimal places. Dates are entered in the short date format configured for your system. Duration is automatically calculated based on Scheduled Start and End Dates and always includes the total number of calendar days between two dates.
Next, fill in your Financials if you want to compare your anticipated budget and costs to your actual costs and revenues. Reports assume that Budgeted Cost, Revenue and Profit are in a currency denomination, and Budgeted ROI is a percentage.
Project Dependencies and Approvals cannot be set up until after the project has been saved the first time. See the Project Dependencies or Project Approval Plans sections of this manual for more information.
When finished filling in the basic project information, you may choose to also fill in information for the Custom Fields for the project. These Custom Fields will vary based on your configuration. If the standard Project Pay and Bill Rate fields are visible in your system, they can be used to calculate project labor costs and billable amounts in standard reports and Journyx Reportlink. Rates must be entered as numbers, and they are always treated as hourly rates in report calculations. You may also see a custom field named "Allow Excess Time In Assignments". This field acts as a default setting for any assignments created under the selected task. If set to Yes, all assignments will be created such that assignees will be allowed to enter actual hours that exceed their scheduled work hours included in the individual assignments. If set to No, assignees will be restricted to their individual assigned scheduled work hours and will not be allowed to enter actual hours that exceed their assigned hours. Regardless of what you choose for this task custom field, you can still change the setting value when you create the individual assignments. This field simply sets the default for the task's assignments.
There are also some checkbox settings specific to Scheduled Projects under Save Options at the foot of the screen. The first two options allow you to set the baseline values for a single task or the entire project. When you select the first option for a top level project, the second option becomes available for applying the baseline to the entire project plan. You can reset the baseline for a project or task at any time. The last setting under Save Options allows you to set individual tasks, portions of a project plan or an entire project plan to complete status automatically. This setting is useful when tasks are completed using less work/hours than was anticipated. When finished, click the Save button. To create another project, click the Save and New button.
Alternatively, on the Project Creation screen you can copy the settings of another project by
searching for and selecting a project and then clicking the Load button located at the top right
corner (see figure 33.3). This will pre-populate that project's settings (with the exception of
MS Project and QuickBooks Custom Fields, Dependencies, Project Approval Plans and Baseline
values) which you can use as a template of sorts. After clicking the Load button, you can modify
the attributes that will be unique to the new project. When finished selecting and specifying
attributes for the new project, you can simply click the Save button.

Figure 33.3.Copy another project
You can also set up your scheduled project plans using imports or Journyx Projectlink, the integration for MS Project. For more information about setting up projects by importing them, see the Imports section of this manual or the separate user manual for Journyx Projectlink
The system allows you to create projects under the root project as well as under other projects.
Creating tasks/summary tasks under scheduled projects can be done from the main Scheduled
Projects screen. To create a task/summary task under a project, click the respective 'Create'
link in the last column of the parent project row in search results (see figure 33.1). This will
direct you to the Project Creation screen, where you can specify the attributes of the
task/summary task (see figure 33.3.1). Notice that the parent is the project that you selected
from the search results. Like top level projects, scheduled work and date values will be rolled
up from the tasks if you are creating a summary task. For a task that will be assigned to users,
filling in the scheduled work and dates will allow you to assign the task to users based on
schedule availability. Project Dependencies and Approvals cannot be set up until after the
project has been saved the first time. See the Project Dependencies or Project Approval Plans
sections of this manual for more information. When finished entering the primary attributes and
Custom Field values, click the Save button. To create another task, click the Save and New
button.
Figure 33.3.1.Task/summary task creation
Alternatively, on the Project Creation screen you can copy the settings of another project by searching for and selecting a project and then clicking the Load button located at the top right corner (see figure 33.3). This will pre-populate that project's settings (with the exception of MS Project and QuickBooks Custom Fields, Dependencies, and Project Approval Plans) which you can use as a template of sorts. After clicking the Load button, you can modify the attributes that will be unique to the new project. When finished selecting and specifying attributes for the new project, you can simply click the Save button.
To modify an existing project, specify the search criteria for the project on the main Scheduled Project screen and click the Search button (see figure 33.1). If your Journyx Administrator has set up your system to display the Actual Hours field in search results, you will also see a checkbox option in the search panel to show all logged time. By default, the Actual Hours field will only show time if: 1. It was logged by someone explicitly assigned to the scheduled project/task, and 2. "Rollup" data processing has added the time to the task actual work.
For the first condition, it is possible to give someone access to a task without assigning them to it. This is done using Journyx Groups. Scheduled project actual work will not reflect time that was logged by an unassigned user. The best way to avoid this situation is to ensure that no one but the project manager has access to these tasks in any of their Journyx groups. If an unassigned user does get access and logs time, you can add an assignment later to ensure the time is counted against the actual work for the scheduled project. The "Show all logged time" checkbox can help you find these discrepancies when actual hours vary from one view to other.
For the second condition, you may need to wait for rollup processing to complete before you see actual hours that were very recently added to the system. Rollup processing checks for changes to scheduled and actual work approximately every 30 minutes and updates the scheduled project totals. This periodic processing allows the scheduled project management screen and other related reports to load more quickly because the calculations are not occurring as the screens load. Again, the "Show all time logged" setting will allow you to see time that has been entered but not added to the rollup data. If you are unsure if there are new records that need to be added to rollup data, you can run rollup data manually if you are logged in as an Administrator. Rollup data is also subject to an editable look back period, so rollup data only looks back for so many days to add changes. If you are making changes to scheduled and actual work that are more than a month in the past, you may need to adjust the look back period briefly and run the rollup data process to get those records entered in the past. See the System Settings section of this manual for more information on manually running the rollup data process.
In addition to the standard search results view, you can also view a scheduled project in a Gantt Chart by selecting the project from the search results and clicking on the View Gantt Chart button below the results. You must select a project to view. The project parent and descendants are automatically included when you select a single project. The Gantt Chart view includes options to change the sorting and display of the scheduled project data, but it does not currently offer any edit capabilities. To edit any of the scheduled project information, you will need to return to the search results view by going to Management-->Scheduled Projects. Edit capability in the Gantt Chart view may be added to a future release.
The search results will be displayed below the criteria. From the search results, click the name of the project you would like to modify. This will direct you to the Project Modification screen where you can modify the attributes of the project (see figure 33.4).
Alternatively, you have the ability to compare and modify multiple projects at the same time.
From the search results on the main Project screen, check the checkboxes of the projects that
you would like to manage at once (see figure 33.1). Then go to the bottom of the screen and
click the Compare and Modify button. This will take you to a Project Modification screen that
contains the attributes of the selected projects side by side (see figure 33.5).
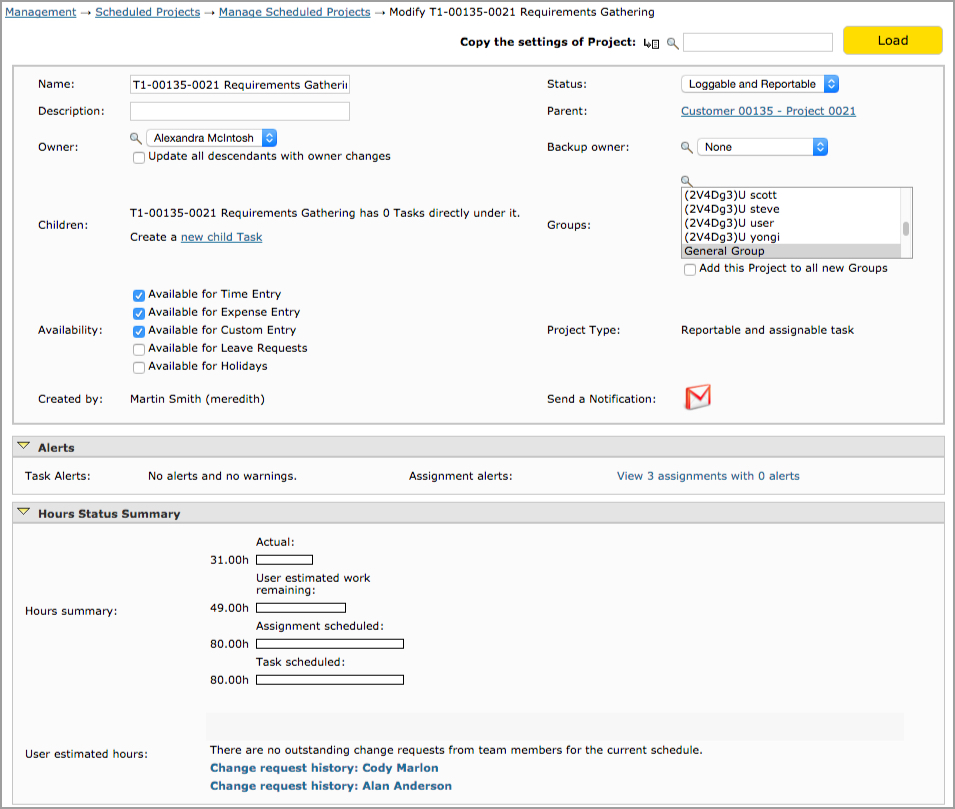
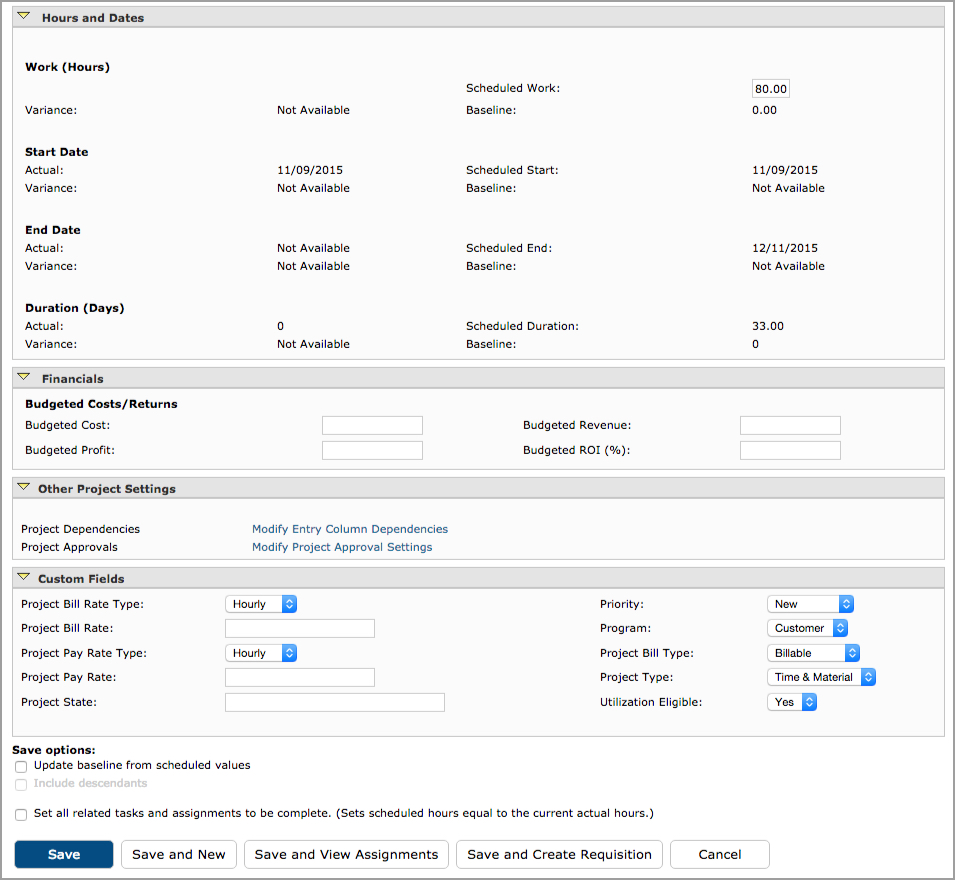 Figure 33.4.Project modification

Figure 33.5.Project compare and modify
You can only manage Project Dependencies and Project Approval Plans from the Project Modification screen of an existing project.
The system allows your organization to delete unused or obsolete projects under certain circumstances. A project that has never had any time, expenses, or custom entries logged against it may be deleted from the database and thereby removed from use. However, if a project has ever been used as part of a time, expense, or custom entry, the system will not allow you to delete that project. These projects should be modified to have a status of 'hidden' instead of deleted. You also cannot delete a parent project/summary task that has tasks/summary tasks underneath it. In order to delete the parent project, you must first delete everything underneath it in the hierarchy. To delete an existing project, specify the search criteria for the project on the main Scheduled Project screen and click the Search button (see figure 33.1). The search results will be displayed below the criteria. From the search results on the main Scheduled Project screen, select the projects that you would like to delete. Then go to the bottom of the screen and click the Delete button.
Once you have created several projects, you can decide how to sort them on the main Scheduled Project screen. You can choose to sort the visible projects by one of three methods: position within the project tree, alphabetical by project name, or alphabetical by project description. Projects are sorted hierarchically by default. To change the sorting order for the screen you are currently viewing, click the column header for Tree, Project Name, or Description. The system will refresh the main Scheduled Project screen and the visible projects will be sorted by the method you indicated.
In addition to the hierarchical Tree sort method, you may also use the yellow and blue arrow icons to view sections within the project hierarchy (see figure 33.1). Yellow arrows appear next to any project that has tasks/summary tasks underneath it. Clicking on the yellow arrow opens up a single level of the hierarchy which will show the 'descendants' underneath the selected project. If a project has more than one level of descendants (summary tasks and tasks), a blue arrow icon will also be displayed next to the project (see figure 33.1). Clicking on the blue arrow icon displays all levels of the hierarchy below the selected project. After expanding a level, you may collapse a level by clicking the respective yellow arrow icon again.
Please note that choosing a sorting method other than the default applies to the current page
view only. Leaving the main Scheduled Project screen and returning later will reset your view to
the default sorting method.
In addition to making modifications to projects by clicking the name or using the Compare and
Modify feature, you have the ability to make batch modifications at the bottom of the main
Scheduled Projects screen (see figure 33.1 and 33.6). Batch modification allows you to
efficiently make modifications to several projects at once instead of having to load each
project separately. You are able to change the Group affiliation, status, and parent of multiple
projects at once. To modify existing projects using the batch modification feature, specify the
search criteria for the projects on the main Scheduled Projects screen and click the Search
button. The search results will be displayed below the criteria. From the search results, select
the names of the projects you would like to edit using batch modification. Then go to the bottom
of the screen and decide the type of batch modification to perform. You can assign Groups to the
selected projects or change Group assignments by selecting the Groups and clicking the
respective Apply button. You can change the status of the selected projects by selecting the
status and clicking the respective Apply button.
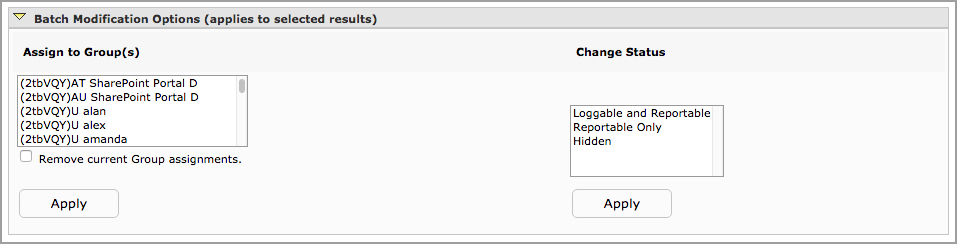
Figure 33.6.Project batch modification
Project Notes can be managed under Management-->Scheduled Projects-->Project Notes (see figure 18.7).
Project Notes provide a way for users to record complex comments and information for specific scheduled projects. Users have the ability to apply Project Notes to specific time, expense, and custom records in their sheets (Project Entry Notes). They can also create Project Notes from their Management tab where they can select a scheduled project and specify a note. Notes created from the main Project Notes screen are not associated with a specific time, expense or custom record.
To create a new Project Note, go to the Create a New Project Note section in
the main Project Notes screen. Select the project and specify the name for this
collection of Notes. When finished, click the Create button. Then click on the
Edit icon to add the first Note.
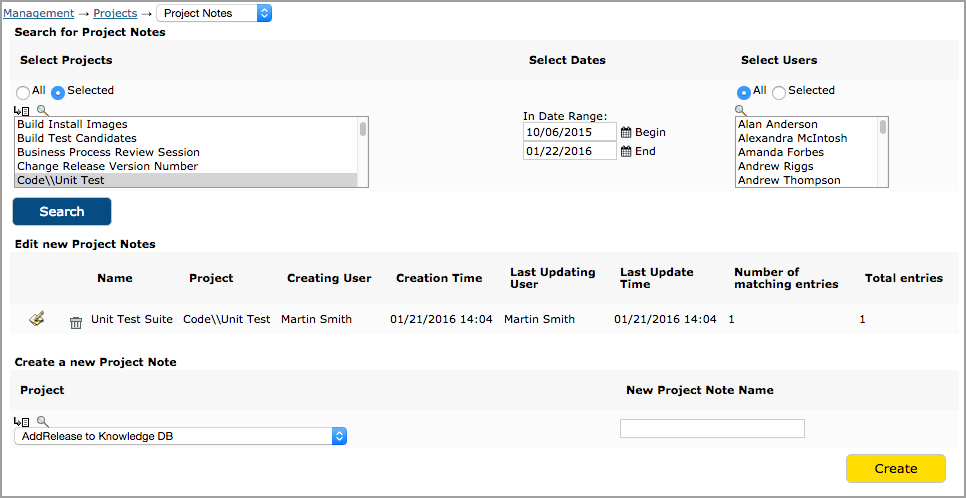
Figure 18.7.Project Notes
To view existing Project Notes, specify the search criteria and click the Search button. The search results will be displayed below the criteria. To view the details of the Project Notes, click the Edit icon. This will prompt a pop-up window displaying the details of the Project Notes with a space for adding an additional note. To add a new Project Note, specify the note in the textbox at the bottom of the pop-up and click the Add Entry button. Each new Note includes that date of creation and the user who added it. You may also edit a specific Note by clicking the respective Edit icon inside the pop-up window. Similarly, you can delete a specific Note by clicking the respective Trash Can icon.
If you are an Administrator, you can delete an entire set of Project Notes from the main Project Notes screen by clicking the respective Trash Can icon.
The system uses Project Dependencies to restrict which objects can be logged against a particular Scheduled Project by any given user. These objects include Activities, Pay Types, Bill Types, Expense Codes, Sources, Currencies, Locations, Items and Units. When no Project Dependencies exist for a scheduled project, it is considered 'open' and users can log entries against any item for a selected project as long that item is contained in at least one of the user's groups.
Group membership restricts users to logging entries against items that are contained in the Groups to which they belong. A user assigned to multiple Groups can combine elements from those Groups regardless of whether those objects are in the same Group. Consider a user's combination of Groups as one large Group for that user.
When logging time, expense, or custom entries, the user's Group membership and a Project's Dependencies are determined behind the scenes presenting only valid choices to the user. Care must be taken when creating Groups as well as Project Dependencies. If a scheduled project is dependent upon objects that are not contained in any of an individual's groups, that user will not be able to log records to that project.
NOTE: In addition to project-to-column dependencies that filter other columns based on the project selection, there is also an option to set up other column-to-column dependencies. For example, a selected Activity could cause the Pay Type column to be filtered for valid selections, and so on. The filtering occurs from left to right on the entry screens, so a selection in a target column can filter the selections in columns to the right of the target column. Column-to-column dependencies must be set up using an import file. Please see Import Tools under the section called Importing Entry Column Dependencies for more information on setting up column-to-column dependencies.

The Project Dependencies screen displays two columns of items. The first column contains items that are not dependent on the scheduled project. The second column contains items that are dependent on the scheduled project. Users will be able to select these items when logging time, expense, and custom entries. By default, every project in the system is initially in an 'open' state and any item (Activity, Pay Type, Currency, et. al.) within the database can be logged against any project, depending only on a user's Group affiliation. However, to limit what is selectable for this scheduled project, you must place the selectable items in the dependency list.
Items are moved between the two columns by clicking on them (ctrl-click or shift-click to select multiple items in a section) and then clicking the Change Dependencies button at the bottom of this screen. When the screen refreshes, you will see that items that were selected in the column on the left have moved to the column on the right.
You can have 'child' projects or tasks inherit the Dependencies of 'parent' scheduled projects in two ways. The system allows Dependencies for a 'parent' scheduled project to be assigned to the scheduled project's 'child' tasks manually at the time of Dependency assignment. Simply click the Change Dependencies and Apply to Children button located at the bottom of the screen.
Alternatively, when 'child' tasks are being created for this scheduled project, you can
automatically have the 'child' task inherit the Dependencies of this 'parent' scheduled project
by applying the automatic inheritance. This can be done by selecting 'yes' to the option labeled
'Should new children inherit these settings'. However, please keep in mind that existing 'child'
tasks will not inherit these Dependency settings unless you click the Change Dependencies and
Apply to Children button.
There is no limit to how many generations 'down' a scheduled project's dependencies can be applied. Therefore, if Project 1 has 'child' tasks spanning 8 additional generations, applying the Dependencies to Project 1's 'children' will result in all of those generations (including the last project generation - Project 9) inheriting Dependencies from Project 1.
A Scheduled Project inherits Dependencies from its closest 'parent' that has Dependencies. Therefore, if Project 1 has Dependencies and its 'child', Project 1A, has dependencies, then Project 1A2, a child of Project 1A, will inherit dependencies from Project 1A only and the Dependencies of Project 1 will not be associated with Project 1A2.
Project Approval Plans allow approvers within your organization to approve or reject users' submitted time, expense, and custom entries for specific scheduled projects. This type of Project Approval Plan based on scheduled projects can be used concurrently with Sheet Approval Plans that allow assigned approvers to approve/reject entire timesheets, expense sheets, and custom entry sheets. For example if a user has been assigned to a Sheet Approval Plan, his/her timesheets, expense sheets, or custom entry sheets will go through that approval process. If the user logs time, expenses, or custom entries to a scheduled project that has been assigned a Project Approval Plan, those entries will go through a separate project approval process. Hence it is possible to be part of two approval processes, one for the sheet and another for the scheduled project. However, keep in mind that if an approver rejects a time entry for a scheduled project, the sheet approver will be required to approve any changes. Likewise, when a sheet approver rejects a sheet, the project approver may be required to approve changes if they affect the scheduled project in question. It is possible to force rejection for all approvers on a level if a single approver on the level rejects. Please see the next paragraph for more details.
In order to implement a project approval process, a Project Approval Plan must first be created for the scheduled project. Within the Approval Plan, approvers must be assigned. When users submit their sheets containing time, expense, or custom entries against the scheduled project, the entries will enter the approval process and the designated approvers will have approval/rejection authority over the individual time, expense, and custom entries related to that scheduled project. This section specifically discusses creating Project Approval Plans. For more information about actually approving project entries, see the Approvals section of this manual.
Project Approval Plans can only be created for existing scheduled projects or after a
new scheduled project has been saved. Once you have created a scheduled project, go to the main
Scheduled Projects screen located under Management-->Scheduled Projects-->Scheduled
Project Management
(see figure 18.1). To create a Project Approval Plan, you must first select
the scheduled project to manage. Specify the search criteria for the scheduled project on the
main
Scheduled Project screen and click the Search button. The search results will be displayed
below the criteria. From the search results, click the name of the scheduled project you
would like to create an Approval Plan for. This will direct you to the Scheduled Project
Modification screen where you can manage an Approval Plan by clicking the 'Modify
Project Approval Settings' link in the Other Project Settings section (see figure
18.4). This will direct you to the Project Approval Plans screen (see figure
18.9).
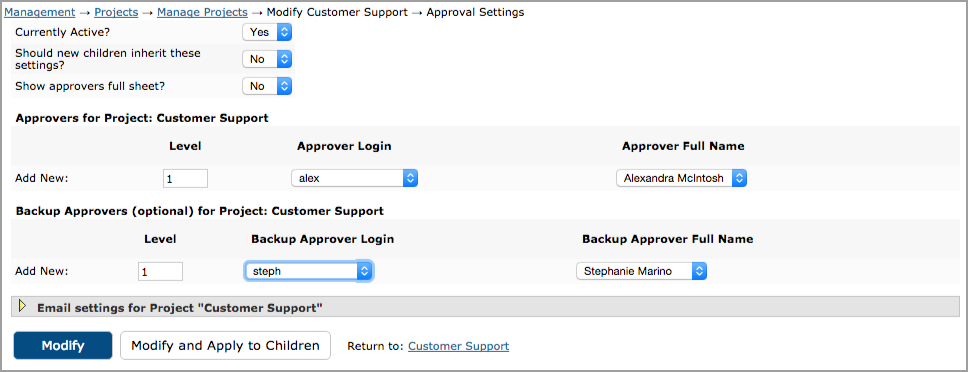
Figure 18.9.Project Approval Plan Settings
The 'Currently Active' dropdown allows you to choose between 'yes' and 'no.' If you want the Approval Plan to take effect immediately, you should set this option to 'yes.' The 'no' option is provided as a way to turn off the approval plan if you should ever find a need to have that process disabled. Please note that if you turn an Approval Plan off, any records that are 'in process' at the time you disable the process will continue through to completion.
The dropdown labeled 'Should children inherit these settings' allows you to specify whether 'child' tasks of this 'parent' scheduled project will inherit this Approval Plan when new 'child' tasks are created. Keep in mind that this inheritance will only be applied to new 'child' tasks at the time of creation. For existing 'child' tasks to inherit these properties, you must click the Modify and Apply to Children button after setting up the Approval Plan.
The dropdown labeled 'Show approvers full sheet' allows you to specify whether approvers in the Approval Plan will be allowed to see a user's full timesheet, expense sheet, or custom entry sheet when he/she has logged hours, expenses, or custom entries to the scheduled project. Keep in mind that users may log time, expense, and custom entries to other unrelated projects. By selecting 'yes' to this dropdown, it will allow approvers to view all entries logged for the period. By selecting 'no', the system will only display to the approver entries that have been logged to this scheduled project.
Next, select the Primary Approver(s) and Backup Approver(s) for the Project Approval Plan.
Selection of a Backup Approver is optional. An entry logged to the project will be directed to
the Backup Approver only if the Primary Approver has not taken any action on the entry submitted
for approval. The system allows you to select as many levels of Primary Approvers and Backup
Approvers for each Approval Plan as you like. You may choose to select each Primary Approver by
either the Username or Full Name. These dropdowns are dependent on one another, so as you select
a name in one dropdown, the other will dynamically update itself. To add more approval levels to
this Project Approval Plan, you must first save the Project Approval Plan by clicking the Modify
button. Once saved, the screen will refresh allowing you to select an additional level of
Approvers and Backup Approvers. To remove an approval level, simply check the respective Remove
checkbox and click the Modify button. This will refresh the Project Approval Plan screen with
the approvers having been removed.
To change the order of approvers within the Approval Plan, change the numbers in the Level text
boxes to the left of each approver's name to reflect the new order of approvers. If you need to
change only one approver level, you may use a decimal number to make the change.
When finished, you can click the Modify button to save changes. Alternatively, you can click the Modify and Apply to Children button if you wish for existing 'child' tasks to inherit this Project Approval Plan.
Each Project Approval Plan has Email Settings associated with it. Email Settings
is located in its own collapsible section (see figure 18.9 and 18.10). In order
for Email Settings to be enabled for Project Approval Plans, you must have your
mail server settings configured under Configuration-->System Settings-->Server
and Email.
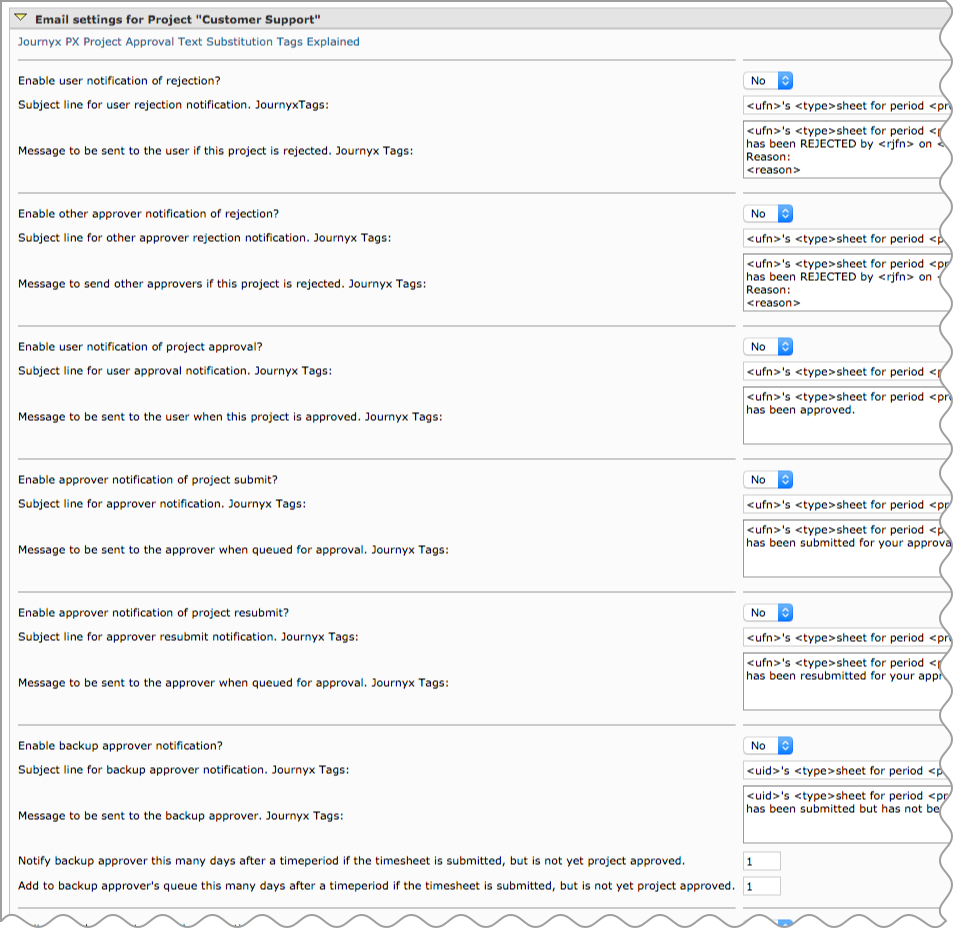
Figure 18.10.Project Approval Plan Email Settings
Within the Email Settings section of Approval Plans, you can view and manage the different emails that can be sent to approvers and users who have been assigned to the Approval Plan. The various Email Settings are detailed below.
User notification of rejection
When this email notification is enabled, the system will send an email to the user if his/her
project entry has been rejected by any one of the approvers in this Project Approval Plan.
Other approver notification of rejection
When this email notification is enabled, the system will send an email to all other approvers
when any single approver rejects a user's submitted project entry.
User notification of project approval
When this email notification is enabled, the system will send an email to the user that the
project entry has been approved.
Approver notification of project submit
When this email notification is enabled, the system will send an email to the approvers when a
user submits a project entry for approval.
Approver notification of project resubmit
When this email notification is enabled, the system will send an email to the approvers when a
user resubmits a project entry that had been previously rejected.
Backup approver notification
When this email notification is enabled, the system will send an email at a specified point in
time after a project entry has been submitted to, but not processed by, the primary approver
associated with the Project Approval Plan. The entry will be placed in the backup approver's
queue a specified number of days after the period has ended if a submitted entry has not been
approved or rejected by the primary approver. The default is 1 day after the end of a period,
though this value can be modified.
Email Log Options
The two email log options for each Approval Plan relate directly to the email log. The email log
should generally only be used if you are having difficulties with the emails for this Approval
Plan. Please enable these options only if instructed to do so by Journyx support.
The Email Setting fields for subject lines and messages accept plain text, HTML tags, and a
selection of 'tricky tags' that pull information directly from the system database. The
available tricky tags are given below along with the system information that the 'tricky tag'
will display:
| Tricky Tag | System Information Displayed | |
| <reason> | Displays the rejection reason for the submitted project entry | |
| <prd> | Displays the period of the submitted project entry | |
| <type> | Displays the sheet type submitted (time, expense, or custom) | |
| <uid> | Displays the username of the user who submitted the project entry for approval | |
| <ufn> | Displays the full name of the user who submitted the project entry for approval | |
| <uem> | Displays the email address of the user who submitted the project entry for approval | |
| <uphn> | Displays the phone number of the user who submitted the project entry for approval | |
| <rjid> | Displays the username of the approver rejecting the project entry | |
| <rjfn> | Displays the full name of the approver rejecting the project entry | |
| <rjem> | Displays the email address of the individual rejecting the project entry | |
| <rjphn> | Displays the phone number of the individual rejecting the project entry | |
| <aprid> | Displays the username of the final approver | |
| <aprfn> | Displays the full name of the final approver | |
| <aprem> | Displays the email address of the final approver | |
| <aprphn> | Displays the phone number of the final approver | |
| <baid> | Displays the username of the backup approver | |
| <bafn> | Displays the full name of the backup approver | |
| <baem> | Displays the email address of the backup approver |
When finished, you can click the Modify button to save changes. Alternatively, you can click the Modify and Apply to Children button if you wish for existing 'child' tasks to inherit this Project Approval Plan.