Import Tool Settings
Import Settings is located under Configuration-->Imports-->Import
Tool Settings.
Within the Import Tool Settings section, you can specify the
default file locations of the import files for each type of field import (see
figure 9.1). You can specify default import file locations for the following fields:
Groups, users, Projects,
activities, Pay Types,
Bill Types, Expense Codes,
sources,
Currencies, Locations, Items, Units,
Group membership, project/column dependencies,
accruals, memorized entries, time/expense/custom records, custom fields, holidays, approval
plans, rules, policies, custom conversions and
project-activity rates. Please keep in mind that
some of these fields may have been renamed by your system administrator. The time/expense/custom
record imports include additional fields for matching up user IDs and setting default values for
blank values. When finished, click the Save
button.
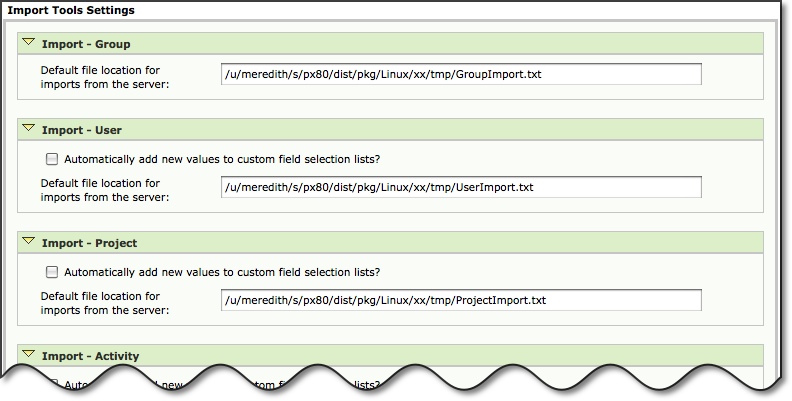
Figure 9.1. Import Tool Settings
Import Tool Access
Import Tool Access is located under Configuration-->Imports-->Import
Tool Access.
Within the Import Tool Access section, you can specify which
roles will have the ability to import files into the system for each type of field
import (see figure 9.2). You can specify import access for the following fields:
Groups, users, Projects,
activities, Pay Types,
Bill Types, Expense Codes,
sources,
Currencies, Locations, Items, Units,
Group membership, project/column
dependencies,
accruals, memorized entries, time/expense/custom records, custom fields, holidays, approval
plans, rules, policies, custom conversions and project-activity rates. You may also select
multiple roles by using the ctrl-click or shift-click functionality. When finished, click the
Save button.
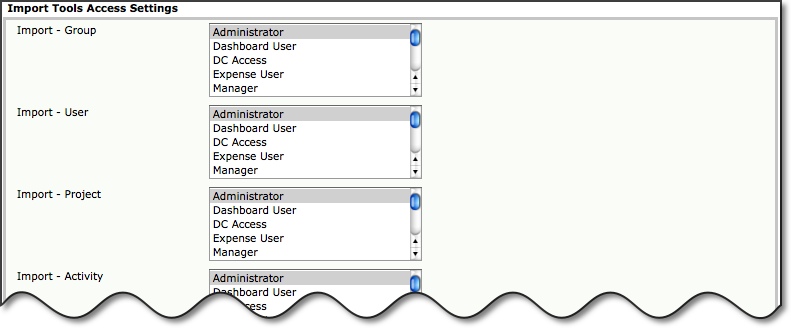
Figure 9.2. Import Tool Access
Import Tools
Import Tools are located under Configuration-->Imports-->Import
Name (see figure 9.3).
The system allows you to import values for the following
fields: Groups, users, Projects, activities,
Pay Types, Bill Types,
Expense Codes,
sources, Currencies, Locations,
Items, Units,
Group membership, project/column
dependencies,
accruals, memorized entries, time/expense/custom records, custom fields, holidays, approval
plans, rules, policies, custom conversions and project-activity rates. Please keep in mind that
some of these fields may have been renamed by your system administrator.
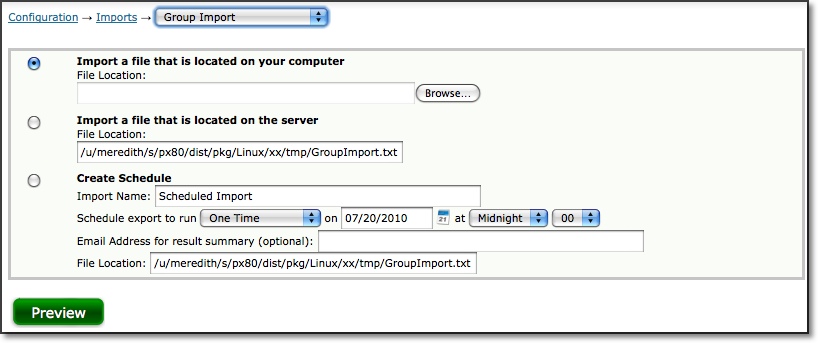
Figure 9.3. Import Tool
Once successfully
imported, users will be able to select the imported entry field values from the
respective dropdowns in their timesheets, expense sheets, and custom entry sheets depending
on Group membership and access. Administrators will also be
able to manipulate
the imported values in their respective areas. To import values, click the field
name for which you would like to import on the main Import Tools screen. The screen
will refresh with the options available for that particular import.
You
can import a file that is stored on your personal computer. If you choose this
method, you will be required to browse and select the file or specify the file
location in the textbox. Alternatively, you can import a file from the default
server file location. When you want to upload a file that is on the server, the
application itself will be acquiring that file. This is an important distinction
for network security. For the server import (and the scheduled import as well)
to work properly, the application must have the correct permissions to read the
import file from the server. Therefore, paths to the import file that do not contain
a drive letter will not work because the application will not have permission
to read from that location. If your installation is on a Windows server, the Anonymous
IIS account will attempt to read the file for import. The Anonymous IIS account
usually does not have read access to most directories, neither on nor off the
server. In this case, you will undoubtedly need to get assistance from your network
administrator to set this up. He/she will probably suggest changing whatever program
is writing the files to have them written into a folder that the Anonymous IIS
user already has permission to read. Journyx further recommends using the \Journyx\jwt\ps
directory for import purposes since this location is backed up by the application.
If your installation is on a Unix server, then it will be the account that installed
the application which will attempt to read the file for import. Your Unix server
administrator should be able to grant the proper read permissions without a problem.
After you have specified the file location, you can opt to preview the import
by clicking the Preview button. When finished, click the Import button.
You
may also schedule an import by specifying the file location, import name, email
address, and when to schedule the import. You should not enable scheduling until
you have manually imported files several times in order to verify that the system
which is producing the files is doing so correctly. Keep in mind that there is
no preview feature for scheduled imports. Therefore you are unable to predict
corrupt data being imported. The File Location field is looking for a server-file,
so you must supply a direct path to the file such as 'c:\importfiles\filename.txt'.
You cannot use relative path names that reference computer names like
'\bobscomputer\importfiles\filename.txt'.
For the date and time, you have the following scheduling options: one time, custom,
daily, weekly, bi-weekly, monthly by day, and monthly by date. The date and time
options will vary depending on the type of scheduling option chosen. For 'one
time', you must specify a date and time that you wish the import to take place.
For 'custom', you must specify the number of days between imports and the time
at which the imports are to take place. For 'daily', you must select which days
of the week and the time at which the imports are to take place. For 'weekly',
you must select the day of the week and the time at which the imports are to take
place every week. For 'bi-weekly', you must select the day of the week, time,
and the effective date for which the imports are to take place every other week.
For 'monthly by day', you must select the day of the month and the time at which
the imports are to take place every month. For 'monthly by date', you must select
the date of each month and the time at which the imports are to take place each
month. When finished, click the Create Schedule button.
To delete an existing
scheduled import, click the field name. The screen will refresh with the ability
to delete any scheduled imports that you have for that specific field. Select
the scheduled import to delete and click the Delete Schedule button.
'Special' Characters, Languages, and Character Sets
Journyx uses the standard Unicode character set for all
internal data
storage. A character set is how the system turns the raw numbers inside the
file into the characters (letters) you see on the screen. Unicode is a
"universal" character set - it is capable of storing text from any human
language within a single file or site. However the source for your import
file may be a different character set (encoding). Therefore when running an
import you need to select the correct character set on the Import screen.
Unfortunately the correct character set cannot be guessed with 100%
accuracy. The character set dropdown menu defaults to the last character set
you used and the initial default is "Windows-1252", a commonly used
character set in Western Europe and the Americas. This is typically a good
choice for users in those regions. Windows-1252 is sometimes known as
"ANSI" or "Latin-1".
If the language or encoding you need is not listed in the choices in the
dropdown, try converting your file to the UTF-8 (Unicode) format first and
then importing it as UTF-8. The command-line program "iconv" is provided
with Journyx to facilitate conversions between different
character sets.
Alternatively you can contact Journyx Support and request that we add a
character set to this list.
File Formats, Backing Up Database, and Sample Text Files
Journyx
recommends that you build your import files in Excel and save it as a tab-separated-text
file. This will ensure that double-quotes are added around each field that contains
a comma. Journyx has enhanced the import tool functionality to automatically strip
double-quote characters from every field upon import, if and only if the double-quotes
are the first and last characters in a field. Therefore, in the unlikely event
that you want a field to contain an initial and ending double-quote, then you
will simply have to double your double-quotes. So, for example, ""John Smith""
will result in "John Smith" being imported. Generally both double-quotes and commas
should be avoided except in fields that specify them like a user's Full Name or
the Groups field.
Similarly, for fields that support multiple comma-delimited
values (Groups and Authority), if your Group or Authority name has a comma in
it then this will cause problems with the import. An example of comma-delimited
values that would cause an import problem would be 'G1, G2, G,3, G4' where the
name of the third Group actually contains a comma. In such a
situation, double
the comma in the name like this: "G1, G2, G,,3, G4". The import tool will recognize
the doubled comma and treat it as a single comma that is part of the name and
not a delimiter.
The following list of files is designed to help you with
the different types of imports that are available. For the various types of imports,
you can view or save sample text files and spreadsheets that are preformatted
and ready for import. There may also be a file that contains the proper names
of headers, field size, and whether or not the field is required for import. The
# column is displayed in this chart for ease of reading; your import file will
not have these numbers. The Header column displays the name of each field and
should also be the header in the import file. The columns in your import file
may need to be changed from the values shown in the sample files if you have renamed
any of the headers. The Req column indicates whether or not the field is required
for import ("Y" = required). If a field is required, then every record (row of
the file) must have a valid value in that field. The Size Column contains the
maximum number of characters that are supported for each field. You should start
by testing these in a non-production environment. The sample files that are attached
can all be imported without any modifications. You can edit and re-import them
to verify that you are able to edit and build importable files.
In the event
that you wish to rename a system object such as a project or
an activity, journyx
has a feature that allows you to efficiently rename these system objects using
import files rather than changing each system object manually. This is especially
helpful when you want to avoid duplication or need to make numerous name changes.
In the import file, create a new column labeled 'NewName' immediately after the
column containing the system object whose name(s) need changing. The old name
should be in the PrettyName or ProjectName column, depending on which import tool
you are using. The new name should be in the NewName column and in the row cell
to the right of the old name.
Finally, you should always 'backupdb' your
journyx database before you begin importing files, especially
into your production
environment. The 'backupdb' is a proprietary Journyx backup file that contains
everything necessary to replicate your environment on a different server. Backupdb
is the command you will run at the Journyx Command Line prompt and it will generate
a zipped file with the '.jx' extension.
If your journyx server is a Windows
computer, then you will have to login to the server to perform the backupdb. On
the server, click |Start|, |Programs|, |Journyx|, and then |Journyx
Command Line Prompt|. A DOS window will appear. You are now at the Journyx command
prompt, and can run the 'backupdb' command to generate the file.
If your
journyx server is a Unix computer then you will have to login
to the server
and 'su' to the account that journyx is running under. Find
your journyx installation
directory by looking for the 'config' file. From that directory, cd to pi/bin.
In <installdir>/pi/bin, type '. ./setup' to source the setup file and set
your environment variables. Now you are ready to run the backupdb command.
At
the command prompt, the backupdb command is very simple. Just type 'backupdb'
and you will get detailed usage instructions. Generally you will simply type 'backupdb
-v backupfile' and a file called 'backupfile.jx' will be created in the directory
that you are in. The backupdb command will tell you what it is doing and when
it is finished. Your users will not be able to log in to journyx while backupdb
is running.
Importing Groups
Importing Users
Importing Projects
Importing Projects/Scheduled Projects
Importing Assignments
Importing activities
Importing Pay Types
Importing Bill Types
Importing Expense Codes
Importing Sources
Importing Currencies
Importing Locations
Importing Items
Importing Units
Importing Groups Memberships
Importing project Dependencies
Importing Column Dependencies
Importing Accruals
Importing Memorized Entries
Importing Time Records
Importing Expense Records
Importing Custom Entry Records
Importing Custom Fields
Importing Holidays/Holiday Schedules
Importing Approval Plans
Importing Rules
Importing Policies
Importing Custom Conversions
Importing Currency Conversions
Importing Mileage Conversions
Importing Project-Activity Rates