Managing Expense Entries
Expense Entry is located under Expense-->Standard Expense Entry (see figure 30.1 below).
NOTE: Version 10.0 includes a redesign of the user interface for all entry screens. Click here to compare the old screen with the
new one and locate your favorite features. This example shows a time entry screen, but most of
the changes apply to expense entry screens as well.
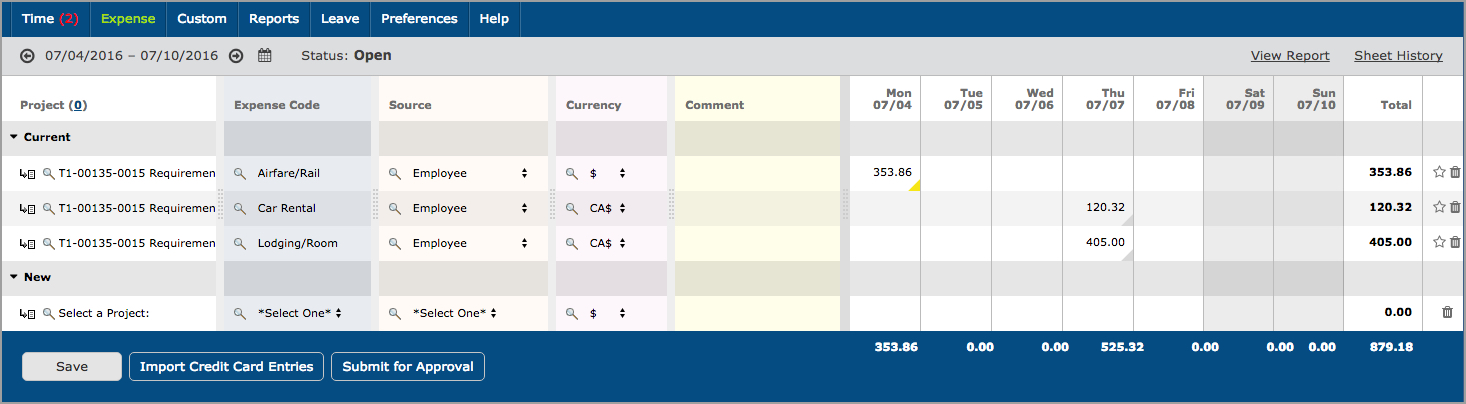
Figure 30.1. Expense Entry
Expense Entry allows you to enter your business-related expenses on a single screen. The default
expense entry screen is shown above. This section of the manual will refer to items as they are
seen on this particular screen. Keep in mind that expense entry screens are configured by
administrators, so your expense entry screen may vary in appearance and functionality from the
one shown. For example, the system allows your organization to customize the names of items used
for expense tracking. Certain column headers on your expense entry screen such as Project,
Expense Code, Source and Currency may be hidden or may have been renamed altogether. Your
expense entry screen should behave exactly as described here, even if the names have been
changed or certain columns are not visible.
Your administrator has already setup your expense entry screen to let you log expenses during a
particular period or date range. Expense periods are typically a week, month, or pay period,
depending on how your company prefers to track expenses. You can view your expenses for a single
day or an entire period. Expense Entry displays the period view by default. To enter expenses or
view amounts for a different period, you can use the arrows on either side of the date range in
the gray status bar above the expense entry grid to move one period back or forward. You can
also use the calendar icon in the same status bar to jump to a particular date.

Entry Screen Status Bar
To enter expenses for a single day, click on the date range in the gray status bar. To enter
expenses or view amounts for a different day, you can use the arrows or calendar icon. To return
to the period view, click on the date in the gray status bar again.
To create an expense entry, select a value from each of the drop downs shown on your expense
entry screen. You may also be required to enter a Comment for the expense entry, depending on
what your administrator has set up for your entry screen. Once you have made your selections,
you can then enter the expense amount for the selected entry details on a specific date.
If your administrator has allowed you to track your work-related mileage or distance traveled,
you can track that mileage on the expense entry screen as well. If you select your mileage- or
distance-enabled code from the Expense Code column on the expense entry screen, the amount field
will change from accepting expense amounts to mileage or distance amounts. While you are
entering your distance amount, you will also be able to see the rate that will be applied to the
distance. After you save the distance amount you have entered, the amount field will be
converted to the expense amount based on the applicable rate. If you need to change the distance
amount that was originally entered, you can do so by clicking on the field to change it. If you
need to see what was entered as the distance amount, you can either hover over the entry or run
an expense report with the Mileage field included in the report. NOTE TO ADMINISTRATORS: Expense
Code values can be flagged as mileage or distance by creating an Expense Code Custom Field
called "Mileage Expense" and setting the field to "Yes" for Expense Codes that should be entered
as distance amounts. See Custom Fields and Mileage Conversions for more information
on setting up the custom field and conversion rates for mileage/distance tracking.
Once you have selected the appropriate items and entered your amount for that combination, click
the Save button at the bottom of the expense entry grid. The expense entry screen will reload,
and your entries will now appear in the Current section of the entry grid. In some cases, your
Journyx Administrator may have configured the system so that
existing entries are locked. In
this case, you cannot simply change the amount for an existing entry. Instead, click on the link
for the expense amount, make the necessary change, and enter a reason for the change. If the
sheet is not locked, you may add more to an existing entry in the same day by simply changing
the amount. In either case, you can always add expenses to another day in the time period that
is currently displayed.
You may create more than one expense entry at a time. Simply create the actual expense entries
for different days and/or different combinations of items under the New section of the entry
grid and click the Save button. The entry screen will reload, and your entries will now appear
in the Current section.
To edit an expense entry row on your expense entry screen, click on the field that you want to
edit for a selected row. (Note that for locked sheets, you may not be able to edit anything but
the amount.) Clicking on the field will open it up for editing. After making the changes to an
existing row, click on Save to preserve the changes.
To delete a an entry from your expense entry screen, click the Delete icon ( ), a trash can, to the
right of a selected row of entries. The amounts on that row will be removed. The next time you
click Save, the row will no longer appear on your entry screen. You can also simply remove an
amount in an existing entry and click Save to remove the entry.
), a trash can, to the
right of a selected row of entries. The amounts on that row will be removed. The next time you
click Save, the row will no longer appear on your entry screen. You can also simply remove an
amount in an existing entry and click Save to remove the entry.
Finding and Selecting Projects for Entry
There are four ways to select a project when managing expense entries. You can use the expandable
Project Tree, the Inline Tree in the Project select list, Project Search, or the My Projects
List.
Project Tree
The first method allows you to select a project from a hierarchical tree that contains all
the projects to which you have been granted access, as well as some of the parent projects
that are required for drilling down into the hierarchy. To view the tree, click the Project
Tree Icon ( ), an
arrow with a list, located to the left of the respective Project select list. This will
launch a pop-up window containing a navigable project tree with expanding
and collapsing nodes (see figure 30.2). To open a node and view all tasks/child projects,
click the expand node. To close a node and hide all tasks/child projects, click the collapse
node. When you have found the project that you wish to log time to, select the project and
click the Done button. This will close the pop-up window and the project you selected should
appear in the Project select list.
), an
arrow with a list, located to the left of the respective Project select list. This will
launch a pop-up window containing a navigable project tree with expanding
and collapsing nodes (see figure 30.2). To open a node and view all tasks/child projects,
click the expand node. To close a node and hide all tasks/child projects, click the collapse
node. When you have found the project that you wish to log time to, select the project and
click the Done button. This will close the pop-up window and the project you selected should
appear in the Project select list.
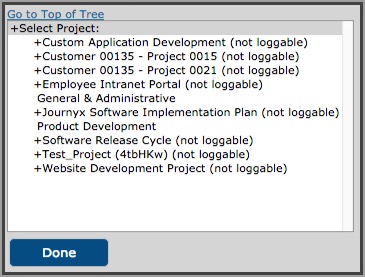
Figure 30.2. Project tree
Inline Tree in Select List
The second method allows you to drill down into the project
hierarchy using a project tree that is included in the project select list itself. If your
administrator has set up your entry screen to include this option, you can navigate down
through the hierarchy of projects by clicking on selections directly in the Project select
list. After each selection, the next level in the hierarchy
is displayed. The final selection that is made prior to save determines the project
to which an entry will be logged.
Project Search
The third method allows you to specify search criteria and select a project from the search
results. To
do a project search, click the Project Search Icon ( ),the
magnifying glass, located to the left of the respective Project select list. This will
launch a pop-up window containing search criteria (see figure 30.3). Specify the project
name or description of the project to be located. As you type, you will see returned search
results below the search criteria. From the search results, you can select the project for
use in a new entry. When you select the project, the pop-up window will automatically close
and the project you selected will appear in the Project select list. Additional search
options are available by clicking on the arrow to expand the Search Options
table.
),the
magnifying glass, located to the left of the respective Project select list. This will
launch a pop-up window containing search criteria (see figure 30.3). Specify the project
name or description of the project to be located. As you type, you will see returned search
results below the search criteria. From the search results, you can select the project for
use in a new entry. When you select the project, the pop-up window will automatically close
and the project you selected will appear in the Project select list. Additional search
options are available by clicking on the arrow to expand the Search Options
table.
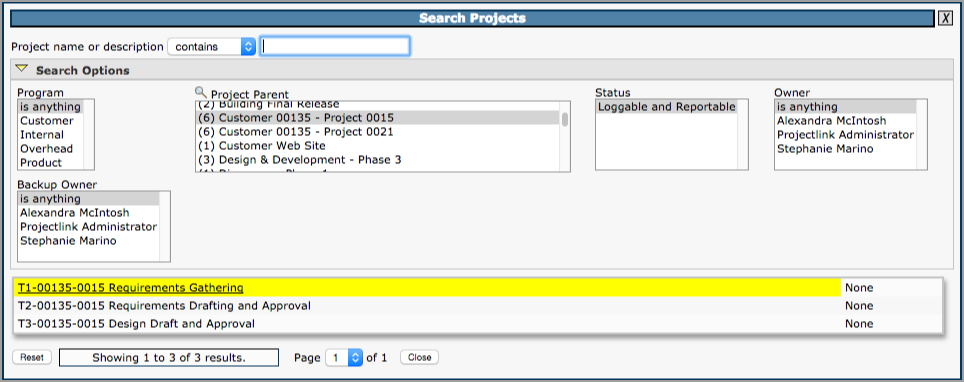
Figure 30.3. Project search
You can maintain your own unique list of projects that will be displayed by default in the
project select list. This will keep you from having to routinely locate and select a project
using the other methods when you have a group of projects that you routinely work. The My
Projects link, a number in parentheses next to the Project column label, will launch a
pop-up window that can be used to add and remove projects from your unique Project list (see
figure 30.4). You may add projects from the Available Projects list by selecting the
projects and clicking the Add button. These projects will be added to your project list
shown in the box to the right. To remove a project from your project list, select the
projects and click the Remove button. You also have the ability to add and remove all
projects to and from your Project List. When you are finished, click the Save button.
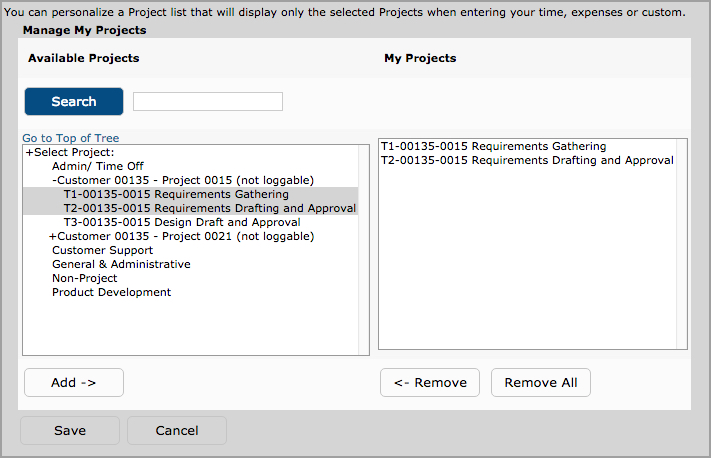
Figure 30.4. My Projects
Memorized Entries
Memorized Entries allow you to save your most common entries so that you do not have to
repeatedly select them when entering expenses. A Memorized Entry contains a single Project,
Expense Code, Source, Currency, and Comment.
After an entry has been memorized, it will appear in all your expense entry screens thereafter.
You then only need to enter the amount, if any, for that entry.
To create a Memorized Entry, select the appropriate Project, Expense Code, Source, Currency, and
Comment, and then click the Save button. After the entry has been saved,
you will see the Memorize Icon ( ),
a gray star, to the right of the entry. Click the Memorize Entry Icon, review the contents of
the entry as it is displayed on the User Memorized Entries screen, and click Save to preserve
the entry. The information in that entry will be memorized, except for the amount, and will
appear on your expense entry screens thereafter. You can also memorize part of an entry by using
the wildcards feature. Selecting the 'any' value from any of the select lists will not memorize
that field. The same is true when leaving the Comment field blank. When a field is left open as
a wildcard, you can select the value at the time you enter the amount for the memorized entry.
The Project field is not eligible for wildcards and cannot be left open for later selection.
),
a gray star, to the right of the entry. Click the Memorize Entry Icon, review the contents of
the entry as it is displayed on the User Memorized Entries screen, and click Save to preserve
the entry. The information in that entry will be memorized, except for the amount, and will
appear on your expense entry screens thereafter. You can also memorize part of an entry by using
the wildcards feature. Selecting the 'any' value from any of the select lists will not memorize
that field. The same is true when leaving the Comment field blank. When a field is left open as
a wildcard, you can select the value at the time you enter the amount for the memorized entry.
The Project field is not eligible for wildcards and cannot be left open for later selection.
You may also create a Memorized Entry at any time by going to Expense-->Memorized Entries-->Create
Memorized Entry (see figure 30.5). Select a Project, Expense Code, Source, Currency, and
Comment. When finished, click the Save button. The entry will be memorized and will appear on
all your expense entry screens until you delete it.
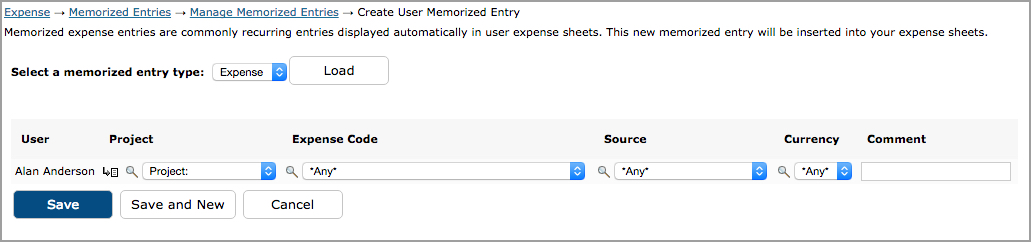
Figure 30.5. Memorized Expense Entries
To manage existing Memorized Entries, go to Expense-->Memorized Entries-->Manage Memorized
Entries. This screen will show you all the Memorized Entries that you have stored in the system.
These are all the Memorized Entries that appear on your expense entry screen. You can change the
Project, Expense Code, Source, Currency, and Comment for the respective Memorized Entry that you
want to modify. When finished, click the Save button. To delete a Memorized Entry from your
expense entry screen, select the Memorized Entries to delete and click the Delete button.
Previous Entries
The Previous Entries section of the entry sheet shows entries entered in the past if you have
turned on the Previous Entries section under Preferences-->Entry Screens. If you also have
Memorized Entries on your sheet, Previous Entries will be displayed in the same section as
Memorized Entries. Previous entries will continue to show up on each week's entry screen until
you stop logging time against them.
Project Entry Notes
The system allows you to create Project Entry Notes for any expense entry. Project Entry Notes
provide a way for you to record complex comments and information for the amount logged in a
specific entry. You can create a Project Entry Note for a specific entry by clicking the gray or
yellow triangle in the lower right corner of the field with the entry amount. A gray triangle
indicates that the entry does not yet have any notes or attachments. A yellow triangle indicates
that an entry has at least one note or attachment. You can hover over the triangle to see what
information exists for the entry. The entry must already be saved in the system before you will
see the gray/yellow triangle. Clicking on the triangle will launch a pop-up window which can be
used to create, edit, or delete Project Entry Notes (see figure 30.6).
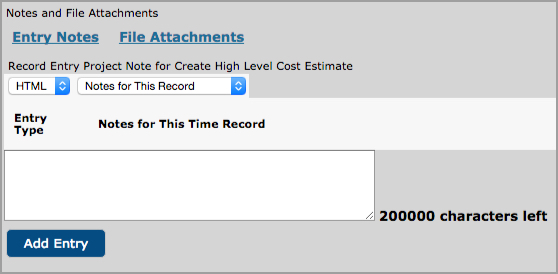
Figure 30.6. Project Entry Note
You can also manage Project Notes and Project Entry Notes under Preferences-->Project Notes.
You can view existing Project and Project Entry Notes by selecting the search criteria and date
range and clicking the Search button. The search results will be displayed below the criteria.
To create a new Project Note, go to the 'Create a New Project Note' section. Select a Project
and enter a note. When finished, click the Save button. Unlike a Project Entry Note, a Project
Note created on this screen will not be associated with a specific entry with an amount and
date.
View Expense Report
The View Expense Report link in the right corner of the gray status bar above the expense entry
grid takes you to a view of your expense entries for the period in report format. You have the
option to display this link or not. You also have the option to pick which expense report will
run when you click this link. Under Preferences-->Entry Screens you can pick the default
expense report that will be tied to the View Expense Report link, or you can remove the link.
You can also modify the default report under Reports-->Standard Reports. See the Reporting section of this user manual for more information on
creating and editing reports.
Sheet History
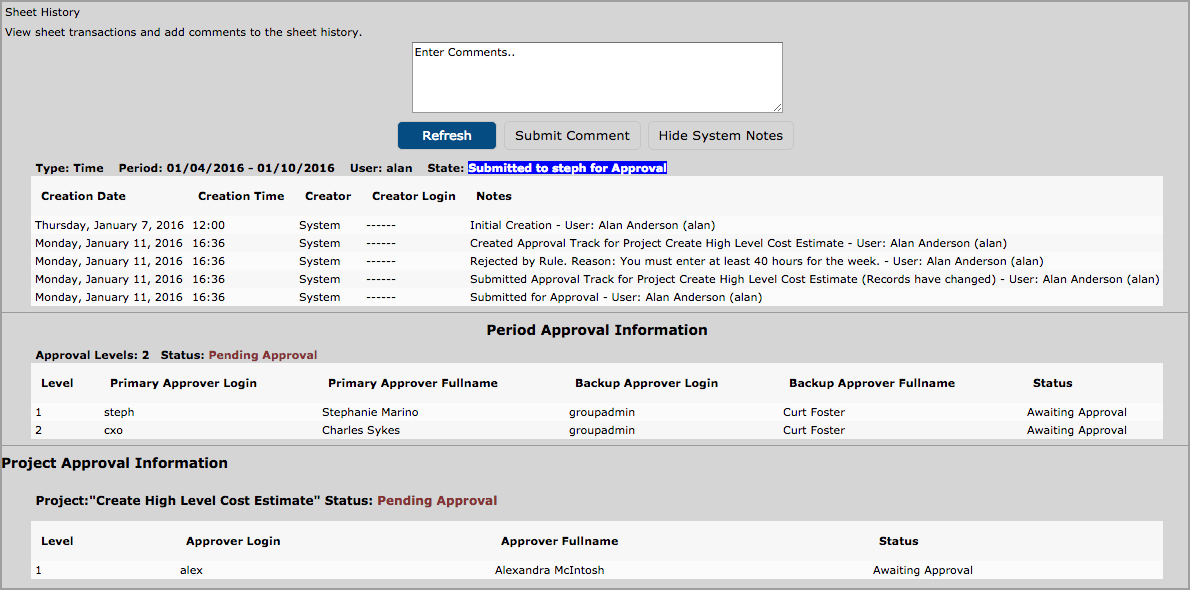
Figure 30.7. Sheet history
Sheet History contains notes regarding an expense sheet for a specific period and the approval
process for that period. The Sheet History link is located in the right corner of the gray
status bar above the expense entry grid. Clicking the Sheet History link will launch a pop-up
window containing all the actions associated with the expense sheet to date. You can insert a
note in the sheet history (i.e., for approvers) by entering the text in the available text box
and clicking the Submit Comment button. To view more details click the Show System Notes button.
This will display the system notes that correspond to the actions associated with the expense
sheet. To hide the system notes, you can click the Hide System Notes button.
Uploading File Attachments
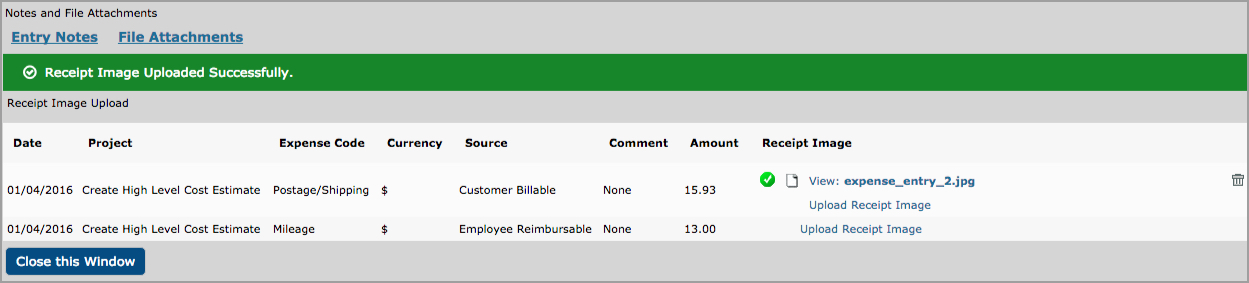
Figure 30.8. File attachments
If your administrator has given you access to upload attachments and receipt images, you will
see gray or yellow triangles in the lower right corner next to the amounts for existing entries.
Before you can upload files, you must create some expense entries and save changes. After
creating entries, click the gray or yellow triangle next to the amount of the entry for which
you want to add an attachment. A gray triangle indicates that the entry does not yet have any
notes or attachments. A yellow triangle indicates that an entry has at least one note or
attachment. You can hover over the triangle to see what information exists for the entry.
Clicking on the triangle will open a pop-up window that shows links for Entry Notes and File
Attachments. Click on the File Attachments link, and a list of your current time entries will be
displayed. Find the entry you want to use. Then click the Upload File Attachment link. Click the
Choose File button and select the attachment from your local computer files. Then click the
Attach File button to complete the process. You can upload multiple attachments per expense
entry as long as they each have a different file name. Your administrator may choose to limit
the total number of attachments or the type of files allowed. For example, the administrator may
only allow PDF files. The administrator may also set a limit on the size of individual files.
You can delete an attachment by clicking on the trash can icon next to the file name. When you
are finished managing your attachment, click on the Close This Window button.
Importing Credit Card Entries as Expense Entries
You can import bank statements and credit card files containing your expenses for the
Expense Entry period
by clicking the Import Credit Card Entries button. This will prompt a pop-up window
allowing you to select the file to import into the system (see figure 30.10). Select the file by
clicking the Browse button. When complete, click the Import button. Supported file formats
include Open Financial Exchange (.ofx and .qfx) files, as well as the older
.qif Quicken Interchange Format files. OFX/QFX files are often provided by banks and
credit card providers via the 'Download Transactions' button or similar features.
You will be presented with all the records in your file along with the option to choose
individual entries and set the Project,
Expense Code,
Currency,
Source, and
for each entry. The defaults for these
columns will be chosen from your Expense Entry screen
defaults.
The will be automatically included in
each entry as a result of the
import, along with the date and the amount.
Once you have selected your entries and selected all of the details, you can click on
the Save button. This will close the pop-up window and your expense entry screen will contain
the expenses you selected in your credit card data file. Expenses in .ofx/.qfx/.qif
files can only be selected on the expense entry screen that corresponds to the same period as
the date of the expense entry.
Submitting Expenses for Approval
If you are assigned to an expense approval plan, you can click the Submit for Approval button to
submit your expenses to your supervisor for the sheet period. Once your expenses have been
submitted for approval, you may not alter any of the entries on the submitted sheet. Therefore,
do not submit your expenses until you have finished all entry for the time period in question.
If you discover that you need to make a correction after the sheet has been submitted, contact
your approver and have the sheet rejected so that corrections can be made. For more information
on the Approvals process, please see the Approvals section of this manual.
Expense Entry Corrections
When an entry is changed on an entry screen, it can be handled in several different ways
depending upon the state of the sheet and the system setting for "Level of auditing required
when users make changes to existing entries." Most of the time, you will not be aware of what
the database is doing with changes as you make them. It will simply handle the changes "under
the hood" as you update your entries. If your administrator has set your audit level to 3 or 5,
you will be required to enter a reason for changing an existing entry on either a submitted or
open sheet. Sheet status must be open or rejected in order to make changes.
Administrators and users whose role includes the Prior Period Corrections ability can make
changes to entries on approved sheets. For these users, the Save Corrections button will appear
on approved sheets. When this button
is present, corrective entries can be entered in the blank rows at the bottom of the screen.
Historical Expense Sheets
Your past and present sheets can be viewed under Expense-->Expense Sheets-->All Expense
Sheets (see figure 30.9). Here you will see a list of sheets based on the dates of the periods.
You can view the details of each sheet by clicking on the Click to View link.
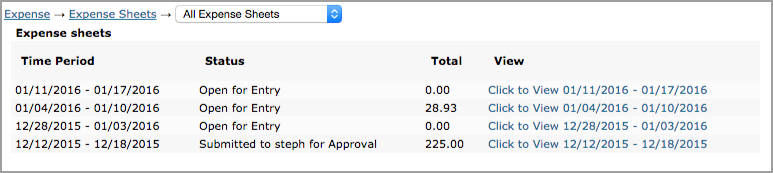
Figure 30.9. Historical expense sheets