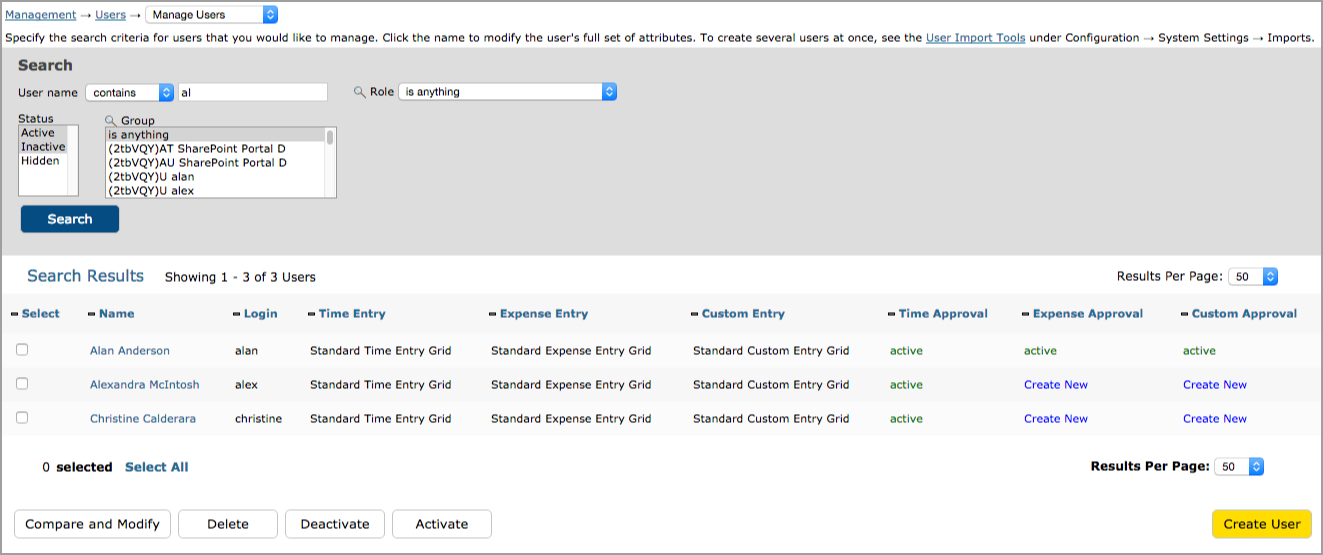
Figure 10.1. User search and selection
User Management |
Help Contents |
User Management is located under
Management-->Users-->Manage Users (see figure 10.1).
The User Management
section allows you to modify a user's profile, roles, assigned groups, entry screens,
default memorized sheets, approval plans, period assignments, policy assignments,
and custom fields.
Figure 10.1. User search and selection
To manage a user, you must first specify search criteria for the users that you want to view and modify. After specifying the search criteria, click the Search button. This will display the search results below, from which you can select the user to modify by clicking the name. You will be taken to the user modification screen where you will be able to modify the above mentioned user attributes (see figure 10.2). From the search results page, you may also select users that you would like to Activate or Deactivate by selecting the users and clicking the respective button (see figure 10.1).
By default, the search results on the User Management screen show all Active users. User status is defined by the values in the Employee Start and End Date fields within the Custom Fields in each user's profile. Active users have a start date that is or precedes the current day and a blank or future end date. Any users who have future start dates or expired end dates will show up in search results for inactive users.
When a new user is created, the Employee Start Date is automatically set to the current day. However, this field can be changed to reflect any date. This date not only determines when the user will become active and thus have access to the Journyx system, but it also determines on what days the user can enter time, expense, or custom records. If the employee becomes active in the middle of a period, he/she will only be able to enter records from the start date going forward. Likewise, a user cannot enter records after the Employee End Date.
Users can be deactivated by either selecting them from the search results and clicking the Deactivate button or adding a value to the End Date field within the user's profile. If you deactivate a user by clicking on the button, the End Date field is automatically populated with the date of the previous day. Inactive users retain their user profiles and configuration, but they are no longer able to access the Journyx system, and no one can enter records for them outside of their active dates. Inactive users continue to appear in Standard Reports. Inactive users do not receive approval email notifications, and approvers will only receive notices for inactive users that apply to periods when they were active.
It is also possible to activate inactive users. This
can be done by either selecting them from the search results and clicking the
Activate button or updating the Start Date and End Date fields within the user's
profile. Reactivated users retain their original configuration, so no other steps
are necessary to grant them access to the appropriate information in the Journyx
system. When a user is reactivated, the Start Date and End Date fields are reset
to the current values. Previous start and end date values are NOT retained.
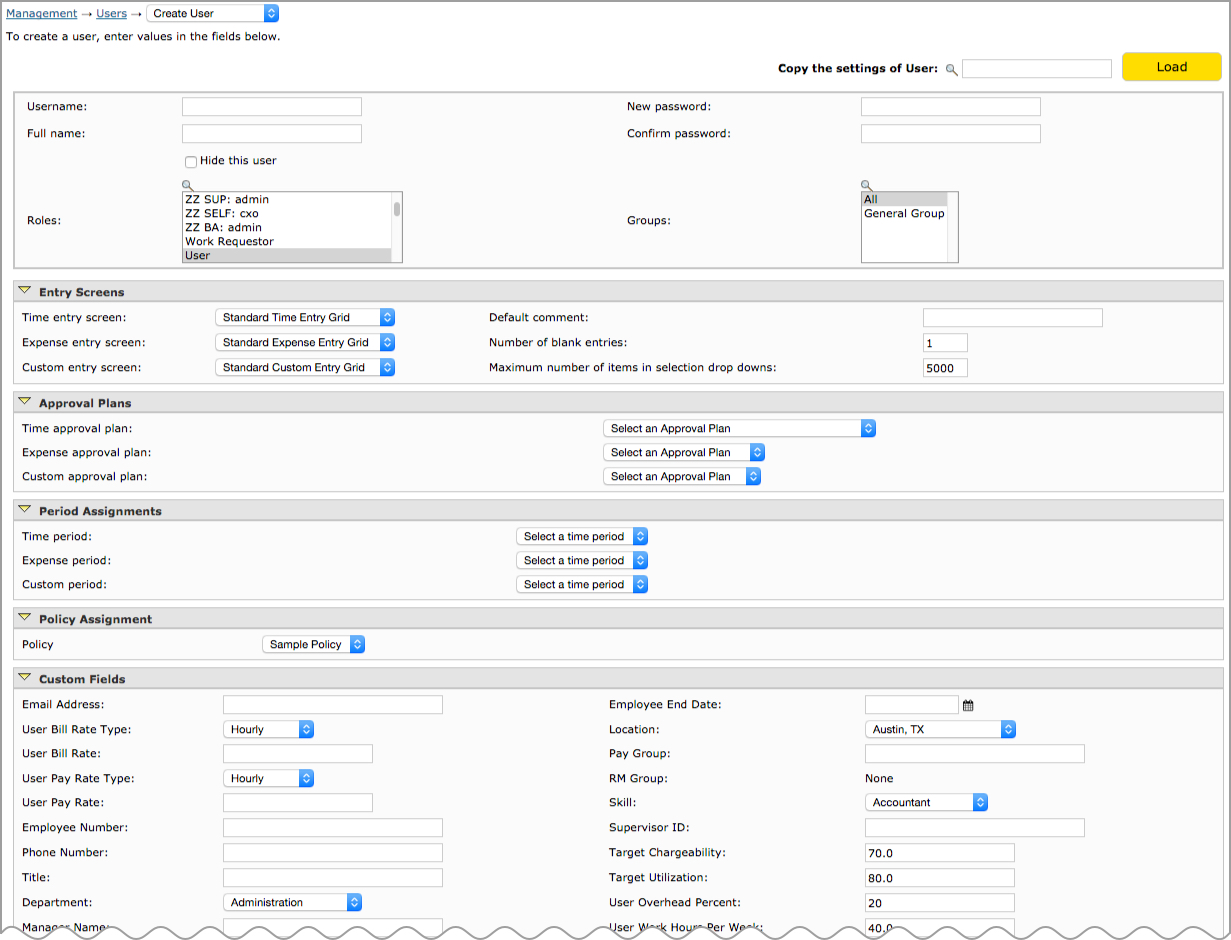
Figure 10.2. User management screen
The User Profile and Privileges section contains the username, full name, password, roles that the user has been assigned to, and groups that the user has been assigned to (see figure 10.2).
The username cannot contain the following special characters:
|
!
|
"
|
#
|
$
|
%
|
'
|
*
|
+
|
,
|
/
|
¿
|
|
:
|
;
|
<
|
>
|
=
|
?
|
[
|
]
|
\
|
^
|
|
|
`
|
{
|
}
|
|
|
~
|
¡
|
¢
|
£
|
¤
|
¥
|
¦
|
|
§
|
¨
|
©
|
ª
|
«
|
¬
|
SHY
|
®
|
¯
|
°
|
±
|
|
²
|
³
|
´
|
µ
|
¶
|
·
|
¸
|
¹
|
º
|
»
|
¼
|
|
½
|
¾
|
(space)
|
  (non-breaking space)
|
|||||||
If you do not specify a password for a new user, his/her password will be the same as the username. A user may also be switched from Active to Hidden status. If a user is hidden, he/she will not be able to login to the system for tracking or reporting purposes. In addition, his/her previous records will only be available in reports run by users with Administrator authority. Hiding users removes them from their Group memberships. As a result, managers cannot report on hidden users' data. A user should only be hidden in the event that his/her records are no longer needed for reporting purposes. If the user data is still required or the user might need access to the system again in the future, the user should be deactivated as described in the previous section.
Roles define the privileges that the user will have. For more information on roles, see the Roles section of this manual. You can select multiple roles by using the ctrl-click or shift-click functionality.
Groups define the field values that the user will have access to such as specific projects, activities, expense codes, etc. You can select multiple groups by using the ctrl-click or shift-click functionality. For more information on groups, see the Groups section of this manual.
In the Entry Screens section, you can select the type of time entry screen, expense entry screen, and custom entry screen that the user will utilize when logging time, expenses, and custom entries (see figure 10.2). You can further specify a default comment and default number of blank entries to display for that user's timesheets, expense sheets, and custom entry sheets. Keep in mind that users will still be able to override these default values from their Preferences section. The last field in this section allows you to set the maximum number of items to display in selection dropdown menus on entry screens. This setting determines at what point a dropdown selection menu is switched out for search only selection. This value will only take effect if it is less than the value in the global preference for this field. For more information on this setting, please see the Entry Sheets section under System Settings in this manual.
This option allows you to assign or change the default memorized sheet for a user (see figure 10.2). You can create memorized sheets under Management-->Memorized Sheets.
In the Approval Plans section, you can select the approval plans for the user's timesheets, expense sheets, and custom entry sheets (see figure 10.2). The system further allows you to make modifications to the assigned approval plans. Modifying the approval plans from the User Management screen will not affect the other users that have been assigned the same approval plan. Please note that if you make modifications to the individual user's approval plan, the user's association with the original approval plan will be removed. You should only make modifications to a user's approval plan via the link on this page if you want the user to have a plan that is completely unique to him/her. To modify the approval plans for the selected user only, click the respective link next to the selected approval plan labeled 'Modify Approval Plan for this user'. This will take you to the Approval Plan management screen where you will be able to select the primary and backup approvers, as well as make modifications to the approval plan email settings. For more information about approval plans, see the Approval Plans section of this manual. If you are using Organization Chart Manager to create your approval plans, you will not assign a time approval plan on this screen.
In the Period Assignments section, you can assign the period for the user's timesheets, expense sheets, and custom entry sheets (see figure 10.2). If the user was already assigned a period for a sheet and you would like to assign a different period, simply select the new period from the respective dropdown. You also have the option to delete any sheets that used the previous period by checking the checkbox labeled 'Remove old sheets'. Please keep in mind that this will delete from the system all of the user's sheets, and the records associated with these sheets, that utilized the old period, and you will be unable to retrieve them afterwards. For more information about Periods, see the Periods section of this manual.
This option allows you to assign an existing policy to the user (see figure 10.2). You can create policies under Configuration-->Policies-->Rule & Policy Management.
In the Custom Fields section, you have the ability to specify values for the available custom fields. For more information about custom fields, please see the Custom Fields section of this manual. When finished making modifications, you can simply click the Save button.
Some custom fields that are included in the default configuration are associated with other features in the system. The user custom fields User Overhead Percent and User Work Hours per Week are both used to determine resource availability and assignment work load scheduling. You can choose to set these values at the individual user level if they vary from user to user, or you can set system wide values in Project System Settings under the Configuration tab. If there are different values in the user fields, the user settings will override the system settings.
To create a new user, click the Create User button located in the
lower right corner of the main User Management page containing the search criteria
and results (see figure 10.1). This will take you to the User Creation screen
where you can select and specify all the necessary user attributes (see figure
10.2).
On the User Creation screen, you also have the ability to copy
the attributes of another user by searching and selecting a user and then clicking
the Load button located at the top right corner (see figure 10.3). This will prepopulate
that user's attributes which you can use as a template of sorts. After clicking
the Load button, you can modify the attributes that will be unique to the new
user. When finished selecting and specifying attributes for the new user, you
can simply click the Save button. Alternatively, if you want to save this user
and create another user, you can click the Save and New button.

Figure 10.3. Copy another user
To delete users, simply check the users to delete from
the search results and click the Delete button (see figure 10.1). You will not
be able to delete any users with time, expense, or custom records in the system.
If you wish to delete a user with records, you must first delete all the records
for the user.